

A busy afternoon can suddenly spark some creative inspiration. Perhaps your children are eager to make something exciting right now. Or maybe you need a last-minute activity that grabs their attention without overwhelming you. That’s when DIY Firework Salt Painting comes into play. It combines simple materials with a fun outcome. This project not only captures the mesmerizing beauty of fireworks but also offers an enjoyable hands-on experience for the family.
Why This DIY Firework Salt Painting Works So Well

This DIY Firework Salt Painting project shines because it is incredibly accessible and low-prep. You don’t need to spend hours gathering supplies or planning complicated steps. With common household items, you are set to create something beautiful in no time. Many families appreciate how this activity fits neatly into their busy schedules.
Another appealing factor is the project’s predictability. No intricate techniques are required, making it a reliable choice even for little hands. The combination of glue, salt, and watercolors provides a delightful experience that is sure to engage children of various ages. You can feel confident that everyone will produce something they feel proud of.
Furthermore, this activity allows for personal expression. Everyone can create their unique designs inspired by firework displays while also learning about colors and textures. It empowers children to explore art without fear. These joyful interactions foster creativity in a light, pressure-free way.
A Quick Look Before You Begin
This DIY project comes together smoothly and efficiently. The total time investment is likely under an hour, which means you can easily fit it into a busy day. The setup requires minimal effort, and you can work in any comfortable area, whether it’s the kitchen table or a crafty corner on the dining room floor.
Keep in mind that working with glue and watercolor paints can lead to some mess, but nothing that a quick wipe won’t fix. It’s a good idea to cover the work surface with some newspaper or an old tablecloth if you’re concerned. Encouraging your kids to embrace the messiness can make the experience even more enjoyable!
As for adult involvement, it can be as little or as much as you’d like. Younger children will likely benefit from your guidance while they gain confidence in their creative choices. Meanwhile, older kids may take the lead and surprise you with their innovative designs.
Explore Visual Creative Crafts
Get inspired by eye-catching projects. Browse our Visual DIY Creative Crafts and bring your creative ideas to life with simple, visual guides.
Materials You’ll Need
- Black construction paper or watercolor paper
- White school glue (liquid glue)
- Table salt (regular granulated salt)
- Watercolors (liquid or pan watercolors)
- Small paintbrushes
- Water cup for rinsing brushes
- Tray or baking sheet (to catch excess salt)
Each item on this list is either a common household item or an easily accessible craft supply. The black construction paper or watercolor paper can normally be found in most homes or can be acquired cheaply. Likewise, the other materials are budget-friendly and often already in your kitchen or craft stash.
Step-by-Step Directions

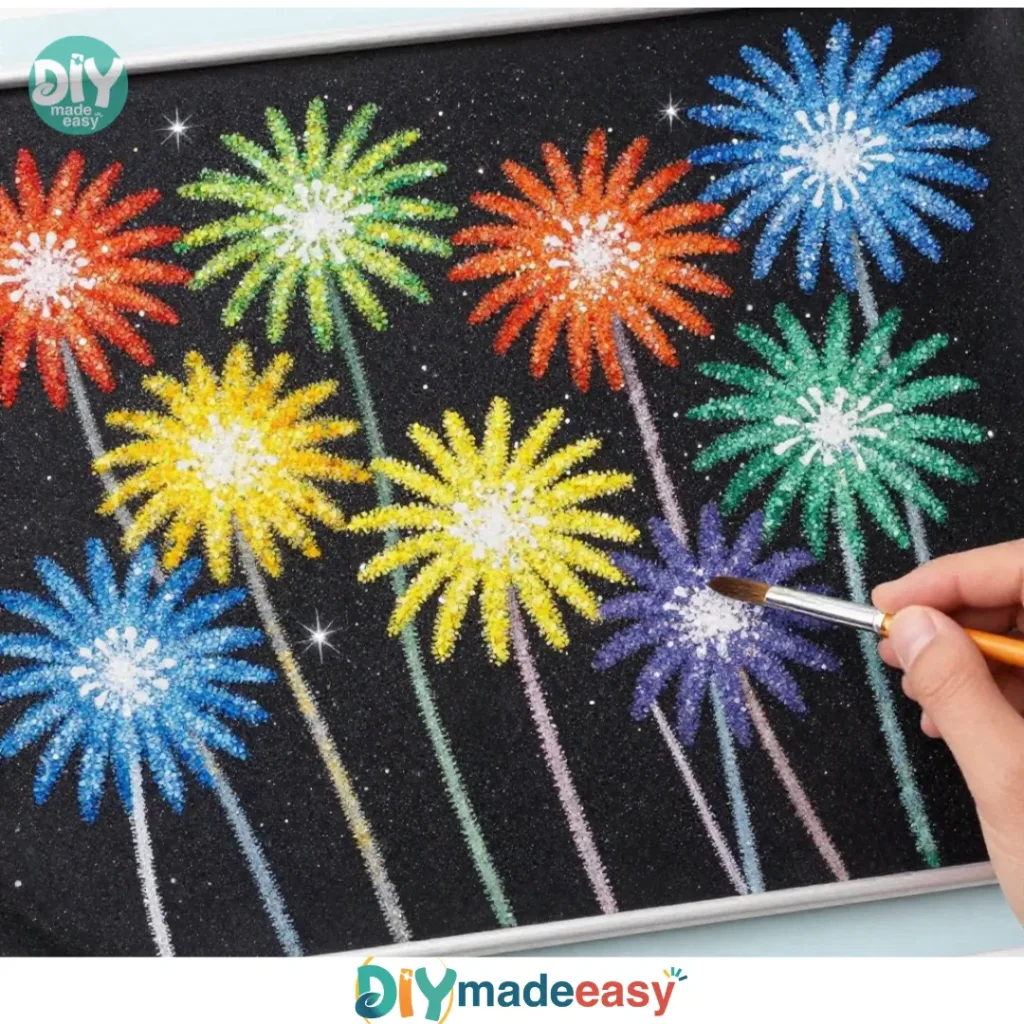
- Start by drawing starburst shapes across your black paper with the glue.
Aim for an even look and be as creative as you’d like. Don’t rush; it’s fine to take your time. - While the glue is still wet, generously sprinkle salt over your design.
Make sure the salt covers all the glued areas to create a good effect. Use a tray or baking sheet to catch any extra salt. This keeps your space tidy and allows for easy cleanup. - Dip a paintbrush into the watercolor and touch it to the salted lines to reveal a beautiful effect.
You’ll see colors burst as the moisture from the paint interacts with the salt. Try different colors and techniques to see what happens. - Allow your colorful masterpiece to dry completely before displaying it.
This step is crucial as it prevents the colors from blending undesirably. Patience here will lead to a more satisfying end result.
The Learning Behind This DIY

While engaging in DIY Firework Salt Painting, kids practice essential skills on multiple levels. First, the act of drawing with glue enhances fine motor skills as they learn to control their movements. They must practice patience while waiting for the glue to set before adding salt.
Moreover, the project introduces basic scientific concepts. Children witness firsthand the cause-and-effect relationship as watercolors spread and react with salt. This hands-on experience deepens their understanding of colors and textures.
Art also promotes creativity and self-expression. Each design turns into a unique interpretation of fireworks, encouraging children to explore their feelings and ideas. It becomes more than just a craft; it transforms into a moment for self-discovery.
Troubleshooting Common Issues
If something doesn’t go as planned, there’s no need to worry. Sometimes, the glue may dry too quickly or the salt may not stick well. If the salt doesn’t hold on, simply add a bit more glue to the areas before sprinkling again.
If the watercolors don’t appear vibrant enough, consider using more color or a different brush technique. You might also want to ensure the paintbrush is not overly wet, as soaking it can dilute the effect.
Don’t fret if the glue creates lines that look messier than expected. Sometimes, the joy comes from the unexpected results. Encourage children to embrace these little imperfections as part of the creative process.
Easy Variations to Try
Mix things up by trying these simple ideas:
- Seasonal Themes: Change colors based on holidays. Use reds and greens for Christmas or pastels for Easter.
- Different Shapes: Explore designs beyond starbursts, like spirals or hearts.
- Textured Backgrounds: Use textured paper like cork or wood to create a unique backdrop.
- Glow in the Dark: Explore glow-in-the-dark paints combined with salt for a fun night effect.
- Collaborative Piece: Work together on a large piece, letting everyone contribute to a bigger masterpiece.
Storing or Reusing This Project
After finishing this project, you may wonder what to do next. If you want to store your artwork, be sure to place it flat in a safe spot where it won’t get damaged. You can frame it or use clothespins to hang it on a string.
As for materials, you won’t need to clean up too extensively. Most supplies can be reused for other crafts. Simply keep your salt in a container for future projects, and don’t forget to save any leftover glue or paints.
This approach reduces waste and allows you to create more beautiful projects later on without needing to buy new materials.
FAQs About DIY Firework Salt Painting
Is this project messy?
While there’s a chance of some spills, you can easily control the mess by working on a covered surface and setting clear boundaries. Most kids enjoy getting involved with the slightly messy process.
What age is appropriate for this activity?
This DIY is suitable for kids around five years and older. Younger ones may enjoy the sensory experience with guidance. Always supervise them during the use of liquid glue and watercolors.
Can I use different paint types?
Absolutely! You can substitute watercolors with acrylics or even diluted food coloring. Just remember that results may vary based on the medium used.
What should I do if it doesn’t turn out as expected?
If the final result doesn’t match your expectation, remember that art is subjective. Each piece can be unique and beautiful in its own way. Emphasize the fun of creating rather than focusing solely on the outcome.
Can we store the leftover materials for future use?
Definitely! You can store any unused salt in a container and save your glue and watercolors for future projects. Creative opportunities are endless!
Conclusion
Embracing DIY Firework Salt Painting can bring moments of joy into your home. It gives children the chance to express their creativity in a manageable and fun way. Remember, art is not about perfection; it is about exploration and joy. For additional guidance on this craft, you can explore resources like Instructables or check out One Little Project for more tips. May your days be filled with creativity and colorful explosions!
PrintDIY Firework Salt Painting

Engaging DIY Firework Salt Painting activity that sparks creativity in kids while exploring art and science.
- Prep Time: 10 minutes
- Cook Time: 30 minutes
- Total Time: 40 minutes
- Yield: 1 artwork
- Category: Craft
- Method: Art Project
- Cuisine: N/A
- Diet: N/A
Ingredients
- Black construction paper or watercolor paper
- White school glue (liquid glue)
- Table salt (regular granulated salt)
- Watercolors (liquid or pan watercolors)
- Small paintbrushes
- Water cup for rinsing brushes
- Tray or baking sheet (to catch excess salt)
Instructions
- Start by drawing starburst shapes across your black paper with the glue.
- While the glue is still wet, generously sprinkle salt over your design.
- Dip a paintbrush into the watercolor and touch it to the salted lines to reveal a beautiful effect.
- Allow your colorful masterpiece to dry completely before displaying it.
Notes
Cover the work surface with newspaper or an old tablecloth to manage mess. Adult supervision is recommended for younger children.
Nutrition
- Serving Size: 1 project
- Calories: N/A
- Sugar: N/A
- Sodium: N/A
- Fat: N/A
- Saturated Fat: N/A
- Unsaturated Fat: N/A
- Trans Fat: N/A
- Carbohydrates: N/A
- Fiber: N/A
- Protein: N/A
- Cholesterol: N/A