

A busy afternoon, a last-minute activity request, and a quick kitchen setup can turn into a small win for everyone with a simple craft. DIY Moon Rocks fit that moment exactly: a low-mess, hands-on project that comes together fast with items you likely already have. I often pull these out when the kids say they need something crafty now, and we end up with glittery rocks, cratered textures, and a tidy cleanup that does not derail the rest of the day. If you want a glow-up later, check out this glow-in-the-dark moon rocks recipe we tried on another afternoon.
Why You’ll Love Making DIY Moon Rocks

These moon rocks work because they keep things simple and flexible. The ingredients are straightforward and forgiving, so you do not need exact measuring skills to have a nice result. You mix, add sparkle, shape, and you are done. That makes this activity perfect for both short attention spans and grown-ups who need a low-stress craft to manage.
You will like how the texture tells you when to stop. The mixture goes from powdery to pliable, and that change happens fast. That means kids see progress without a long wait. It also means you can adjust on the fly if the mix feels too wet or too crumbly.
This project fits real days. It works on a rainy afternoon, during a five-minute break, or as an art table choice while dinner cooks. It does not demand fancy tools, and the cleanup comes down to a wipe, a sweep, and a rinse. The result looks fun and keeps well enough to play with a little after they dry.
A Quick Look Before You Begin
Start by knowing this will take about 15 to 30 minutes of hands-on time, plus a little drying if you leave the rocks to sit. Setup is just a bin or bowl, the baking soda and water, and the glitter and food coloring. Expect a little sparkle on the table and on small hands. That is normal and part of the fun.
Mess level is light to moderate. Glitter will spread more than you think, so working on newspaper or a silicone mat helps. Children can do most of the steps themselves, but I stay close for the stirring and shaping to guide pressure and keep food coloring off clothing.
Adult involvement depends on age. Preschoolers will need help with mixing and shaping. Elementary kids can do nearly everything on their own with a quick demo. Keep a damp cloth and a small tray nearby to catch spills and tidy as you go.
Materials You’ll Need
4 cups baking soda
- common household item
1/4 cup water
- common household item
Gold glitter
- optional amount; budget-friendly and gives a metallic shine
Silver glitter
- optional amount; mixes well with gold for a galaxy look
Black food coloring
- small amount; strong color so use sparingly
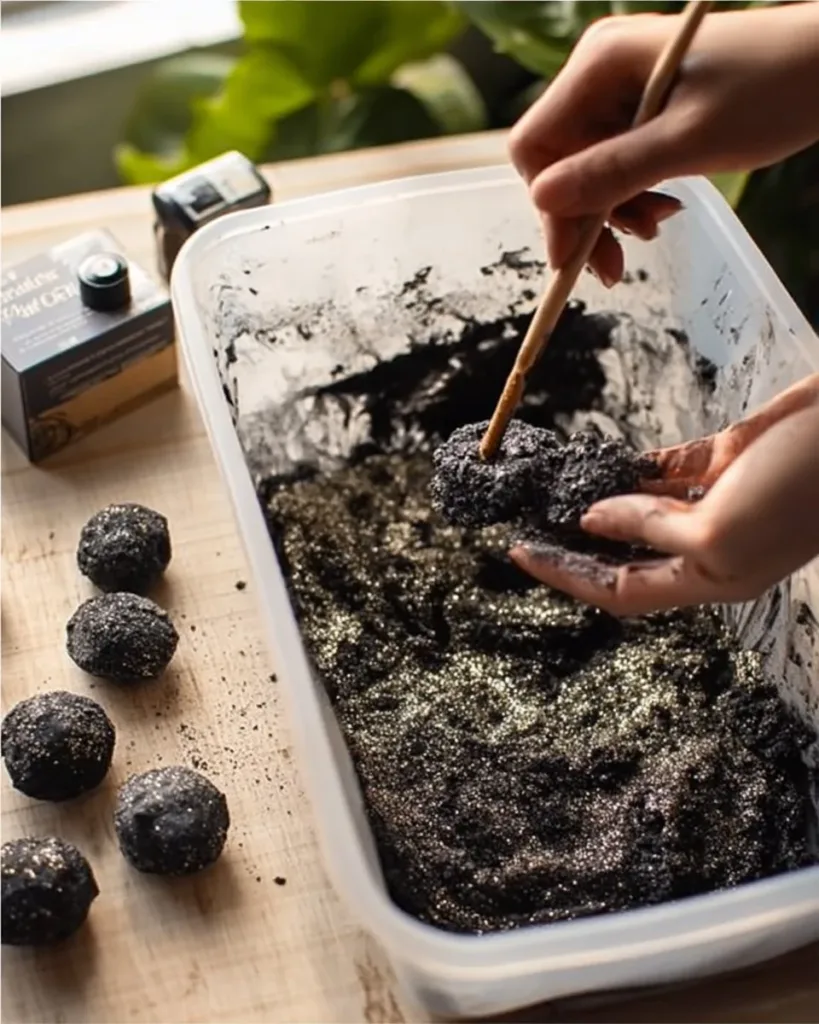
STEP-BY-STEP DIRECTIONS

- In a large plastic bin, mix together the baking soda and water until combined.
Place the bin on a flat surface and pour the baking soda in first, then add the water.
Stir slowly at first, then use your hands to bring the mixture together into a crumbly, barely hold-together texture. - Add plenty of glitter and a bit of food coloring, then stir well.
Sprinkle the gold and silver glitter over the mixture and add a drop or two of black food coloring.
Stir thoroughly until the color spreads and the glitter disperses, watching the mixture shift from dry powder to a moldable paste. - Mold the mixture with your hands into rock shapes, pressing your fingers in to create craters.
Grab handfuls and press firmly to compact the mix, then shape into rounds, lumps, or more angular rocks.
Use your fingertips to make small craters and texture the surface so the rocks look more lunar.
The Simple Science or Skills at Work

This activity blends simple chemistry and hands-on skill. Baking soda acts like a dry base that, when combined with water, softens and becomes moldable. You do not need a chemical reaction to get the feel you want, just enough water to let the particles cling together.
Kids practice fine motor control as they pinch, pat, and press. Making craters with fingertips helps small hand muscles and coordination. Stirring and measuring develop basic sequencing and cause-and-effect thinking.
Color mixing teaches another small lesson. A tiny drop of black will spread a lot, so children learn about the power of concentrated color and how to control intensity. Glitter adds sensory feedback; it catches light and invites exploration without changing the basic structure.
Troubleshooting Common Issues
If the mixture is too dry and falls apart, it needs a touch more water. Add water a teaspoon at a time and knead until the mix holds together. It is better to add little by little than too much at once.
If the mixture gets too wet and sticky, sprinkle in a few spoonfuls of baking soda and fold the mix until it firms up. Letting it sit for five to ten minutes can also help excess moisture re-distribute and make shaping easier.
If the color looks uneven or blotchy, stir a bit more slowly and press the mix together to help the food coloring spread. If glitter clumps, break it up with your fingers and distribute it across the mix for an even shimmer.
If fingers stain from black food coloring, rinse with soap and warm water quickly. For younger children, use gloves or a mixing spoon so stains do not become a distraction.
Easy Variations to Try
Try a swirled look by splitting the mix into two bowls and coloring one bowl more intensely than the other. Press pieces of each color together before shaping so the rocks show marbled streaks.
Add different sizes of glitter for texture. Use a fine glitter for an all-over shimmer and a chunkier metallic for highlighted sparkles. Mix both in different ratios for variety.
Make mini moons by rolling small marble-sized rocks for younger children. Smaller pieces dry faster and make great additions to sensory bins or play scenes.
For a seasonal twist, switch the glitter colors to match holidays. Use silver and blue for winter themes, or gold and bronze for a space party look.
If you have older kids, challenge them to create crater maps on the rocks by using a blunt tool to press deeper marks and then dusting a bit more glitter into the recesses for contrast.
Storing or Reusing This Project
If you want to keep the rocks, let them air dry on a tray for several hours or overnight. They harden but remain slightly crumbly, so store them in a shallow box lined with tissue to prevent rubbing off glitter.
Reuse the leftover dry mixture by storing it in an airtight container for a few days. If it absorbs moisture while stored, sprinkle a little fresh baking soda and mix to refresh it.
If pieces crumble during play, compress the crumbs back together with a tiny water mist and press into a new shape. Do not add too much water at once; small amounts help you control the texture.
For easy cleanup, sweep up glitter into a small dustpan and wash your mat or bin with warm soapy water. Rinse hands and tools promptly to avoid staining from food coloring.
FAQs About DIY Moon Rocks
Will this project stain clothes or surfaces?
It can stain if black food coloring touches fabric, so I recommend old clothes or an apron. Work on a washable mat and keep a damp cloth nearby to wipe spots immediately. Small splashes rinse out easily; set-in stains need a bit more attention but usually lift with warm water and soap.
Is this safe for young children to do?
Yes with supervision. The ingredients are non-toxic, but the glitter and small pieces present a choking risk for toddlers. I supervise mixing and shaping closely for kids under five. For littler hands, pre-shape the rocks and let them decorate rather than handling the whole batch.
Can I use a different color instead of black food coloring?
You can, but black gives the most lunar look. A drop of blue or purple will still make interesting rocks. Keep in mind that a little coloring goes a long way. Start with one drop and add more if you want a stronger color.
How long do the moon rocks last?
If you let them dry and store them gently, they will last for several weeks. They are more like decorative play pieces than long-term toys. If kids handle them roughly, they will crumble faster. Treat them like craft keepsakes for best results.
What if my mixture looks too plain or not shiny enough?
Add more glitter or mix gold with silver for depth. You can also press in a small coin to create a smooth, reflective patch. The rocks will always look handmade, and that is part of their charm.
A Final Helpful Note
This project rewards patience and small adjustments. If something goes off, it takes only a small change to fix it. Remember that the best results often come from simple tweaks, like a teaspoon of water or a pinch more baking soda. Keep expectations relaxed, let the kids explore texture, and enjoy the little sparkle left behind on the table.
Conclusion
If you want more inspiration or a slightly different approach, the DIY Moon Rocks tutorial at The Crafting Chicks shows another take on shaping and decorating. For a compact, kid-tested version with step-by-step photos, try this DIY Moon Rock at Mombrite to compare techniques and pick ideas to suit your day.
PrintDIY Moon Rocks

A fun and easy crafting activity for kids that creates glittery ‘moon rocks’ using baking soda, water, and glitter.
- Prep Time: 15 minutes
- Cook Time: 0 minutes
- Total Time: 30 minutes
- Yield: Makes several moon rocks
- Category: Craft
- Method: Hands-on crafting
- Cuisine: Crafting
- Diet: Non-Dietary
Ingredients
- 4 cups baking soda
- 1/4 cup water
- Gold glitter (optional)
- Silver glitter (optional)
- Black food coloring (small amount)
Instructions
- In a large plastic bin, mix together the baking soda and water until combined.
- Place the bin on a flat surface and pour the baking soda in first, then add the water.
- Stir slowly at first, then use your hands to bring the mixture together into a crumbly texture.
- Add plenty of glitter and a bit of food coloring, then stir well.
- Sprinkle the gold and silver glitter over the mixture and add a drop or two of black food coloring.
- Stir thoroughly until the color spreads and the glitter disperses.
- Mold the mixture with your hands into rock shapes, pressing your fingers in to create craters.
- Grab handfuls and press firmly to compact the mix, then shape into rounds or lumps.
- Use your fingertips to make small craters and texture the surface.
Notes
Keep cleanup light by working on newspaper or a silicone mat. Supervise younger kids closely.
Nutrition
- Serving Size: 1 rock
- Calories: 0
- Sugar: 0g
- Sodium: 0mg
- Fat: 0g
- Saturated Fat: 0g
- Unsaturated Fat: 0g
- Trans Fat: 0g
- Carbohydrates: 0g
- Fiber: 0g
- Protein: 0g
- Cholesterol: 0mg