

A busy afternoon, a pile of empty tubes, and a kid who says they need to craft something now. That exact moment is where Feathered Cardboard Chicks shine. This small, cheerful project turns ordinary cardboard tubes into sunny little chicks with a few sheets of paper, a feather or two, and some glue. It takes under an hour, uses things you likely already have, and leaves kids proud of a real, displayable result. If you need a quick, low-prep activity that still feels special, these chicks fit the bill.
Why You’ll Love Making Feathered Cardboard Chicks

This project works because it keeps things simple and satisfying. You do not need fancy tools or long prep. A quick setup and clear, short steps get everyone moving, and the craft delivers an obvious payoff: a sweet chick you can set on a windowsill.
Parents like it because cleanup stays manageable. Kids like it because they can see the chick take shape fast. The materials are inexpensive and easy to replace if a feather or glue blob goes missing. That combination of low cost, low time, and a cute result makes the craft dependable on busy days.
Discover Easy Kids Activities
Looking for simple, fun ideas for kids? Explore our Low Prep Kids Activities and find quick projects that spark creativity without long prep time.
A Quick Look Before You Begin
Before you start, give the table a quick wipe and gather the few supplies. Plan for about 20 to 40 minutes from start to finish depending on age and how many chicks you make. Younger kids may need help with cutting and folding, while older kids can work nearly independently.
Expect some glue spots and a stray feather or two. That is normal and part of the fun. Lay down a scrap of newspaper or a washable tablecloth to protect the surface. Keep a damp cloth nearby for those quick cleanups that make the whole process feel easier.
Materials You’ll Need
Empty Cardboard Tubes (1 per chick)
common household item, easy upcycle
Yellow Construction Paper
bright, kid-friendly; easy to cut and glue
Orange Construction Paper (for the beak)
small amount needed; substitute light brown if you do not have orange
Bright Yellow Feathers (1–2 per chick)
adds texture and charm; inexpensive at craft stores
Googly Eyes
optional: draw eyes with marker if you do not have them
Blue Construction Paper (for the background)
for a simple display that pops
Natural Elements (Small pebbles, peanut shells, or twigs)
adds a natural touch to the base; optional and reusable
Craft Glue or Glue Stick
glue stick works for less mess; craft glue gives stronger hold
Scissors
child-safe scissors for kids; adult scissors for precise cuts
STEP-BY-STEP DIRECTIONS

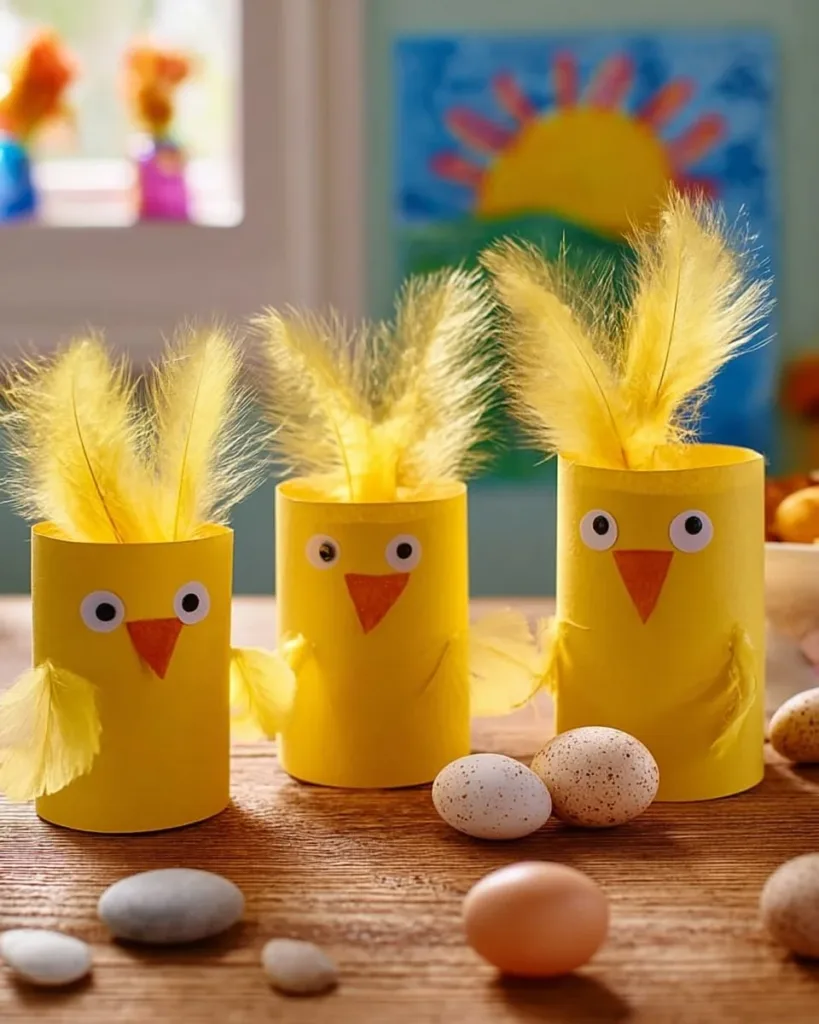
- Measure and cut a piece of yellow construction paper to fit your cardboard tube. Apply glue to the tube and wrap the paper around, tucking the seam at the back.
Measure the paper by holding it around the tube and trimming a little extra for overlap. Smooth the paper with your fingers to remove air pockets. Tuck and press the seam so it sits snug and stays put while the glue dries. - Cut a small diamond from orange paper, fold it for the beak, and glue it to the center, leaving the top open.
Cut the diamond about the size of a thumbnail for a small chick; make it bigger for a more dramatic beak. Fold the diamond in half so it makes a tiny cone and press the glued edges lightly so it flares open at the top like a baby beak. - Add googly eyes just above the beak, placing them close together for a baby bird look.
Put the eyes close together to give that baby chick expression; if you use glue stick, press for a moment to secure. If eyes shift, a dab of craft glue will hold them firmly in place after a few minutes. - Glue the quill of a yellow feather inside the top rim, letting it lean forward or to the side.
Hold the feather in place for 10 to 20 seconds so the glue sets a bit, and let the quill rest inside the tube rim for a natural tilt. One feather gives a subtle look; two feathers make the chick feel extra fluffy and expressive. - Lay down blue construction paper as a vibrant background and scatter small pebbles or peanut shells around the base for a natural touch.
Place your finished chick on the blue paper to create contrast and a little scene. Arrange pebbles or shells gently so they frame the chick, not crowd it; this keeps the display tidy and more convincing.
The Learning Behind This DIY

This craft supports fine motor skills in a gentle, practical way. Cutting small shapes, folding a tiny diamond, and gluing feathers all test hand control. Kids learn hand-eye coordination while they press, smooth, and tuck paper.
The project also teaches simple cause and effect. When glue goes on and you press the paper, it sticks. If you fold the beak too small, it will not show. Those small, real-world lessons feel natural during the activity.
You get a small dose of visual design thinking too. Choosing where the feather leans, how close the eyes sit, and how the chick rests on the blue background helps kids notice balance, scale, and color contrast without any formal terminology.
Troubleshooting Common Issues
If the paper peels up at the seam, add a thin line of glue and press with a fingertip. Rubbing the seam for 20 seconds usually helps craft glue bond better. Avoid over-gluing; a little goes a long way.
If the beak flops forward, check that you folded and glued the base of the diamond well. Add a small glue dab behind the beak where it meets the paper wrap to stabilize it. Let it sit for a few minutes under light pressure from a finger or folded cloth.
If googly eyes do not stick, switch to a small dot of craft glue rather than a glue stick. Press gently for 10 to 20 seconds and let rest flat. For pre-schoolers, using sticky-backed eyes or drawing eyes with a marker reduces frustration.
If the feather droops or falls out, the quill may not have enough glue contact. Apply glue inside the top rim and slide the quill in deeper, holding it until the glue thickens slightly. Use two small dots of glue if the quill is thin.
Easy Variations to Try
Make a family of chicks in different sizes by using shorter or taller tube pieces and varying the beak size. This creates a charming display and gives siblings options to experiment.
Turn the blue paper background into a scene. Cut simple sun shapes or grass strips and glue them to the blue sheet to lend a story to each chick. Kids enjoy arranging these extra pieces and watching their scene come alive.
Use different feather colors for seasonal themes. Pale yellow for spring, soft orange for fall, or tiny white feathers for a wintry look. The change in color keeps the same steps but gives a fresh result.
Add tiny paper feet to the bottom of the tube for a standing chick. Cut small U-shaped feet from orange paper and glue them to the inside bottom rim so the chick stands more steadily on a display.
Making This Work for Different Ages
For toddlers, pre-cut the paper wraps and beaks, and let them glue and add feathers. Keep the steps short and praise the choices they make.
For school-age kids, invite them to design a tiny nest from shredded paper or twigs. Encourage experimentation with feather placement and facial expressions to develop a personal style.
For older kids or adults, challenge them to create a whole scene with multiple chicks and natural elements, arranging them into a small diorama.
Storing or Reusing This Project
Keep finished chicks on a shelf or in a shallow box with tissue between each one to avoid crushed feathers. A shoe box lined with paper works well for short-term storage.
If you want to reuse materials, gently peel off feathers and remove googly eyes; construction paper can often be smoothed flat and used again for collage. Recycle the cardboard tube if the chick is not meant to be kept.
Save natural elements like pebbles and twigs in a small jar for future displays. That way you build a little craft stash that speeds next-time setups and reduces waste.
FAQs About Feathered Cardboard Chicks
Will this project make a big mess?
It makes a small, manageable mess. You will see a few glue spots and loose feather bits. Lay down scrap paper to catch anything and keep a damp cloth nearby for quick wipes. Most glue stick use stays neat, while craft glue needs a little more drying time.
What age is this best for?
This works great with kids ages 3 and up with help. Toddlers enjoy simple glue and feather placement with supervision. Children 6 and older can follow the whole process with minimal assistance. Always watch scissors and strong craft glue when younger kids help.
Can I substitute materials if I do not have everything?
Yes, in small ways. You can draw the beak and eyes with markers if you do not have googly eyes or orange paper. Substitute light brown paper for orange in a pinch, but do not invent new steps. Keep the base materials close to the list for best results.
How long does this take to make and dry?
Plan for 20 to 40 minutes from start to finish. Glue stick pieces set quickly, while craft glue can take 10 to 20 minutes to firm up and longer to harden completely. If you need the chicks for a display that day, allow extra drying time.
What if my chick looks lopsided or sad?
That is normal and fixable. If the feather leans the wrong way, reapply glue inside the rim and tilt the feather until the glue bonds. If the beak sits oddly, add a tiny glue dab behind it and press for a moment. Imperfections give the chick character, not failure.
A Final Helpful Note
Remember that this project values joy over perfection. Expect a sticky finger, a crooked beak, and a feather that needs a little coaxing. Those moments teach kids that making includes small fixes and choices.
Give space for experimentation and celebrate the odd, charming results. You will get more consistent findings over a few tries, and the process itself builds confidence. Keep supplies in a small bin so you can pull this activity out for another busy afternoon anytime.
Conclusion
If you want a quick idea for how to turn cardboard tubes into little spring friends, this simple guide gets you there with clear steps and everyday supplies. For extra inspiration on caring for real chicks and understanding living birds, see When to Move Chicks from Brooder to Chicken Coop. If you would like another cardboard roll chick idea for a quick comparison or a different take on the same materials, check out Cardboard Roll Chicks | Today We Did.
Good luck, and enjoy the bright little flock you make.
PrintFeathered Cardboard Chicks

Transform ordinary cardboard tubes into cheerful little chicks with construction paper, feathers, and glue.
- Prep Time: 20 minutes
- Cook Time: 20 minutes
- Total Time: 40 minutes
- Yield: 2 chicks
- Category: Craft
- Method: Crafting
- Cuisine: N/A
- Diet: N/A
Ingredients
- Empty Cardboard Tubes (1 per chick)
- Yellow Construction Paper
- Orange Construction Paper (for the beak)
- Bright Yellow Feathers (1–2 per chick)
- Googly Eyes (optional)
- Blue Construction Paper (for the background)
- Natural Elements (Small pebbles, peanut shells, or twigs)
- Craft Glue or Glue Stick
- Scissors
Instructions
- Measure and cut a piece of yellow construction paper to fit your cardboard tube. Apply glue and wrap the paper around the tube.
- Cut a small diamond from orange paper, fold it for the beak, and glue it to the center.
- Add googly eyes just above the beak.
- Glue the quill of a yellow feather inside the top rim.
- Lay down blue construction paper and scatter small pebbles or peanut shells around the base.
Notes
Expect a little mess; keep a damp cloth nearby for quick cleanups. Emphasize creativity and experimentation.
Nutrition
- Serving Size: 1 chick
- Calories: 0
- Sugar: 0g
- Sodium: 0mg
- Fat: 0g
- Saturated Fat: 0g
- Unsaturated Fat: 0g
- Trans Fat: 0g
- Carbohydrates: 0g
- Fiber: 0g
- Protein: 0g
- Cholesterol: 0mg