

A late afternoon thunderstorm has everyone stuck inside and the kids want to make something now. You pull a few empty cardboard tubes from the recycling bin, grab a handful of pastel paints and cardstock, and set up a tiny craft station on the kitchen table.
In an hour you will have cute Easter Bunny Treat Tubes ready to fill with candy, hand out to neighbors, or tuck into Easter baskets. This project fits a busy afternoon. It uses things you already have or can find at the store quickly. It lets kids help in safe, simple ways while you handle the trickier bits. That relaxed, do-able feeling is exactly what makes Easter Bunny Treat Tubes a go-to for last-minute fun.
Why You’ll Love Making Easter Bunny Treat Tubes

This craft feels like a small win. It takes little prep and gives a clear, useful result. You turn plain cardboard tubes into little bunny holders that stand up, hold candy, and look festive on a mantel or table. The materials are basic and friendly for families. You will not need specialty tools or complicated steps.
The project works well for busy schedules because most steps are quick. Paint or wrapped paper takes the longest to dry. While you let parts dry, kids can cut ears or sort candies. You can stretch the work across short windows of time. That makes it perfect for evenings, nap-time crafts, or short after-school sessions.
The materials and steps also keep frustration low. Cardboard tubes are a forgiving base. Cardstock holds a crease and a little glue without tearing. Googly eyes and pompoms hide small imperfections in the paint or paper wrap. If something looks a bit uneven, a marker whisker or a ribbon hides it and adds charm. You do not need perfect symmetry for a sweet result.
This project also gives real results you can use. These treat tubes are decoration, party favors, place card holders, and simple gifts. They serve a function. That makes the time you spend feel worth it. Expect a few drips, slightly wonky ears, and proud kids. Those hands-on marks tell the story. They show the project worked and that real people made it together.
Create with the Seasons
Celebrate every time of year with hands-on ideas. Explore our Seasonal DIY Projects and enjoy creative crafts perfect for holidays and seasonal moments.
A Quick Look Before You Begin
Set aside about 45 to 75 minutes total, mostly waiting for glue or paint to dry. That time depends on the paint you use and how many tubes you make. One tube can come together in 15 to 30 minutes if you use wrap paper instead of spray paint.
Setup is simple. Lay down a table cover or newspaper, keep wet wipes or a damp cloth nearby, and have a container of fresh water for cleaning painty brushes. Keep candies in a bowl so kids can choose without spilling wrappers all over. If you use spray paint, work outside or in a ventilated area and give the tubes a few minutes between coats.
Expect light to medium mess. Paint can drip if you go heavy. Glue can smear if you rush. Cardstock bits will create small scraps. These clean up easily. A quick sweep and a paper towel usually do the job.
Adult help matters for a few steps. Young children will love sticking on eyes, adding pompoms, and filling the tubes with candy. An adult should handle spray paint and trimming the base circle if it needs a precise cut. That keeps the process smooth and safe. Overall, you will find the work flows: prep, decorate, dry, assemble, and fill.
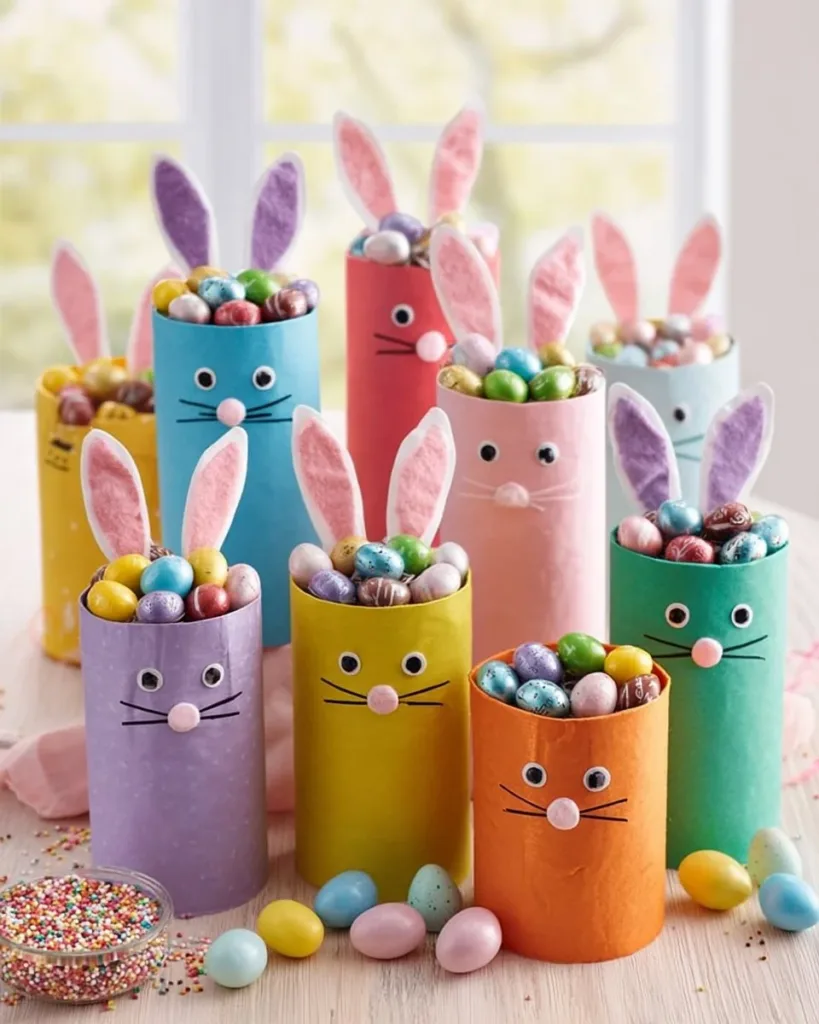
Materials You’ll Need
Empty Cardboard Tubes (2 per bunny)
Common household recycle item. Use two tubes for a slightly taller bunny or to create a thicker base if you prefer.
Pastel Spray Paint or Acrylic Paint (Pink, Blue, Green, Yellow, Purple)
Choose spray paint for fast coverage or acrylic that dries with a matte look. Pick pastel shades for a spring feel.
White and Mismatched Colored Cardstock (for inner and outer ears)
Sturdy for ears and bottom circles. Use white for inner ear highlights and any pastel or patterned cardstock for outer ears.
Googly Eyes
Easy and forgiving decoration. Use different sizes for a playful look.
Pink Pompoms (for noses)
Soft and full without glue showing. Small pink pompoms create an instant bunny nose.
Black Fine-tip Marker (for whisker details)
A simple way to add expression. Black works best for contrast.
Green Shredded Paper or Easter Grass
Fill the bottom of the tube so candies nestle in and do not rattle out.
Mismatched Easter Candies (Chocolate eggs, Jellybeans, wrapped eggs)
A mix looks festive and gives kids choices. Use allergy-safe candies if needed.
Craft Glue or Glue Stick
Glue stick works well for light paper pieces. Craft glue gives stronger hold for pompoms and the base circle.
Optional: Household scissors or a craft knife (optional)
Easy to have on hand for cutting cardstock neatly. Label this optional if older kids will handle cutting with supervision.
Gather these items in one place before you start. Lay them out so children can reach the safe parts. Put small items like googly eyes and pompoms in shallow bowls to prevent spills. That small step saves time and keeps the mood calm and playful.
Step-by-Step Directions

- Start with a cardboard roll, applying glue and wrapping it in colorful paper or spray paint. Let it dry and keep the seam at the back.
Press the wrap down along the tube and smooth any air bubbles with your fingers. If you spray paint, place tubes upside down on a newspaper and spray light, even coats. - Glue on the googly eyes and pink pompom for the nose. Use the marker to draw little whiskers.
Center the eyes about one inch below the tube rim and press the pompom gently into place. Draw three small, quick whisker lines on each side. - Cut ear shapes from the cardstock, glue the inner and outer parts together, and attach them to the front rim of the tube.
Layer the white inner ear onto the colored outer ear and press together. Glue the bottom of each ear to the front rim so they stand slightly forward. - Cut a larger circle of cardstock and glue it to the bottom for a sturdy base.
Make the circle about a half inch wider than the tube to keep it steady. Press the base into place and hold until the glue grabs. - Add rectangles of paper inside the back for extra ear support and decorate as you like.
Slip the rectangles in and glue them vertically against the inner back wall to brace the ears. Add ribbons, marker dots, or small stickers for a final touch.
Skills This Activity Supports

This project teaches small, meaningful skills. Kids practice fine motor control when they pick up pompoms, press small googly eyes into place, or smooth wrapping paper. Those tiny, repeated motions help strengthen hand muscles that later help with writing and cutting.
The craft also builds hand-eye coordination. Children learn to aim where to place the nose and where the eyes look best. They notice how positioning changes expression. That simple cause and effect matters. When a nose sits too high or ears tilt to one side, they can change it. They see their choices make a visible difference.
There is also practical planning in this activity. Kids learn to balance drying time with other tasks. For example, after wrapping a tube, they have time to cut ears while paint dries. That pacing teaches patience and sequence.
The project encourages sensory play too. Wet paint has a smell and a glossy look. Glue feels tacky, cardstock has a slight resistance when you fold it, and pompoms are soft under little fingers. Those sensory cues let children name materials and sensations, which helps vocabulary and awareness.
You can use this craft to talk about measurement and estimation. How big should the circle base be for the tube to stand? How long should the inner ear be to look balanced? Those tiny judgments invite simple math without pressure.
Beyond skills, this activity supports creativity and confidence. Kids see an ordinary object become something charming. That sense of transformation is motivating. It makes them more willing to try other ideas and to fix small mistakes, because they have positive experience with a low-stakes project.
Troubleshooting Common Issues
Paint looks uneven or runs: This happens when paint goes on too thick. Fix it by sanding light drips after drying and applying a thin second coat. If you use spray paint, keep the can 8 to 12 inches away and spray in short bursts. Let each coat dry before adding another.
Glue is not holding cardstock or pompoms: Check the glue type. Glue stick works fine for paper but not for pompoms. For pompoms and the base circle, use craft glue and give it time to set. If a nose or ear falls off, press a dab of craft glue and hold it for 20 to 30 seconds, then let it sit for a few minutes before moving the tube.
Ears flop forward or look floppy: Reinforce the bottom of the ears with the rectangles of paper inside the back as directed. If they still lean, add a small strip of cardstock glued from the back rim to the ear base for extra stiffness.
Seam of wrapped paper shows: Keep the seam at the back as suggested. If it still shows, hide it with a little decoration. Glue a narrow ribbon over the seam or add a small sticker. A marker or a thin strip of contrasting paper also covers the line easily.
Base is wobbly: Make the bottom circle slightly larger or add a second circle glued to the first for thickness. Another trick is to glue a small coin inside the bottom before sealing to lower the center of gravity and give stability.
Candies spill out when the tube tips: Add a small dab of glue inside the bottom rim to keep the shredded paper in place. Alternatively, fold a tiny square of tissue paper and glue it to the bottom center before adding grass and candies for an inside lining that keeps things from sliding.
Glue shows around edges: Use less glue and press edges firmly. If glue dries with a white ring, you can cover it with a dab of marker that matches the cardstock or by placing a small sticker over the spot.
Ears are uneven: Trim the taller ear slightly, or gently curl one ear outward so the unevenness looks intentional. Small asymmetry often reads as character.
Easy Variations to Try
- Color and Pattern Mix
Use patterned scrapbooking paper for the outer ear and a solid color for the inner ear. Mix and match patterns for a playful, mismatched look. You can also use strips of washi tape as a fast, no-mess wrap for the tube. - Name Tags and Place Holders
Write names on small cardstock flags and glue them to the back rim for place settings. These treat tubes double as table decorations and name cards for an Easter meal. - Mini Bunny Family
Make different sizes by cutting tubes shorter or stacking two tubes. Use two tubes per bunny as the base instruction suggests to create a taller figure for a matinee-sized bunny. Group them for a little bunny family display. - Allergy-Safe Fillers
Replace candy with small toys, stickers, or packets of crayons for classrooms with snack restrictions. Green shredded paper still looks like grass and keeps the surprise intact. - Glow-in-the-Dark or Glitter Finish
Switch one paint coat to a glow-in-the-dark medium or sprinkle a little craft glitter on wet glue for a festive sparkle. Keep the glitter light so it does not overwhelm the simple look.
Each variation keeps the original steps intact but lets you tailor the project to the group and the occasion. Present these as friendly options rather than rules.
Storing or Reusing This Project
If you plan to keep these bunnies for a season, store them in a cool, dry place. Cardboard can warp in damp air. A shallow box or dish tub works well. Line the bottom with tissue or a thin towel to prevent rubbing.
To reuse materials, remove any remaining candy and compost the paper grass. Cardboard and cardstock often recycle, but you can also save the tubes and ears for next year as craft blanks. Keep eyes, pompoms, and markers in a small craft box so you can make replacements quickly.
If an ear comes loose, do not throw the whole tube away. Re-glue the part and let it dry. A little repair often restores the piece to party-ready condition.
For classroom projects, make a quick repair station with extra glue, pompoms, and cardstock. That way a volunteer can fix minor issues while other kids keep crafting.
When cleaning up, sweep cardstock scraps into a small pile before moving them to recycling. Wipe dried craft glue off the table with warm soapy water. For paint, follow the paint label for cleanup. If any spray paint overspray lands on nearby surfaces, a little rubbing alcohol on a cloth often lifts it, but test a small area first.
FAQs About Easter Bunny Treat Tubes
How messy will this get and how do I keep cleanup easy?
It will create craft-level mess, not a full kitchen disaster. Paint drips and tiny paper scraps are the main things to deal with. Lay down newspaper or a plastic tablecloth and use shallow bowls for small items like pompoms and eyes. Keep a damp cloth nearby. If paint or glue drips, wipe sooner rather than later. Most of this cleans up quickly with warm water and a sponge.
Is this safe for young children and what age works best?
This craft fits a wide age range. Three to five-year-olds can stick on eyes and pompoms with help. An adult should handle spray paint and careful cutting. If younger children cut paper, provide safety scissors and close supervision. Use non-toxic glue. If you worry about small parts, swap pompoms and googly eyes for larger stickers.
Can I substitute materials if I do not have everything listed?
Yes. The list covers the basics, but small swaps work. If you do not have spray paint, acrylic paint covers well. If you lack cardstock, thicker construction paper will do. Keep glue stick for paper and craft glue for heavier parts. Be honest with kids if you change something. The result will still be fun.
What if the result looks a little messy or uneven?
That is normal and fine. Handmade items often have quirks. Use small decorations like marker dots, ribbons, or stickers to balance things visually. Kids usually love their creations the way they are. If you want a cleaner look, take more time on smoothing wraps and let glue dry fully between steps.
How long will these last and can we reuse them next year?
They will last through the season if you store them carefully in a dry box. Remove candy and store the bunnies flat if possible. Cardboard may not survive rough handling for many years, but you can save key bits like pompoms and eyes to refresh new tubes next year.
A Final Helpful Note
Keep the mood light and expect small, fixable imperfections. The goal is time together and a tangible, cheerful result. If you feel rushed, make just one or two bunnies now and keep the rest of the materials for another short session. The project fits into pockets of time, so you can spread it out and still get great results. Trust that the kids will be proud, and you will enjoy the gentle charm of homemade Easter Bunny Treat Tubes on your table or in a basket.
Conclusion
If you want to compare a ready-made take on the idea, check out the Easter Bunny NoNo’s Tube – No Whey Chocolate for inspiration on presentation. For another DIY version and party styling ideas, take a look at this DIY Easter Bunny Treat Tubes for Kids – Party Ideas page, which shows how others have decorated and displayed similar treats.
PrintEaster Bunny Treat Tubes

A fun and simple craft project turning cardboard tubes into festive Easter Bunny treat holders.
- Prep Time: 15 minutes
- Cook Time: 30 minutes
- Total Time: 45 minutes
- Yield: 4 bunnies
- Category: Craft
- Method: Crafting
- Cuisine: N/A
- Diet: N/A
Ingredients
- Empty Cardboard Tubes (2 per bunny)
- Pastel Spray Paint or Acrylic Paint (Pink, Blue, Green, Yellow, Purple)
- White and Mismatched Colored Cardstock (for inner and outer ears)
- Googly Eyes
- Pink Pompoms (for noses)
- Black Fine-tip Marker (for whisker details)
- Green Shredded Paper or Easter Grass
- Mismatched Easter Candies (Chocolate eggs, Jellybeans, wrapped eggs)
- Craft Glue or Glue Stick
- Optional: Household scissors or a craft knife
Instructions
- Start with a cardboard roll, applying glue and wrapping it in colorful paper or spray paint. Let it dry and keep the seam at the back.
- Glue on the googly eyes and pink pompom for the nose. Use the marker to draw little whiskers.
- Cut ear shapes from the cardstock, glue the inner and outer parts together, and attach them to the front rim of the tube.
- Cut a larger circle of cardstock and glue it to the bottom for a sturdy base.
- Add rectangles of paper inside the back for extra ear support and decorate as you like.
Notes
This project is great for busy afternoons and allows kids to participate in a hands-on way. Easy to store and reusable for future crafts.
Nutrition
- Serving Size: 1 tube
- Calories: 30
- Sugar: 5g
- Sodium: 50mg
- Fat: 2g
- Saturated Fat: 0g
- Unsaturated Fat: 1g
- Trans Fat: 0g
- Carbohydrates: 5g
- Fiber: 0g
- Protein: 1g
- Cholesterol: 0mg