

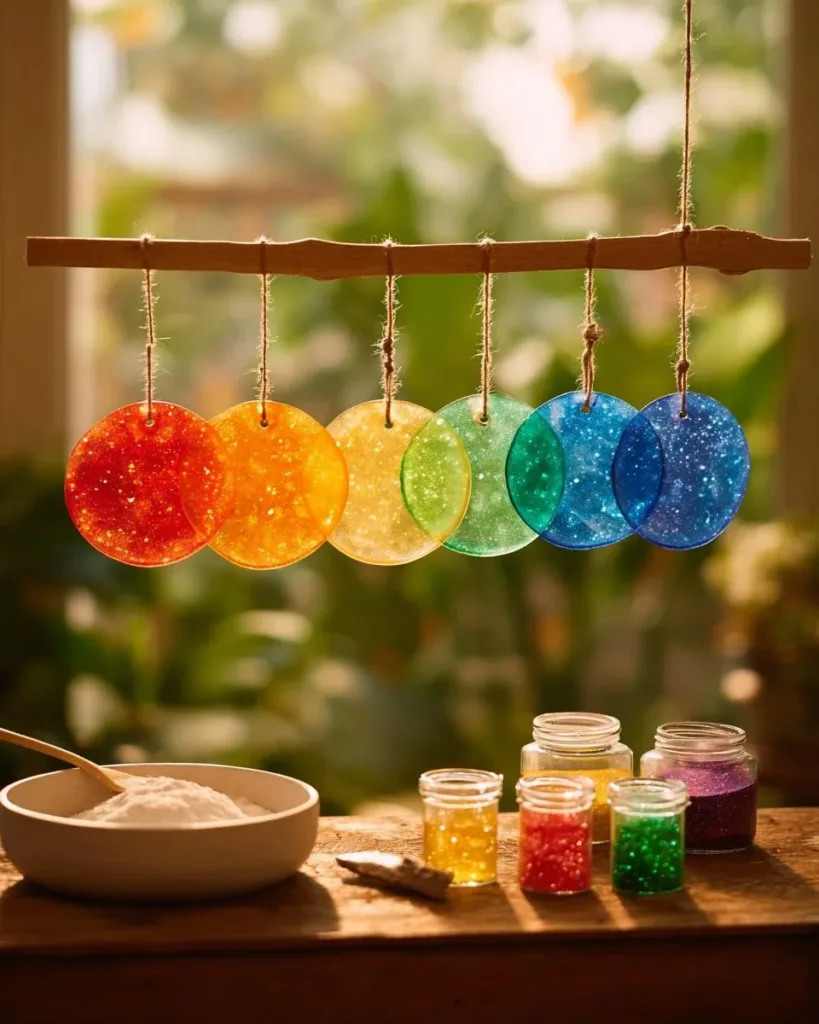
A busy afternoon has kids asking for something to make right now. You clear a small space on the kitchen counter, pull out a saucepan, and decide to try Cornstarch Rainbow Suncatchers. This simple kitchen craft stretches a single cup of cornstarch and a cup of water into bright, jewel-like pieces that dry hard and catch the sun. It feels satisfying and fast, and you can pair it with other rainbow projects like Baking Soda Rainbow Crystal Forest when you want to extend the afternoon into a small creative lesson.
You do not need fancy tools. You do need a little adult help for the cooking step and a patient spot for drying. The process rewards calm stirring, gentle timing, and a willingness to embrace imperfect shapes. When the kids see color deepen in the saucepan and later hang glowing pieces in the window, the small effort feels like a big win.
Why You’ll Love Making Cornstarch Rainbow Suncatchers

This project works on busy days because it uses a tiny list of things you probably already have. You mix, cook, color, and pour. The most hands-on part takes about 10 minutes. Then you leave the pieces to dry while you do other things.
It fits different ages. Young kids enjoy choosing colors and pressing simple shapes. Older kids like precision and experimenting with thickness. Adults can step in to manage the hot saucepan and keep the rhythm steady.
The result feels real. These suncatchers go from soft paste to firm, clear-ish color. They do not look perfect and crafty kids will love that. You will get pieces that hang like little stained-glass snacks for the window.
A Quick Look Before You Begin
Set aside about 20 minutes of active time and a few hours for drying. Active time includes mixing, cooking, coloring, and pouring. Drying time depends on humidity and the thickness you pour.
Set up on a clear counter or table. Put baking sheets lined with wax paper ready. Keep a wooden spoon or heatproof spatula nearby for stirring. Expect a little dribble when you pour. Wipe spills quickly with a damp cloth while the mixture is still warm.
The mess stays minimal when you plan a small cleanup zone. You will rinse the saucepan and bowls after the mixture cools and the scraping goes easier if you soak the pan soon. If you want more pattern or texture, have simple things like cookie cutters or straws ready.
Materials You’ll Need
1 cup cornstarch
common household pantry staple
1 cup water
tap water works fine
Food coloring (various colors)
liquid or gel works; a few drops go a long way
Baking sheets
use the flat sheet pans you bake on
Wax paper
nonstick base for easy peeling
These are the only required items. If you want to add simple extras, label them clearly as optional: cookie cutters for shapes, toothpicks for details, or string for hanging. Keep the main list on the counter so you do not look for extra tools during the hot-cooking step.
STEP-BY-STEP DIRECTIONS

- In a saucepan, mix the cornstarch and water until smooth.
Measure one cup of cornstarch and one cup of water into a small saucepan.
Stir with a spoon until no dry lumps remain and the texture looks milky. - Cook over medium heat, stirring constantly, until the mixture thickens.
Place the pan on medium heat and keep the mixture moving so it heats evenly.
Watch for it to turn translucent and pull away from the pan a little as it thickens. - Divide the mixture into separate bowls and add food coloring to each one.
Spoon equal portions into small bowls or cups while the mixture is still warm.
Add a few drops of food coloring and stir until the color looks even. - Pour the colored mixtures onto baking sheets lined with wax paper.
Move the wax paper-lined baking sheets to a spot where you can work without rush.
Pour each colored portion in small puddles or lines, keeping colors slightly apart. - Spread the mixture into your desired shapes.
Use the back of a spoon, spatula, or a cookie cutter outline to shape the colors.
Keep the pieces no thicker than a quarter inch for faster, clearer drying. - Allow to dry for several hours or until completely hard.
Leave the sheets in a dry, warm place out of direct dust and breeze.
Check edges for tackiness; the center should feel firm and cool when done. - Once dry, peel off the wax paper and hang your suncatchers in a sunny window.
Gently lift a corner and peel the suncatcher from the wax paper.
Use thread or tape to hang and enjoy the simple glow in the sunlight.
The Simple Science or Skills at Work

This project teaches simple cause and effect. You heat starch and water. Heat changes the mixture and makes it thick and sticky. As it cools and dries, the water leaves and the starch bonds into a firmer piece.
You practice fine motor control when you pour colors and spread them. Children learn to steady hands for small lines and watch how much pressing changes thickness. Mixing colors helps kids predict results and see how combining drops changes hues.
The sensory cues help judgment. The cooked mix feels smooth, then firmer as it cools. When you pour thinly, drying goes faster and the result looks more translucent. These small observations build confidence in future kitchen science projects.
Troubleshooting Common Issues
If the mixture feels too runny after cooking, it likely did not cook long enough.
Return it to the pan and heat gently while you stir until it thickens more.
Do not overload the heat or the bottom may scorch.
If you get lumps while mixing cornstarch and water, stop and scoop any dry pockets into the pan.
Stir briskly and use the spoon to press lumps against the pan until they dissolve.
If lumps persist, strain the warm mix through a fine sieve into a bowl.
If colors bleed into one another while drying, the puddles overlapped too much or the mixture was too thin.
Scoop away excess with a paper towel early, reshape, or separate colors with a thin line of wax paper.
Next time, pour slightly further apart or let the first color set a little before adding another.
If suncatchers stay tacky after long drying, the pieces may be too thick or the air too humid.
Try thinner pours or move the sheets to a warmer, less humid spot.
You can also leave them in a room with a circulating fan for a few hours.
If pieces crack when you peel them from the wax paper, they probably dried unevenly.
Let them cure a little longer on the paper before peeling and handle the peeled piece gently.
For delicate shapes, slide a spatula under the edge first to support the piece.
Easy Variations to Try
Make small sun discs for a quick success.
Pour tiny circles for kids to help make and hang.
They dry faster and teach quick wins.
Try color swirls by partially mixing two colors before pouring.
Stir just a little so you see streaks instead of full blending.
This gives a marbled effect without extra tools.
Use cookie cutters on the wax paper and pour into the outline.
Place the cutter on the paper, then pour a small amount.
Lift the cutter carefully after the piece sets a bit.
Create a rainbow garland by making matching pieces in a row.
Make small shapes of each color and punch holes for stringing.
Tie with twine for a cheerful window display.
For older kids, try layering thin pours to build depth.
Let each layer dry a bit and pour the next when surface feels tacky.
This adds thickness without bubbles and gives a gem-like look.
When you try variations, keep the core recipe the same. Changing shape or color works best when the base mixture behaves predictably.
Storing or Reusing This Project
Store finished suncatchers flat on wax paper in a cool, dry spot.
Stack pieces with fresh wax paper between layers to avoid sticking.
If you plan to display seasonally, keep them in a shallow box or drawer.
To reuse materials, scrape leftover mixture into a compost if your local rules allow cornstarch composting.
Rinse bowls and the saucepan right away and soak any stuck spots before they harden.
Wax paper peels cleanly and you can often use the same baking sheets again without extra scrubbing.
If a suncatcher breaks, save the undamaged pieces for a mosaic mobile.
Glue shards onto a cardboard shape and hang as a textured sun catcher.
This reduces waste and gives another simple craft to do with kids.
FAQs About Cornstarch Rainbow Suncatchers
How messy will this be and how long will cleanup take?
Expect a little dribble while pouring and a few streaks on the counter. Most of it wipes away with a damp cloth while the paste is warm. You will soak the pan to loosen any cooked-on bits. Plan for about 10 minutes of active cleanup after pouring and a short soak for the saucepan and bowls. If you do cleanup right away, the work stays easy.
Is this safe for younger children to help with?
Yes, with supervision. The mixing and coloring steps are perfect for young hands. An adult should handle the cooking step over the stove. Let kids pour the cooled, colored mix if you transfer it to bowls first. Keep the hot pan away from little ones and use a spoon with a long handle to stir.
Can I swap the cornstarch or water for something else if I run out?
Cornstarch and water are the heart of this recipe. Substitutions change how the mixture sets and how clear it dries. If you do not have cornstarch, you will not get the same result. It is better to pause and try this project another time than to substitute without testing first.
What will the finished suncatchers actually look like?
They will look translucent and colorful, not crystal clear like glass. Thin pieces let a lot of light through and show bright color. Thicker pieces look more opaque and can feel weightier. Expect natural imperfections like air pockets and uneven edges. Those flaws give them charm and keep the project low-pressure.
How long do they last in the window and do they fade?
They last well for several months in a protected window. Bright, direct sun can reduce vibrancy over time, especially with liquid food coloring. If you want longer-lasting color, hang pieces out of afternoon sun or choose a north-facing window. If a piece gets dusty, wipe gently with a soft cloth; avoid water unless you plan to let it dry flat again.
A Final Helpful Note
Take the pressure off perfection. These crafts look best when they show the making process. Let kids measure, stir, and explore color. Expect little spills and a few failed shapes. Each attempt teaches timing, texture, and how heat changes simple ingredients.
If something goes wrong, treat it as the start of a new idea. Scraps become mosaics. Overcolored batches can become bold, playful pieces. The goal is a bright moment together and a small, handmade decoration that tells a story.
Conclusion
If you like projects with a rainbow twist for kids, you might enjoy trying a soft, squishy activity like Edible Rainbow Marshmallow Slime from The Craft-at-Home Family for something hands-on and different. For inspiration from handcrafted, professional suncatchers, check out the elegant Ceramic moon crystal rainbow Suncatcher at YukiAndYoko to see how simple shapes translate into long-lasting art.
If you want more ideas that use similar materials or build on this technique, try making thin layers, marbled effects, or garlands. Keep it simple, enjoy the process, and know that a sunny window full of colorful suncatchers came from a single cup of cornstarch and a cup of water.
PrintCornstarch Rainbow Suncatchers

A fun and easy craft project that transforms simple ingredients into beautiful rainbow suncatchers.
- Prep Time: 10 minutes
- Cook Time: 10 minutes
- Total Time: 600 minutes
- Yield: Varies
- Category: Craft
- Method: Cooking
- Cuisine: N/A
- Diet: N/A
Ingredients
- 1 cup cornstarch
- 1 cup water
- Food coloring (various colors)
- Baking sheets
- Wax paper
Instructions
- Mix the cornstarch and water until smooth.
- Cook over medium heat, stirring constantly, until the mixture thickens.
- Divide the mixture into separate bowls and add food coloring to each one.
- Pour the colored mixtures onto baking sheets lined with wax paper.
- Spread the mixture into your desired shapes.
- Allow to dry for several hours or until completely hard.
- Once dry, peel off the wax paper and hang your suncatchers in a sunny window.
Notes
This project is a great way to teach kids about science and creativity. Embrace imperfections for beautiful results.
Nutrition
- Serving Size: 1 suncatcher
- Calories: Not Applicable
- Sugar: 0g
- Sodium: 0mg
- Fat: 0g
- Saturated Fat: 0g
- Unsaturated Fat: 0g
- Trans Fat: 0g
- Carbohydrates: 0g
- Fiber: 0g
- Protein: 0g
- Cholesterol: 0mg