

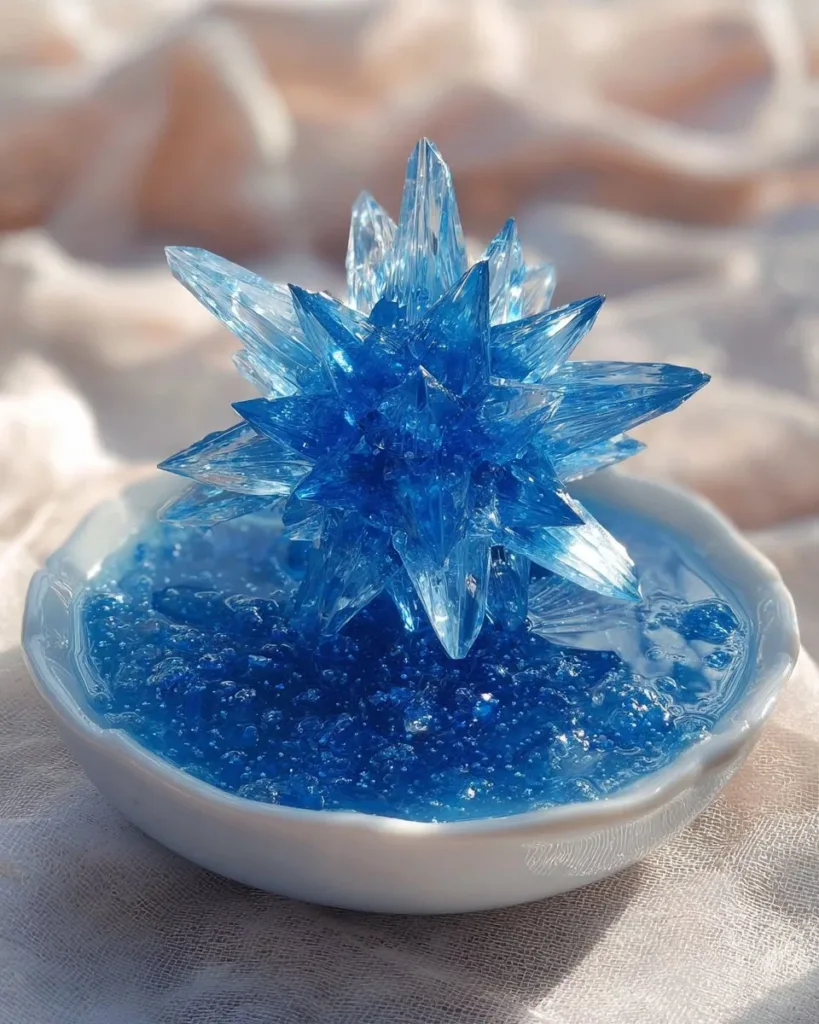
A busy afternoon, a small pile of pipe cleaners, and suddenly everyone wants to make something now. That is the exact moment I pull out the simple recipe for a DIY Crystal Growing Star and set up a tiny station at the kitchen table. It takes just a cup of very hot water, a few spoonfuls of Borax, and a shaped pipe cleaner to turn a restless hour into a hands-on project that feels like a little kitchen science fair.
If you want a longer project that still asks for low prep and gives real sparkle, this activity fits. For more projects like this, check out our walk-through of a full crystal growing experiment at our crystal growing experiment page for extra ideas and photos.
Why You’ll Love Making DIY Crystal Growing Star

This project works well because it sits between a quick craft and a small science experiment. It takes almost no special gear, so you can set it up on short notice. A single measuring cup and a jar become the lab. The materials cost next to nothing, and you can reuse the jar and string for another round.
It also fits real family schedules. You can prepare the solution in ten minutes, then let the star do its own work while you fold laundry, read a book, or cook dinner. Come back in a few hours or the next morning and something magical appears on the pipe cleaner frame.
The steps stay the same every time, so you get reliable results with small kids or older ones who like precise experiments. The process rewards patience. The longer the star sits undisturbed, the more defined the crystals. That steady, slow growth feels satisfying to watch and to explain to curious hands.
A Quick Look Before You Begin
This project starts and stops in short bursts. You do the active work in about 10 minutes. Then the crystals grow while you go about your day. Plan for at least several hours of undisturbed time and expect the best results after overnight.
Setup is low-mess. A single jar or cup holds the solution and the star. Lay down a paper towel or tray just in case of spills. Keep the jar somewhere level and out of reach of pets and small children who might tip it.
An adult should handle the boiling water and the Borax mixing. Older kids can stir and shape the pipe cleaners. If you want, set up two stations: one for making shapes and one for mixing the solution. That split keeps the hot water away from small hands.
Materials You’ll Need
1 cup very hot water
- common household item; heat on the stove or in a kettle
3 tablespoons Borax
- ordinary laundry booster; read label and keep out of reach of young children
Pipe cleaners (shaped like stars or other designs)
- easy craft supply; twist into stars or any shape you like
A container for growing crystals
- a glass jar or cup works best; clear sides let you watch growth
String (for suspending the star)
- kitchen twine or craft string; long enough to suspend without touching the bottom
If you enjoy making shapes that become keepsakes, try a different project later such as our playful seashell crystal recipe at DIY crystal seashells for a beachy variation.
STEP-BY-STEP DIRECTIONS

- Start by boiling some water and measure out 1 cup into your container.
Tie yourself to safety here. Use an adult to handle the boiling water. Pour the hot water slowly into a heatproof jar so it does not crack. You want the water hot enough that it steams but does not splash. - Add 3 tablespoons of Borax to the hot water and stir until it dissolves completely.
Use a spoon to stir slowly. The solution will look clear when fully dissolved. If you see gritty bits, keep stirring until they disappear. - Shape your pipe cleaners into stars or any fun design you like.
Twist the pipe cleaners firmly so the shape holds together. Small hands can make simple shapes while an adult makes the solution. - Tie a piece of string to your shape and suspend it in the solution, ensuring it doesn’t touch the bottom.
Adjust the length of the string so the shape hangs in the middle of the jar. Use a pencil or chopstick across the jar mouth to steady the string. - Leave your creation undisturbed for several hours or overnight to grow beautiful crystals.
Place the jar somewhere level and out of the way. Do not move or jostle the jar. The longer it sits, the larger the crystals. - Once ready, gently remove the star and let it dry.
Lift the star straight up to avoid breaking clusters. Set it on a paper towel to dry, and watch the crystals harden into a sparkly ornament.
The Simple Science or Skills at Work

This activity blends simple chemistry with hands-on skills. When Borax dissolves in very hot water, the water can hold more Borax than it can at room temperature. As the water cools, it releases that extra Borax. The Borax comes out of solution and forms little crystals on the pipe cleaner where tiny bits of the wire give it a place to start.
Kids practice fine motor skills when they twist pipe cleaners and tie string. They learn about cause and effect by setting the star in the solution and returning later to see what changed. They also get a gentle lesson in patience. Watching crystals grow teaches persistence without lecturing.
You can point out cues like steam from the cup when you pour the hot water, the way the solution looks clear at first, and the sparkly coating that appears as the crystals begin to form. Those small details make it feel like a real experiment, not just a craft.
Troubleshooting Common Issues
If the crystals are small or sparse, the solution probably cooled too quickly or the Borax did not fully dissolve. Try using water that stays very hot when you pour, and stir until the solution looks clear.
If the pipe cleaner touches the bottom and crystals form there instead of on the star, remove the string and rehung it higher so the shape is suspended in the middle. Use a pencil across the jar to keep the string steady.
If the jar tipped or you get movement while crystals grow, you may see oddly shaped clumps instead of a neat coating. Gently start a new batch and try again. This is normal and fixable.
If the crystals fall off when you lift the star, let it dry longer. Fresh crystals are delicate right after removal. Placing the star on a paper towel and waiting several hours helps them harden.
If the Borax solution looks cloudy and never clears, it might contain undissolved bits. Warm it and stir more until the water appears transparent. Do not add more Borax than the recipe calls for. The ratio matters.
Easy Variations to Try
Make a string of small shapes. Instead of one large star, create a few small stars on short strings and hang them at different heights for a mobile feel.
Add a little color. Twist a colored pipe cleaner together with a regular one. The color peeking through the crystals gives a faint tint without changing the chemistry.
Try different shapes. A simple spiral or heart catches crystals differently. Younger kids may prefer chunky shapes they can grasp easily.
Turn them into ornaments. After the crystals dry, add ribbon and hang them on a seasonal tree or in a window for a sparkly display. If you want other themed ideas, see our crystal flower project for a floral approach at crystal growing flower inspiration.
Seasonal swaps work too. Small stars for winter and hearts for Valentines make the same method feel new.
Storing or Reusing This Project
Save the jar for another batch. Wash it with warm soapy water and dry it well before using again. Borax can leave a thin residue, so rinse carefully.
Keep the dry crystal stars in a small box or bag to protect them from breakage. They last well if you store them somewhere dry.
Reuse pipe cleaner frames if they still have a good shape. You can gently remove the crystals by soaking the frame in warm water and twisting off the crystal clusters. Then you can reshape the pipe cleaners for a new attempt.
Dispose of leftover Borax solution down the drain with plenty of water, and rinse the sink afterward. Never pour the solution where pets or small children can access it.
FAQs About DIY Crystal Growing Star
Will this project make a mess in the kitchen?
It can, but properly prepared it stays tidy. I set a tray or a towel under the jar to catch drips. If a little solution spills, wipe it up right away with warm water and soap. Borax dissolves easily, but you should avoid getting it on fabrics you want to keep. Overall, cleanup takes just a few minutes.
Is Borax safe to use with kids?
Borax works well for crystal growing, but it is not a snack. An adult should measure and mix the Borax and handle the hot water. Keep the Borax container closed and out of reach. Wash hands after handling crystals. With these simple rules, families use Borax safely for this kind of supervised activity.
How long should I leave the star in the jar?
I usually leave it overnight for the best coverage. You will see some crystals after a few hours, which can delight younger kids. If you want the biggest crystals, give it at least 8 to 12 hours. The longer it stays put, the more time crystals have to form.
Can I substitute another ingredient for Borax?
Borax gives consistent, reliable crystals. Other materials like salt or baking soda can form crystals, but they need different amounts and temperatures, and they behave differently. Borax gives a predictable sparkle that works well for pipe cleaner frames. If you want to explore other crystal types later, try projects that focus on those specific ingredients.
How fragile are the finished stars?
They look delicate, but the crystals harden as they dry. Handle them gently at first. Let them sit on a towel for several hours or overnight to harden fully before hanging or storing. If a piece breaks, you can glue it back or use it in a collage.
A Final Helpful Note
This project works best when you relax into the process. Expect some tiny surprises and imperfect crystals on your first try. That is part of the fun. Prepare the space, supervise the hot water and Borax, and let the jar sit quietly. The rest happens without much fuss.
Celebrate small wins. Even an uneven coating looks beautiful in sunlight. If a batch does not turn out exactly as you hoped, take it as a note for the next try. Adjusting how long you leave the star, or how tightly you twist the pipe cleaners, gives you more control next time.
Conclusion
If you want a step-by-step visual guide that matches this approach, see a clear tutorial at How to Make Crystal Stars | Borax Crystal Ornaments, which shows shaping tips and finished ornaments. For a broader look at home crystal growing and the science behind different methods, read Growing Crystals: How to Make Beautiful Crystals at Home for ideas and variations you might try after this simple star project.
PrintDIY Crystal Growing Star

Create beautiful crystal stars using pipe cleaners and a Borax solution in this fun and educational DIY project.
- Prep Time: 10 minutes
- Cook Time: 0 minutes
- Total Time: 480 minutes
- Yield: 1 star 1x
- Category: Craft
- Method: DIY
- Cuisine: None
- Diet: None
Ingredients
- 1 cup very hot water
- 3 tablespoons Borax
- Pipe cleaners (shaped like stars or other designs)
- A container for growing crystals (glass jar or cup)
- String (for suspending the star)
Instructions
- Start by boiling some water and measure out 1 cup into your container.
- Add 3 tablespoons of Borax to the hot water and stir until it dissolves completely.
- Shape your pipe cleaners into stars or any fun design you like.
- Tie a piece of string to your shape and suspend it in the solution, ensuring it doesn’t touch the bottom.
- Leave your creation undisturbed for several hours or overnight to grow beautiful crystals.
- Once ready, gently remove the star and let it dry.
Notes
An adult should handle boiling water and the mixing of Borax. Keep the jar out of reach of pets and small children.
Nutrition
- Serving Size: 1 star
- Calories: 0
- Sugar: 0g
- Sodium: 0mg
- Fat: 0g
- Saturated Fat: 0g
- Unsaturated Fat: 0g
- Trans Fat: 0g
- Carbohydrates: 0g
- Fiber: 0g
- Protein: 0g
- Cholesterol: 0mg