

A busy afternoon, a bowl of random supplies on the counter, and three bored kids asking for something fun right now that is exactly the kind of moment when Homemade Rock Candy becomes a perfect save. You can clear a small space in the kitchen, pull together 2 cups water and 6 cups granulated sugar, and in under ten minutes start a week-long magic show that grows sugar crystals on skewers. This project fits into a short window of time, keeps hands busy, and leaves a sweet reward at the end.
If you like other kitchen experiments that feel a little like science and a lot like play, you might enjoy our take on glow-in-the-dark treats like the glow-in-the-dark moon rocks recipe for another easy afternoon activity.
Why This Homemade Rock Candy Works So Well

This recipe uses very simple chemistry in a friendly, hands-on way. Two cups of water and six cups of sugar make a super-saturated solution that wants to give the sugar back to the world. Wooden skewers or strings act as a rough surface where sugar can gather and start forming crystals. The process does not need fancy tools, and it stays mostly tidy if you plan a little ahead.
The low-prep part shows up in two ways. First, you coat the skewers with ordinary granulated sugar and let them dry that takes a little time but almost no work. Second, once the syrup goes into jars, the rest is patient waiting. You do need to check a few times, but the day-to-day time commitment stays tiny.
This project makes sense for busy families. You can start it in a short window and then come back later to check progress. It works indoors with common glass jars, and it gives real, visible results in 5 to 7 days. That reliability makes it great for a weekend start or a weekday kickoff that ends with a weekend treat. The results feel grown-up enough to show off, but they still arrive without drama.
A Quick Look Before You Begin
This whole activity splits into three clear parts: prep, making the syrup, and patient crystal growth. Prep takes about an hour of mostly hands-off time for the skewers. The syrup step takes 10 to 15 minutes of active work and a little cooling time. Then you wait 5 to 7 days for crystals to grow large enough to enjoy.
Setup stays compact. You need a saucepan, a heat-safe spot to pour into jars, and a level surface where the jars can sit undisturbed. Mess level stays low if you wipe spills as you go. Expect a little stickiness on jars and a few splashes while stirring, but nothing that takes more than a quick rinse and wipe.
Adult supervision matters during the boiling and pouring part. Kids can help with the sugar coating and hanging the skewers, which is great fine motor practice. If you want a different but similar activity for shorter attention spans, try our simple homemade sugar bubble gum project for a faster sweet treat that still feels playful.
Materials You’ll Need
2 cups water
- common household item
6 cups granulated sugar
- the main ingredient; buy extra if you plan to coat lots of skewers
Extra granulated sugar for coating skewers
- budget-friendly and helps crystals start
Food coloring (your choice of color)
- optional for fun color; a couple drops go a long way
1/2 tsp flavored extract (optional: vanilla, lemon, peppermint, etc.)
- optional; choose simple flavors kids like
Wooden skewers or strings
- wooden skewers work best for big crystals; strings work if you prefer candy on a string
Clothespins
- one per jar to hold skewers steady and keep them from touching the bottom
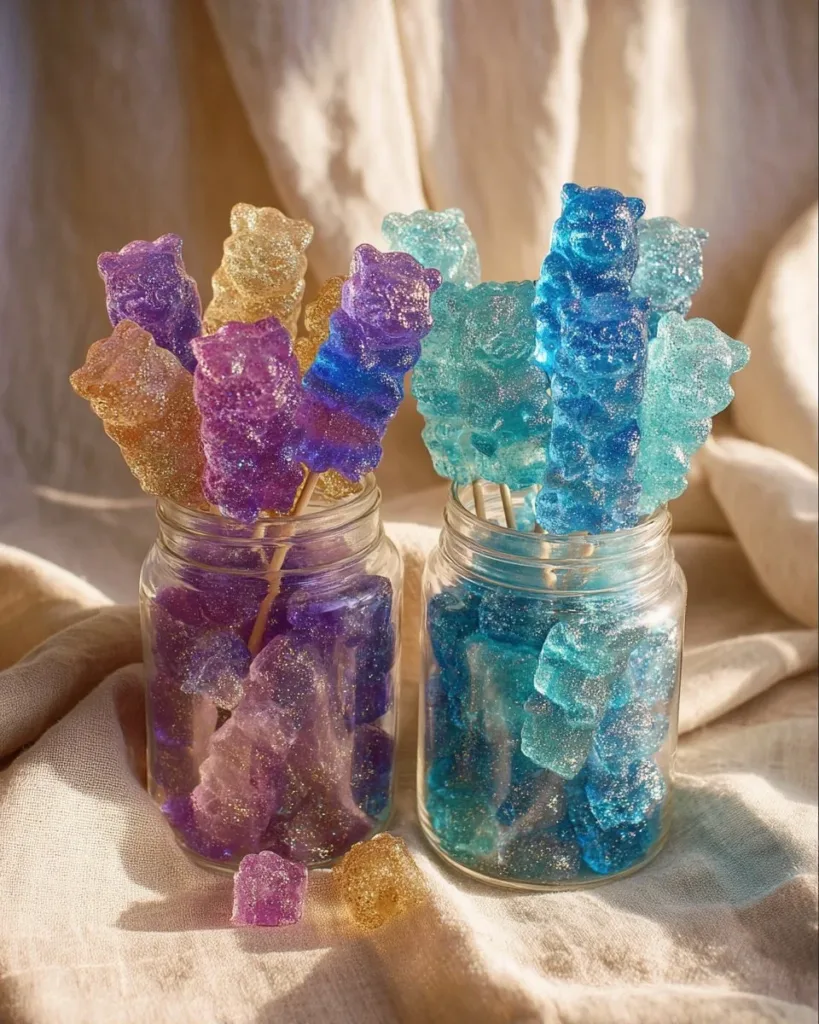
Mason jars or tall glasses
- clear containers make crystal growth easy to watch
Step-by-Step Directions

- Start by dipping the skewers in water and rolling them in granulated sugar.
Let them dry for at least 1 hour. - Boil the water in a medium saucepan over medium-high heat.
Use a clean pot and watch for big rolling bubbles. - Gradually add 6 cups of sugar, one cup at a time, stirring until completely dissolved and clear.
Take your time so the sugar fully dissolves and the liquid looks glossy. - Remove from heat and add your favorite food coloring and flavored extract.
Stir gently. - Let the mixture cool for about 10 minutes, then pour it into the jars or glasses.
Pour slowly to avoid splashes and hot spots. - Use clothespins to suspend the sugar-coated skewers so they don’t touch the bottom.
Center the skewers so air can circulate around them. - Allow the jars to sit undisturbed for 5 to 7 days to form beautiful crystals.
Keep them in a calm place away from direct sunlight or drafts. - When they reach the size you like, carefully remove the skewers and let them dry.
Set them on wax paper or a plate to finish drying and harden.
A few small clarifications while sticking to those exact steps: when the skewers dry after coating, the sugar should feel gritty and stick well to the wood. If it comes off easily, re-dip and roll again. While you heat the syrup, you will see steam and bubbles that is normal. When the sugar is fully dissolved the liquid looks clear and smooth. Cooling for about ten minutes makes the syrup less likely to break the glass when you pour. Hang the skewers so they hang freely; if the wood touches the jar bottom you will get crystals on the glass instead of on the skewer.
The Simple Science or Skills at Work

Making rock candy teaches a few lovely things without sounding like a lesson. One, kids see cause and effect: heat dissolves sugar, and slow cooling makes sugar come back out as crystals. Two, they practice fine motor skills when rolling skewers and fixing clothespins. Three, they learn patience and observation as crystals slowly grow day by day.
Keep the explanations short and tactile. You can describe the syrup as “thick and glossy” when the sugar is fully dissolved. Point out how the sugar on the dried skewer looks different from loose sugar it clings because the tooth of the wood gives sugar seeds a place to latch on. Those are simple, hands-on cues that help a child understand what’s happening without needing a chemistry textbook.
This activity also supports gentle counting and measuring practice. Measuring cups, counting scoops of sugar, and timing the drying or cooling steps all give kids small, satisfying chores with clear results. Watching the crystals form gives a moment of quiet curiosity that balances the more active parts of the project.
Troubleshooting Common Issues
If Something Doesn’t Go as Planned
If crystals do not form at all, check the sugar concentration. The recipe needs a very sugary solution. If you accidentally added too much water, boil longer to reduce it, or start over with the correct 2 cups of water to 6 cups sugar ratio.
If crystals form on the sides of the jar instead of the skewer, the skewer might have touched the glass or the jar moved too much in the first days. Remove any side crystals carefully with a spoon and re-center the skewer so it hangs without touching anything.
If the syrup becomes cloudy or grainy while you stir, the sugar might not have dissolved fully or the pot could have had tiny bits of undissolved sugar. Heat gently and keep stirring until the liquid looks clear and smooth. If the pot overheats and the sugar starts to caramelize and turn tan, stop and start over caramelized sugar will not form the same crystals.
If your crystals look small after a week, they will continue to grow slowly. Warmer rooms speed growth but can also make crystals less tidy. Cooler rooms slow growth but often yield clearer, more faceted crystals. You can always leave them a few extra days to reach the size you like.
If you have sticky fingers and a sticky countertop, use warm water and a scrub brush for cleanup. Sugar dissolves easily in warm water, so most messes wash away well. Place wax paper under the jars while they grow if you worry about drips or sticky spills.
Easy Variations to Try
Simple Ways to Change It Up
- Color layering: Make two small batches of syrup in different colors and pour one after the other when the first layer cools a touch. You get pretty banded crystals. This takes extra jars and careful timing, but kids love the stripes.
- Flavor play: Swap the 1/2 teaspoon of extract for something seasonal, like peppermint at winter holidays or lemon in spring. Go light with extracts; a little goes a long way.
- String pops: Use food-safe string instead of skewers if you want sugar on a string. Tie the string to a clothespin and hang it. Strings yield smaller, more delicate crystals and make a fun candy necklace option.
- Jar presentation: Use different jars or clear glasses to make a colorful display. Wrap the finished sticks with a little parchment and a ribbon for a homemade gift.
These ideas stay close to the main method, so they do not add risk or complex tools. Treat them as suggestions rather than rules. If one variation looks messy in the first try, go back to the basic recipe and try again with small changes.
Storing or Reusing This Project
What to Do With It After
Rock candy keeps for quite a while if you store it in a dry container. Wrap finished sticks in plastic wrap or place them in airtight jars to keep their shine. The crystals can absorb moisture from the air and become sticky in a humid kitchen, so airtight storage helps.
If you want to reuse jars or clothespins, rinse them well with warm water and a scrub brush. Soaking in hot water loosens leftover sugar. Wooden skewers are not reusable for fresh crystal growth the sugar seeds on them remain, and they will start a new batch unevenly. Use fresh skewers if you plan another batch.
To reduce waste, keep extra sugar and the used food coloring in sealed containers for later crafts. Mason jars make good long-term storage for both sugar and small craft bits. If you have leftover syrup, do not save it for future batches it can crystallize oddly or pick up impurities. It is safer to make fresh syrup each time.
FAQs About Homemade Rock Candy
How messy is this project and how much cleanup should I expect?
Some stickiness is normal. Expect a little sugar on the counters and a few splashes in the pour. Warm soapy water cleans most things quickly. If a child helps, have a damp cloth handy to wipe hands and surfaces between steps. The long growth time means most clean-up happens soon after you pour, not later.
Is it safe for younger kids?
The hands-on parts like dipping and hanging skewers work well for children around five and up with supervision. An adult must handle the boiling and pouring. If you have younger children who want to join, give them roles like rolling skewers in sugar or counting cups of sugar while you do the hot work.
Can I swap ingredients if I’m out of something?
The main ratio of 2 cups water to 6 cups sugar must stay the same for good crystals. You can skip the food coloring or the 1/2 teaspoon extract and still get crystals, but do not change the water-to-sugar balance. If you do not have wooden skewers, strings will work but give different-sized crystals.
What size crystals should we expect the first time?
First batches often start small and take a few days to show size. Expect thin clusters the first two days and fuller crystals around day five to seven. They may not all be perfectly shaped some will look knobby or uneven, and that is okay. The fun part is that every stick looks unique.
Can I keep the finished rock candy for a long time?
Yes, if you store it dry in a sealed container. Humidity can make crystals sticky, so airtight storage helps. The candy will last for weeks to months depending on how dry your kitchen stays.
A Final Helpful Note
Ending This Project on a Good Note
Remember that this is a project about watching something grow. It will not always match the perfect pictures you see online, and that is part of the charm. Little imperfections mean the batch is real and made by your family. Be patient during the wait days. Check gently, and if the first batch does not look perfect, try again small tweaks in drying time, jar position, or skewer coating usually fix it. Trust simple steps, enjoy the process, and celebrate the moment when everyone bites into their homemade crystal.
Conclusion
If you want another view of the same basic idea or a step-by-step from a different source, this guide from How to Make Rock Candy {DIY Project} | We are not Martha gives a clear alternative method. For further reading and one more take on the classic recipe, see Homemade Rock Candy | How to Make Rock Candy for extra tips and photos.
PrintHomemade Rock Candy

A fun and easy activity for kids to create their own colorful sugar crystals at home.
- Prep Time: 60 minutes
- Cook Time: 15 minutes
- Total Time: 7 days
- Yield: 8 servings 1x
- Category: Dessert
- Method: No-Bake
- Cuisine: American
- Diet: Vegetarian
Ingredients
- 2 cups water
- 6 cups granulated sugar
- Extra granulated sugar for coating skewers
- Food coloring (your choice of color)
- 1/2 tsp flavored extract (optional: vanilla, lemon, peppermint, etc.)
- Wooden skewers or strings
- Clothespins
- Mason jars or tall glasses
Instructions
- Start by dipping the skewers in water and rolling them in granulated sugar. Let them dry for at least 1 hour.
- Boil the water in a medium saucepan over medium-high heat. Use a clean pot and watch for big rolling bubbles.
- Gradually add 6 cups of sugar, one cup at a time, stirring until completely dissolved and clear.
- Remove from heat and add your favorite food coloring and flavored extract. Stir gently.
- Let the mixture cool for about 10 minutes, then pour it into the jars or glasses.
- Use clothespins to suspend the sugar-coated skewers so they don’t touch the bottom.
- Allow the jars to sit undisturbed for 5 to 7 days to form beautiful crystals.
- When they reach the size you like, carefully remove the skewers and let them dry on wax paper or a plate.
Notes
Ensure to center the skewers so air can circulate around them during crystal growth.
Nutrition
- Serving Size: 1 stick
- Calories: 100
- Sugar: 20g
- Sodium: 0mg
- Fat: 0g
- Saturated Fat: 0g
- Unsaturated Fat: 0g
- Trans Fat: 0g
- Carbohydrates: 25g
- Fiber: 0g
- Protein: 0g
- Cholesterol: 0mg