

A busy afternoon, a small patch of quiet, and a jar of pressed petals on the table: that is how Permanent Flower Charms often begin in my house. Kids wander in, curious, and the simple setup turns into a focused, peaceful half hour where everyone can make something pretty to wear or gift. These little charms work perfectly when you want a quick, satisfying craft that feels special without a lot of prep. If you have a few fully dried petals, clear casting resin, and a small mold or bezel, you can move from idea to finished charm in a single afternoon and still have time for snacks and homework afterward. For a different kind of flower keepsake, you might also like our guide to making crystal flower projects that stretch the same quiet time into a sparkling display.
Why You’ll Love Making Permanent Flower Charms

These charms hit the sweet spot between simple and satisfying. You do not need fancy tools or complicated steps. You pick petals, mix a measured amount of resin and hardener, and pour. The prep takes minutes and the hands-on work stays small and neat. That low-prep setup makes this project excellent for a weekday afternoon or a last-minute craft when kids want something to do now.
The materials work reliably. Silicone molds give you clean edges and little cleanup. Clear casting resin preserves the colors and makes the flowers feel like they float in glass. When you follow basic safety and timing, you get consistent results and a little keepsake that looks polished. If you want a slightly different look, try pairing this with lessons from our crystal growing flower tutorial for other decorative ideas to display nearby.
Why it fits real life: you can spread the work across a day. Petal prep and layout take 10 to 20 minutes. The main active tasks testing fit, placing flowers, and pouring take another 20 to 30 minutes. Then you wait for the resin to cure. That wait means you can get dinner started or help with homework while the charms set up undisturbed.
The charm process keeps mess low. Resin uses small amounts for each piece, and molds contain everything. You only need a clean cloth for the workspace and one mixing cup per pour. That containment makes cleanup straightforward and keeps the project family-friendly.
A Quick Look Before You Begin
Start by thinking about timing and supervision. Mixing resin and handling small tweezers need a steady hand and attention, so plan for an adult to handle the mixing and any torch use. Kids do wonderfully well picking petals and laying them out. Expect light, contained cleanup and a curing window that can range from several hours to a full day, depending on the product.
Set expectations about results. Resin captures color and detail, but it will add a glossy depth that slightly magnifies petals. Imperfections like tiny bubbles or a dust speck may show up if you rush. That is okay. You can often remove small surface bubbles with a soft pass of a torch or warm breath over the piece (done carefully by the adult), and you can sand tiny edge roughness later if needed.
Measure space: pick a flat, level surface away from direct sunlight and drafts. Resin cures best when it stays still and dust-free. Cover nearby household items if you worry about drips. This project uses small amounts of resin, so mess stays manageable. If you want to explore a different display idea after you finish, check how pressed petals pair with other crafts in our notes on crystal flower projects for more inspiration.
Materials You’ll Need
Small pressed flowers and petals, fully dried.
These are the stars. Press and dry them ahead of time or use a packet of pre-pressed petals. Fully dry petals avoid moisture traps inside the resin.
Clear casting resin and hardener, suitable for small jewelry or charms.
Measure by volume exactly. Use a resin made for casting, not craft glues.
Silicone charm molds or small bezel pendant settings.
Silicone molds give you smooth backs and are easy to unmold. Bezels give a metal finish if you prefer that look.
Mixing cups and stirring sticks.
Disposable cups and wooden or plastic stirring sticks work well and keep cleanup easy.
Fine tweezers.
You need steady, precise placement. Tweezers help prevent fingerprints and smudging.
A small torch or heat source (optional).
A short pass with a torch removes tiny bubbles. Use only as directed and keep it away from kids.
Nitrile gloves.
Protect your hands. Resin can irritate skin.
Sandpaper or a fine file (optional).
Use this only if edges need smoothing after unmolding.
Jump rings and small pliers.
Attach a ring to make the charm wearable.
A soft cloth for polishing.
Buff to a gentle shine and remove any dust or fingerprints.
STEP-BY-STEP DIRECTIONS

- Prepare your flowers and workspace. Wear nitrile gloves and set items on a clean cloth. Lay petals flat and choose which ones you want together.
Take time to arrange combinations on the cloth first so you can see how they overlap. When petals feel fragile, handle them gently and keep a spare petal or two in case one crumbles. - Choose your mold or bezel and test fit. Place the largest petal first, then layer smaller bits using tweezers to avoid smudging.
Use tweezers to orient petals toward the charm edges or center. If something looks off, lift it gently and try again silicone molds let you nudge pieces before you pour the base layer. - Mix the resin carefully by volume, measuring resin and hardener exactly as labeled and stirring slowly to avoid air bubbles.
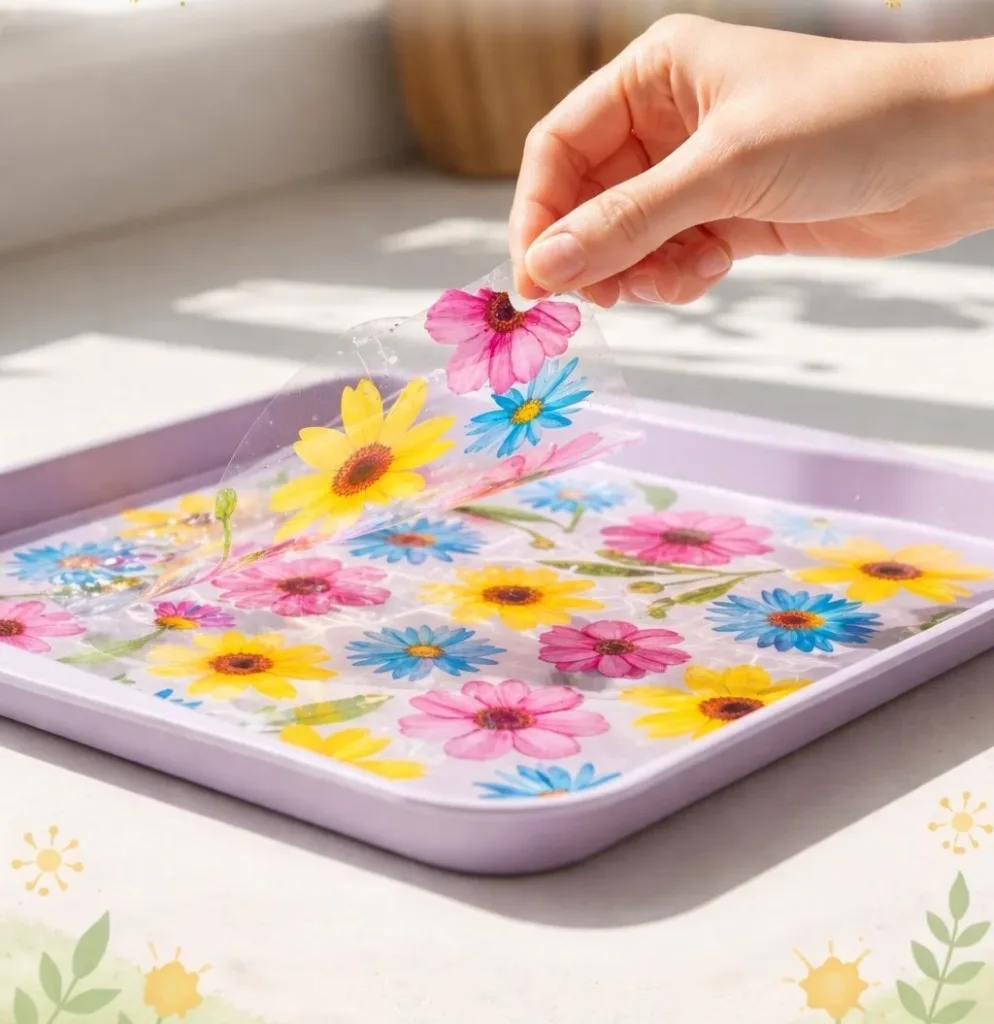
Pour slowly into the cup and stir in a steady, slow motion for the time the manufacturer recommends. Sweep the stick around the sides and bottom to fold the mix, not whip it. - Pour a thin base layer into the mold to cushion the petals. Wait a few minutes for bubbles to settle before placing petals with tweezers.
A thin base keeps petals from sinking and makes positioning easier. Watch for small bubbles rising; they usually appear within the first two to five minutes. - Pour resin to cover the petals fully, leaving a small margin if planning to sand edges later.
Pour gently from one spot so the resin flows and covers evenly. If you want perfectly domed edges, fill to the top of the mold; if you plan to file later, leave a hairline margin. - Allow the resin to cure undisturbed for several hours to a day.
Place the mold somewhere level and dust-free. Check the resin’s tackiness after the minimum cure time, but do not move the piece until it fully sets. - Unmold and finish edges as needed, polishing with a soft cloth.
Peel the silicone back and ease the charm out. If edges feel sharp, use fine sandpaper or a file in light strokes, then buff with the cloth. - Let the finished charm rest and settle before wearing or displaying.
Even when cured, resin benefits from a day or two to finish hardening and clear up fully. Store charms flat until you use them.
The Learning Behind This DIY

This project packs a few useful hands-on lessons for kids and adults. First, fine motor skills get a workout as fingers learn to pick up, angle, and place tiny petals with tweezers. That careful placement builds coordination and patience. Measuring resin by volume teaches basic math and the idea that ratios matter. When you mix the resin slowly, you see cause and effect: stirring quickly traps bubbles and stirring slowly reduces them.
There is a simple science lesson in curing. Resin is a liquid that hardens through a chemical reaction when combined with its hardener. The room temperature affects how fast it cures, so a cooler room can slow things down, and a warmer room speeds things up. That link between temperature and timing is an easy, real-world way to explain how reactions work.
The sensory cues help too. You learn to watch for bubbles, notice the glossy sheen as it cures, and feel the firmness when it is ready to be unmolded. Those immediate, observable changes make the process feel reliable and predictable, which is reassuring for kids who want clear signals of success.
Troubleshooting Common Issues
If tiny bubbles appear on the surface after you pour, they usually rise and pop within minutes. You can gently pass a small torch or heat source over a couple of inches to nudge them out, but only if you are comfortable using a torch. A slow stirring technique helps prevent most bubbles from forming in the first place.
If a petal shifts or floats when you pour, it probably did not sit fully on the base layer. Next time, pour a little more base or press the petal down gently with tweezers before the base sets. If a piece looks cloudy after curing, it may have trapped moisture or air. That can happen if petals were not fully dry. For best results, always use fully dried flowers and petals.
If the resin feels tacky after the recommended cure time, your ratio may have been off or the room might have been too cool. Double-check measuring accuracy and try again with steady room temperature. Avoid adding more hardener post-pour; a second small pour of correctly mixed resin can sometimes top off and harden cleanly once the original piece reaches a firm set.
If dust settles on your piece while curing, you can lightly sand and buff the surface once fully cured. For small specks stuck in the top layer, a careful sand and polish will often restore a smooth, glossy finish.
If you need a visual refresher during a tricky step, our step photos and notes from the crystal growing flower tutorial can help you compare textures and finishes so you know what to expect.
Easy Variations to Try
Make a tiny set: create matching charms for a bracelet and a pair of simple stud-style pendants for a child’s doll or a keyring. Use the same petal type but change placement for a coordinated look.
Try a bezel finish: pour into small metal bezel settings rather than silicone molds. The metal edges give a vintage, framed look and need less sanding.
Seasonal themes: pick petals that match the season pale pinks for spring, bright yellows for summer, earthy dried pieces for autumn. Keep it simple and let the charm reflect the moment.
Add initials under the flower: use a tiny piece of gold or silver foil placed under the petals to catch the light. Place the foil first on the base layer, then add petals on top and pour the final layer.
For a subtle science twist, make a layered piece with two thin pours separated by a brief partial cure. Place one petal on the base, pour a thin layer and let it firm up until slightly tacky, then add a second small petal and a final thin layer. This takes more time but creates depth.
Storing or Reusing This Project
Store finished charms flat in a small box or jewelry pouch to avoid scratching or bending jump rings. Keep them away from direct sunlight to preserve color; prolonged UV exposure can fade some petals over months.
Leftover resin stays usable only as the manufacturer allows. Avoid storing mixed resin. Unmixed resin and hardener in their original sealed containers store for the shelf life listed on the label. Clean mixing cups and sticks promptly with paper towel and a small amount of solvent if your product recommends it, but always check safety instructions first.
Silicone molds last a long time if you rinse gently and store them flat. They also work well for other small projects, so keep them in a labeled container for repeat crafts. If a mold picks up dust, rinse and dry it before next use.
If you end up with spare charms, swap them as small gifts, make one into a zipper pull, or tie a few to a ribbon as a tiny sun-catcher. If you have leftover pressed petals, keep them in a dry, airtight envelope to prevent humidity from making them soft.
FAQs About Permanent Flower Charms
Can my child help with this project, or is it too risky?
Yes, kids can definitely join in, but plan for adult handling where resin is mixed and heated. Children do wonderfully at arranging petals and choosing colors. Keep the resin mixing and torching steps to an adult and let kids take pride in the placement and final choices.
How messy is resin?
I worry about drips on the table. Resin in small batches is very manageable. Work on a clean cloth and use disposable mixing cups. If you do get a drip, wipe it quickly before it cures. Cover the workspace with a plastic sheet if you want extra protection. A little preparation prevents most clean-up.
What if the petals darken or change color after resin?
Pressed petals can shift slightly in tone once encased. Most retain their shape and pattern. To minimize color change, use flowers that are fully dry and press them flat first. Expect a gentle, natural result rather than a perfect match to a fresh bloom.
Will I ruin the petals if I touch them when arranging?
Finger oils can darken or shift delicate petals. Use tweezers to place them when possible. If you prefer to let a child arrange by hand, consider having them work on the cloth and then an adult transfers pieces with tweezers.
How long do these charms take before I can wear them?
Allow the resin to cure fully for the time specified on the product label, then let the charm rest for another day for full hardness. In practical terms, you can usually finish the visible steps in one afternoon and wear the charm the next day once it feels firm and cool to the touch.
A Final Helpful Note
One last tip: go slow and enjoy the small moments. The most satisfying part of making Permanent Flower Charms is watching a fragile petal find a new, lasting place in a tiny piece of wearable art. If something feels off, you can often nudge it, sand it, or re-make it without fuss. This craft rewards patience more than perfection, and a slightly imperfect charm has personality that often makes it more lovable. Trust the process, keep your workspace calm, and don’t worry if your very first set looks homemade. That is exactly how keepsakes begin.
Conclusion
You can find charming ready-made pieces for inspiration at Flower Charms – Linked By Laur, which show creative layouts and finishes. For a wide range of metal findings and charm options to pair with your finished pieces, check out CHARMS – Links Permanent Jewellery Supplies.
PrintPermanent Flower Charms

Create beautiful, lasting charms using dried flowers and clear casting resin. Perfect for a quick, satisfying craft project.
- Prep Time: 20 minutes
- Cook Time: 30 minutes
- Total Time: 60 minutes
- Yield: 4 charms
- Category: Craft
- Method: Crafting
- Cuisine: N/A
- Diet: N/A
Ingredients
- Small pressed flowers and petals, fully dried
- Clear casting resin and hardener
- Silicone charm molds or small bezel pendant settings
- Mixing cups and stirring sticks
- Fine tweezers
- A small torch or heat source (optional)
- Nitrile gloves
- Sandpaper or a fine file (optional)
- Jump rings and small pliers
- A soft cloth for polishing
Instructions
- Prepare your flowers and workspace. Wear nitrile gloves and set items on a clean cloth.
- Choose your mold or bezel and test fit the largest petal first.
- Mix the resin carefully by volume, measuring resin and hardener exactly.
- Pour a thin base layer into the mold to cushion the petals.
- Allow the resin to cure undisturbed for several hours to a day.
- Unmold and finish edges as needed, polishing with a soft cloth.
- Let the finished charm rest and settle before wearing or displaying.
Notes
Ensure full drying of petals and proper measurement of resin for best results. Kids can help with placing petals while adults handle resin mixing.
Nutrition
- Serving Size: 1 charm
- Calories: 50
- Sugar: 0g
- Sodium: 0mg
- Fat: 0g
- Saturated Fat: 0g
- Unsaturated Fat: 0g
- Trans Fat: 0g
- Carbohydrates: 0g
- Fiber: 0g
- Protein: 0g
- Cholesterol: 0mg