

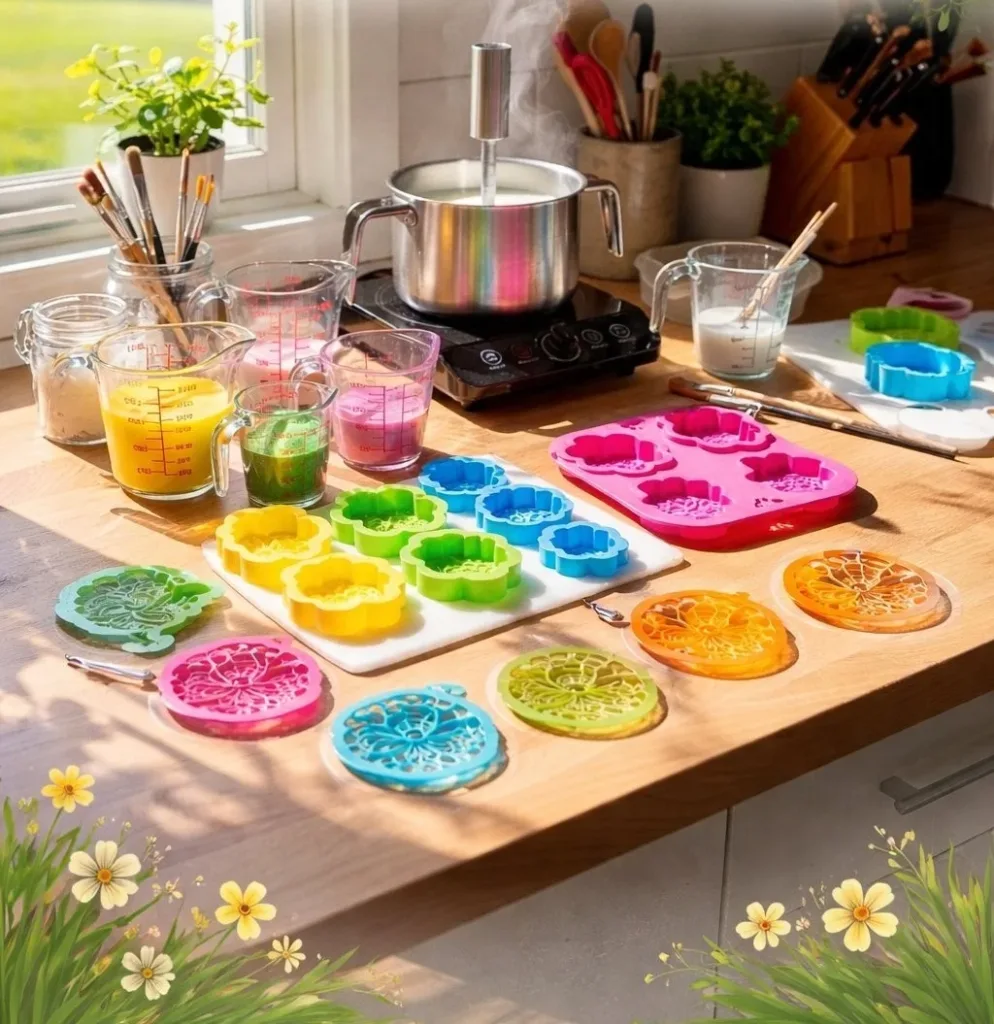
It was a busy late afternoon and the kids wanted something bright to make right now. I cleared a corner of the kitchen counter, set out a few bowls, and we made Vibrant Eco-Friendly Bioplastic Suncatchers with things we already had. The whole thing came together while dinner was in the oven, and everyone loved watching the colors bloom and then dry into clear, shiny shapes. If you want measurements and a quick reference later, I keep a handy version of the full recipe page that I use when I make these with friends and family: full recipe page.
What Makes Vibrant Eco-Friendly Bioplastic Suncatchers Easy to Start

This project works because it asks for little prep and uses simple kitchen tools. You heat a tiny bit of water with agar or gelatin, add a few common pantry items, tint small bowls with color, and pour into silicone molds. The setup takes under 10 minutes and cleanup is straightforward.
It fits into real life. You can set kids up with molds and pipettes while you keep an eye on supper. It feels like a craft and a quick kitchen experiment at once. The results look special, even if your shapes are a little wobbly at first.
You get reliable results because the chemistry behind agar or gelatin is forgiving. It sets into a flexible, translucent sheet that dries hard enough to hang. That predictability makes this project a good pick for short windows of time and for helping kids feel successful fast.
A Quick Look Before You Begin
You will need about 30 to 60 minutes of hands-on time and a full day of drying. The active work sits in a short heating step and a few quick color pours. Most of the waiting comes during the curing stage while the pieces dry and become clear.
Setup is low mess if you use silicone trays and keep a towel nearby. Expect a few drips from pipettes and some sticky spots on bowls, but nothing that needs special cleaners. Paper towels and a small drying rack make cleanup simple.
Adult help matters during the heating and pouring steps. Kids can do the coloring, filling pipettes, and choosing molds. If you want a deeper read on how others make these and extra tips, see this project overview I often share: project overview.
Materials You’ll Need
Agar powder or gelatin
Glycerin
Distilled water
White vinegar or lemon juice
Food coloring or concentrated liquid watercolor
Small saucepan or nonstick pan
Measuring spoons and a small scale
Silicone trays or smooth baking trays lined with silicone baking mats
Heatproof bowl and a silicone spatula
Small pipettes or droppers
Cookie cutters or small craft punches
Needle and thin thread or small suction-cup hooks
Paper towels and a small drying rack
Kitchen thermometer
Oven mitts and a towel
These are items most homes already have, or that you can easily borrow. If you want a crayon-based twist later, check the blue crayon version for a different method: blue crayon version.
Step-by-Step Directions

- Heat water and agar or gelatin in a saucepan until clear and warm.
Heat gently while stirring so powder dissolves fully.
Watch for the mixture to turn clear and free of lumps. - Remove from heat and add vinegar or lemon juice and glycerin.
Stir these in quickly so they blend and you get a smooth mix.
The glycerin adds flexibility and the acid helps clarity. - Cool briefly, then add food coloring to create desired colors in small bowls.
Let the liquid drop a few degrees so it is warm but not steaming.
Use pipettes or spoons to mix small batches of color. - Pour colors into silicone trays, allowing them to take shape.
Work carefully and move slowly to avoid mixing colors unless you want marbling.
Use cookie cutters if you pour a sheet first, or pour directly into individual molds. - Let sit undisturbed until mostly set.
This usually takes 20 to 60 minutes depending on room temperature.
Look for a matte surface and slight spring when you touch it gently. - Gently check for flexibility, then remove and place on a drying rack.
Run a fingertip along the edge to see if it holds shape but still bends.
If it peels clean, lift the piece carefully and set it on the rack. - Cure for 24 to 48 hours before hanging. Enjoy the play of light through the suncatchers.
Leave pieces in a dry, well-ventilated spot out of direct heat.
After curing they hang well on thread or small suction hooks and catch the light.
The Simple Science or Skills at Work

This project touches a few neat ideas without getting technical. Agar and gelatin form a network that traps water as they cool. That network makes a sheet that starts flexible and then firms as it dries. Glycerin keeps the finished piece a little bendy so it does not crack like plain dried glue.
Kids practice measuring, pouring, and watching cause and effect. They learn that heat changes liquids, and cooling creates solid shapes. The simple steps build fine motor skills when using pipettes and threading needle holes. It also teaches patience, since the best results need waiting while the pieces set and then cure.
You can point out clear cues: when the liquid goes from cloudy to clear, it is ready to cool. When the surface loses its wet shine, it is mostly set. Those are reliable signs that help kids gain confidence.
Troubleshooting Common Issues
If your mixture looks grainy or lumpy, it usually means the powder did not dissolve fully.
Heat it a bit longer and stir until the liquid turns clear, then let it cool slightly.
Avoid boiling vigorously because rapid bubbles can trap air and leave holes.
If colors sink together and you lose distinct shapes, the mix might still be too warm.
Cool the batch a touch longer before pouring, or pour into shallow molds to set faster.
You can also embrace blending and make marbled pieces with a soft swirl.
If suncatchers remain sticky after a day, the room may be too humid.
Move them to a drier spot or extend the cure time to 48 hours.
A fan on low can help, but keep pieces out of direct drafts while they firm.
If pieces crack when drying, they may have dried too fast or been too thin.
Try slightly thicker pours next time and let them set more before moving them to the drying rack.
For reference on crayon-style projects that handle drying differently, I keep an example of another crayon-based suncatcher project that helps explain texture differences: another crayon-based suncatcher project.
Easy Variations to Try
Try layered pours for color blocks. Pour a thin clear layer first, let it set slightly, then add a bright color on top. This creates depth and makes little windows of color.
Make marbled pieces by dropping tiny dots of different colors and swirling gently with a toothpick or pipette tip. Work quickly while the mix is warm if you want soft blends.
Switch up molds and shapes. Pour a sheet on a silicone mat and cut shapes with cookie cutters, then poke a hole for hanging. This gives you nonstandard shapes without special tools.
Make a sun catcher garland by threading several cured pieces together on thin thread. Space them so light moves through each piece and the garland looks lively across a window.
Keep these as suggestions not rules. The process rewards curiosity, and small experiments often lead to the best results.
Storing or Reusing This Project
Store finished suncatchers flat and in a dry spot to keep them from warping. Lay pieces between sheets of parchment or tissue inside a shallow box if you need to stack them.
You can reuse some tools easily. Silicone trays and mats wash with warm soapy water. Pipettes, bowls, and spatulas rinse clean; agar or gelatin residue wipes off with a towel if you act before it hardens.
If a few small pieces break, save the scraps. You can melt them gently and press into a new mold, or use fragments as colorful insets in a larger piece. That keeps waste low and gives kids a chance to learn from small mistakes.
If you plan to keep these long term, avoid very humid bathrooms or damp basements. Window light looks great but direct hot sun on very warm days can soften the pieces slightly. A cool, bright spot works best.
FAQs About Vibrant Eco-Friendly Bioplastic Suncatchers
Will this make a big sticky mess in the kitchen?
Not usually. You will get a few drips when you pour and some sticky spots on bowls if the mix cools in them. I keep a towel and paper towels handy. Wiping things while they are still warm makes cleanup easy and the silicone molds rinse clean with soap and water.
Is this safe for my preschooler to help with?
Small kids can do the coloring and place molds, but an adult should handle the hot saucepan and the warm mixture. The hands-on parts for kids mostly involve pipettes, spoons, and choosing colors. With close supervision this project works well for ages four and up for basic tasks, and older kids can take on more of the pouring.
Can I substitute ingredients if I do not have glycerin or distilled water?
Glycerin helps flexibility, so skipping it will still give a result but one that is a bit more brittle. Distilled water keeps the final pieces clearer, especially if your tap water is very hard. If you must use tap water, expect a slightly less transparent finish, not a failure. We keep expectations modest and focus on the joy of making rather than perfection.
How long do the suncatchers last and can you clean them?
They last a long time if kept dry and away from very hot direct sun. You can wipe them gently with a damp cloth, but avoid soaking them for long periods since that can soften the material. If they get dusty, a quick soft wipe usually restores the shine.
A Final Helpful Note
Start simple and treat the first batch as a test run. Use one or two colors and one mold, and learn the cues: clear liquid, mostly set surface, and slight spring before you move a piece. Those small checks help you get consistent results quickly.
Give kids clear roles and celebrate small wins. Even imperfect shapes look beautiful in a sunny window. Be ready to adapt drying time and thickness based on your room and the weather. This project rewards curiosity, so feel free to try tiny changes and see what you like.
Keep your expectations gentle. You will learn more each time you make these, and the best pieces often come from happy accidents.
Conclusion
If you want a detailed step-by-step photo guide that matches the approach we use here, the original tutorial offers clear photos and measurements in a helpful format: DIY Bioplastic Suncatchers: Eco-Friendly Art That Shines Bright!. For a printable pattern and a concise PDF you can take into the kitchen, this online tutorial provides a tidy download that many parents find handy: DIY Bioplastic Suncatchers PDF Tutorial | Fun Science Craft for Kids.
PrintVibrant Eco-Friendly Bioplastic Suncatchers

Create vibrant bioplastic suncatchers with simple ingredients and tools, perfect for a fun family craft.
- Prep Time: 10 minutes
- Cook Time: 30 minutes
- Total Time: 60 minutes
- Yield: Varies by molds used
- Category: Craft
- Method: Decoration
- Cuisine: N/A
- Diet: N/A
Ingredients
- Agar powder or gelatin
- Glycerin
- Distilled water
- White vinegar or lemon juice
- Food coloring or concentrated liquid watercolor
- Small saucepan or nonstick pan
- Measuring spoons and a small scale
- Silicone trays or smooth baking trays lined with silicone baking mats
- Heatproof bowl and a silicone spatula
- Small pipettes or droppers
- Cookie cutters or small craft punches
- Needle and thin thread or small suction-cup hooks
- Paper towels and a small drying rack
- Kitchen thermometer
- Oven mitts and a towel
Instructions
- Heat water and agar or gelatin in a saucepan until clear and warm.
- Remove from heat and add vinegar or lemon juice and glycerin.
- Cool briefly, then add food coloring to create desired colors in small bowls.
- Pour colors into silicone trays, allowing them to take shape.
- Let sit undisturbed until mostly set.
- Check for flexibility, then remove and place on a drying rack.
- Cure for 24 to 48 hours before hanging.
Notes
Use silicone trays for low mess and easy cleanup. Supervise kids during the heating and pouring steps.
Nutrition
- Serving Size: 1 suncatcher
- Calories: N/A
- Sugar: N/A
- Sodium: N/A
- Fat: N/A
- Saturated Fat: N/A
- Unsaturated Fat: N/A
- Trans Fat: N/A
- Carbohydrates: N/A
- Fiber: N/A
- Protein: N/A
- Cholesterol: N/A