

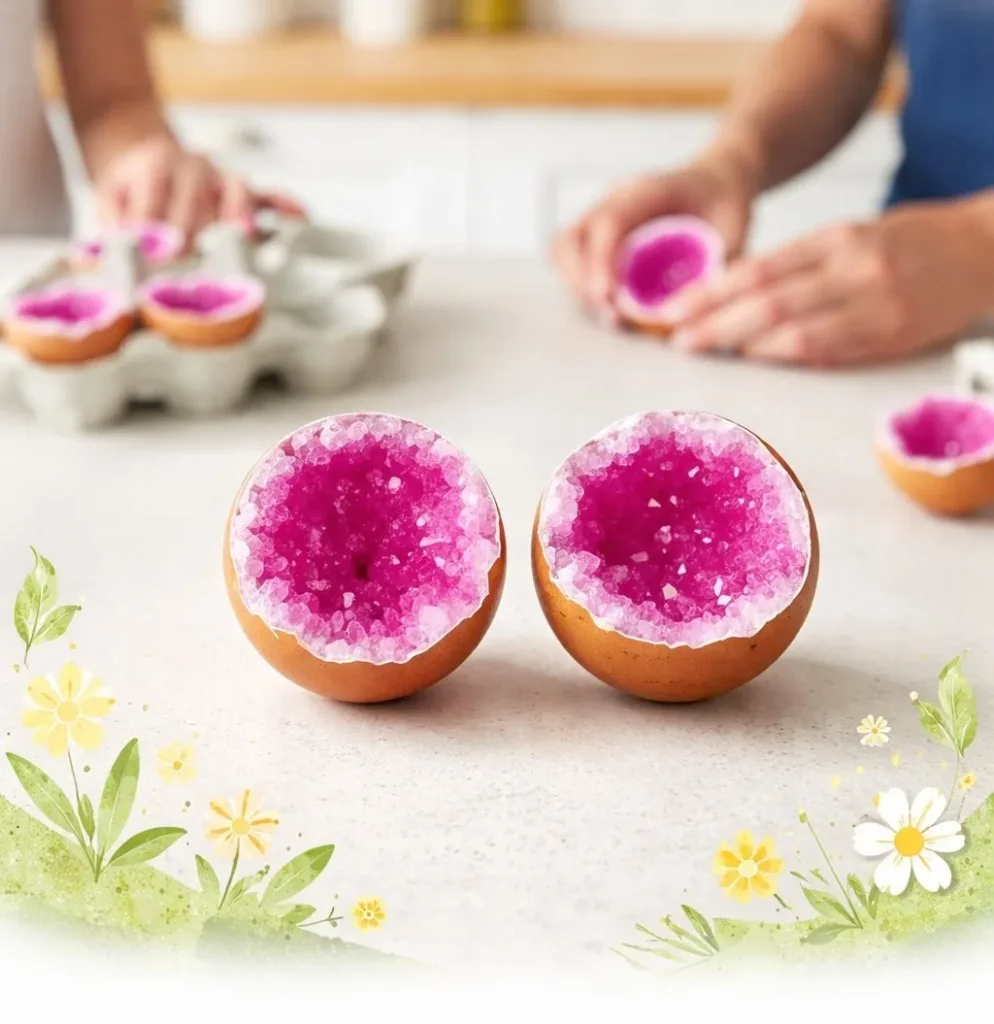
A busy afternoon turned into an art-and-science moment when the kids asked, “Can we make something sparkly right now?” I had a few eggshells in the sink and a cup of warm water ready, so we set up a quick station and started on Pink Crystal Eggshell Geodes. The idea fit the moment: low prep, familiar supplies, and a steady reward a few days later. If you need something hands-on and calm that still feels like a tiny kitchen miracle, this project does the trick and gives everyone a chance to watch real crystals form.
Why You’ll Love Making Pink Crystal Eggshell Geodes

This craft works because it uses things most homes already have and asks for only a little patience. You do not need fancy tools or long prep. Empty eggshell halves make perfect little bowls, and salt, Epsom, borax, or alum all create crystals when the water evaporates at the right pace. The dye gives the crystals a soft pink glow, and you get a satisfying reveal when the shells dry.
It fits real life. You can set the shells and walk away while dinner simmers or while helping with homework. The mess stays small if you use an egg carton and paper towels, and cleanup is mostly wiping up spills and rinsing a cup. If you want a full walkthrough of similar projects for inspiration, try the pink eggshell crystal geodes gallery on our site at pink eggshell crystal geodes, which shows a few finished looks and different crystal strengths.
Why this is reliable: salts dissolve in warm water and form crystals as the water leaves. The eggshell shape helps the crystals stack against a curved white background so the color pops. You get results most times, and when you do not, it usually points to an easy fix like adding a bit more saturated solution or moving the shells to a warmer spot.
A Quick Look Before You Begin
This activity usually takes 2 to 5 days from start to finish, with a few short checks along the way. The setup takes about 10 to 15 minutes. Most of the time, an adult helps with heating water and handling powdered salts, and a child can stir, add dye, and place shells. Expect small drips and a few sticky surfaces if dye spills, but nothing that does not clean up quickly with warm water.
The mess level stays low. Use a shallow box or an old egg carton to catch spills and protect the table. Paper towels and a soft brush make cleanup fast. You will want to keep the shells still while crystals grow. If you need a how-to that takes the same steps but with slightly different notes, see our detailed guide on how to make crystal eggshell geodes at how to make crystal eggshell geodes.
Timing tips. Crystals often start as tiny seed points within a few hours. The most visible growth happens between day two and day five. You can check in gently without moving the shells. If you want bigger clusters, leave them alone longer and avoid touching.
Materials You’ll Need
Empty eggshell halves, cleaned and dried
Table salt, Epsom salt, borax, or alum powder
Warm water
Pink food coloring or powdered dye
Small cup or container for stirring
Wooden stir stick or spoon
Tweezers or a toothpick
Clear glue or white craft glue
A shallow box or egg carton
Paper towels and a soft brush
Safety gloves and eye protection
Notes: eggshells come from the kitchen and are free; salts are budget-friendly and easy to find; food dye is common and powdered dye can give richer color. Tweezers or a toothpick help arrange crystals or remove blobs. Glue is optional to seal in fragile crystals once dry. Safety gloves and eye protection protect hands and eyes when handling powdered salts, especially borax or alum.
STEP-BY-STEP DIRECTIONS

- Gently rinse the eggshell halves and let them dry completely.
Wipe the inside with a soft brush if there is any membrane left.
Dry them upside down on paper towels for at least an hour so they do not introduce extra moisture. - Heat water until comfortably hot and stir in your chosen salt until it stops dissolving. Add tiny drops of pink dye as you stir.
Warm water helps the salt dissolve faster; you should feel the cup as warm but not hot to the touch.
Stop adding salt when you see a few crystals still floating or the cup looks cloudy, and add color a drop at a time until you like the shade. - Use a small cup to fill each shell with the salt solution to just below the rim.
Pour slowly so the pink solution sits evenly without overflowing the shell.
If a drip runs down the outside, wipe it right away with a paper towel. - Set the shells in a stable, warm place to rest, using an egg carton or box to keep them steady.
A sunny windowsill, a shelf near a warm radiator, or a room that stays above cool-dawn temperatures works well.
Make sure the surface will not be jostled by pets or heavy foot traffic. - Wait a few hours to check for crystal formation. If none appear in 24 hours, add more saturated solution.
Look for tiny glints or little needles forming at the surface or along the shell edge.
If nothing shows after a day, carefully add a bit more of the saturated mix to encourage seeding. - Let the crystals grow over 2 to 5 days, avoiding moving them.
The real magic happens slowly; large clusters need steady conditions.
If you move the shells, crystalline patterns can crack or grow oddly, so resist the urge to rearrange. - When satisfied with the crystals, drain excess liquid carefully and let them dry.
Tilt each shell slightly and use a cup to catch the liquid, or use a pipette or spoon to remove it.
Let the crystals air dry in the same steady spot until fully set, which may take a few more hours. - Optionally, seal the crystals with a light coat of clear glue for durability.
A thin brush coat of clear glue helps fragile crystals stay put and reduces shedding.
Let the glue dry fully before handling; it will make the sparkle a bit more muted but much stronger.
If you like the look of the pink crystals and want a matching craft, try pairing them with our easy pink crystal heart ornaments for a quick gift the kids will love at easy pink crystal heart ornaments.
The Simple Science or Skills at Work

This project is a gentle lesson in evaporation and crystallization. When salt dissolves in warm water, the water holds the salt as a solution. As the water slowly leaves, the salt molecules find each other and lock into regular shapes we call crystals. The slower the evaporation, the more orderly the crystal patterns can form. A quick dry can give small grains; a steady, patient dry often gives larger, prettier clusters.
Hands-on skills include careful stirring, pouring, and gentle handling of breakable shells. Kids practice measuring a feel of saturation by watching for tiny undissolved particles. Tweezers and toothpicks build fine motor control when you nudge crystals into place. The activity also teaches cause and effect: add more solution and you get more growth; disturb the shell and the pattern changes.
This craft also helps with observation. Encourage notes like when small sparkles first appeared, or which shell grew the largest cluster. Those simple records help children predict outcomes in the next batch.
Troubleshooting Common Issues
If your crystals do not form well, check these common problems and fixes.
Problem: No visible crystals after 24 hours.
Why: The solution may not be fully saturated, or the area may be too cool.
Fix: Make a new saturated mix with warm water, pour a bit more into the shell, and move the shells to a warmer spot for a day.
Problem: Crystals are small and dusty instead of forming clusters.
Why: Rapid evaporation or too dilute a solution can make tiny grains.
Fix: Try a more saturated solution and let the shells sit longer without disturbance.
Problem: Dye pooled in one spot or gave uneven color.
Why: Pouring too fast or adding too much dye at once causes pooling.
Fix: Drain and add a little more clear saturated solution to blend, or accept the variegated look. It often looks pretty.
Problem: Crystal clusters cracked when handled.
Why: Crystals are fragile while wet and can break if moved.
Fix: Let them dry completely, and then seal with a thin coat of clear glue to add durability.
Problem: Powdered salt created a skin on top and no crystals below.
Why: A thin film can form if the solution skims before seeding happens.
Fix: Gently break the skin with a toothpick and let the surface re-level. You can remove the skin and replace with a little fresh solution.
If you see irritation from powder or dye, rinse skin with water and seek help if redness persists. For kids, keep a close eye when handling borax or alum and use gloves and eye protection. These salts work well but should be treated respectfully and kept out of mouths.
Easy Variations to Try
Try slightly different looks without changing the basic steps.
- Pale ombre shells.
Make three solutions with different dye strengths and layer them carefully in the shells as they evaporate to get a soft gradient. - Mixed-salt textures.
Mix table salt and Epsom in the same solution for a combination of fine crystals and fluffier clusters. - Shell size play.
Use smaller or larger eggshells to create a display of different crystal sizes. Arrange them in a shallow tray for a mini geode garden. - Tiny treasure nests.
Glue a small faux pearl or bead into the shell before pouring to have a jewel appear as crystals grow around it.
If you want a beachy twist, try the idea behind our pink seashell crystals for inspiration on combining shells and crystals at pink seashell crystals. These are only suggestions. The experiment remains the same; you only change the small details to explore different looks.
Storing or Reusing This Project
When the crystals fully dry and you sealed them, store them in a dry place away from direct sunlight. A small shadow box, a shelf, or a sealed container lined with tissue protects the delicate faces. Avoid high humidity; moisture can dissolve or dull crystals.
If you plan to reuse materials, save any undissolved salts in a labeled jar for future batches. Eggshells do not cleanly reuse after crystals set, but you can gently tap out leftover salt and rinse to compost the shells if you use food-safe salts. Use the leftover saturated solution carefully: pour it down the sink with plenty of running water, or let it evaporate in a disposable container if you used non-food-safe salts like borax.
Make cleanup part of the project. Keep paper towels handy for drips, rinse tools right away, and wipe the table with a damp cloth. This keeps the activity tidy and fast to reset for the next batch.
FAQs About Pink Crystal Eggshell Geodes
Can kids do this on their own, or does an adult need to help?
This depends on age. Older kids can do much of the stirring and filling, but an adult should heat water and measure powders. I usually stand nearby for the first few steps and let the child handle stirring and observation. Safety gloves and eye protection are important when handling powdered salts, and an adult can make sure everything stays safe.
How messy will this be, really?
Will dye stain surfaces? You can keep it very tidy. A shallow box or egg carton catches most drips. If dye splashes, it wipes up with warm soapy water from most surfaces, but it can stain fabric or porous wood, so protect tabletops and clothing. Paper towels make quick work of spills, and the soft brush cleans shells gently without making dust.
Can I use any salt I have at home?
Table salt, Epsom salt, borax, and alum powder all work, but they give different textures. Table salt makes small, grainy crystals. Epsom tends to give flatter, sparkly clusters. Borax and alum can produce larger, more defined crystals, but use them with gloves and keep them away from pets and little hands. Be honest about the trade-offs: some salts work faster or give stronger crystals.
What if my crystals look uneven or pale?
Uneven color often comes from pouring too much dye at once. Pale color usually means the solution was too diluted; make a slightly stronger mix next time. You can also layer colors for more interest. Real results vary; sometimes you get perfect clusters, and sometimes you get delicate, frosty patterns. Both are pretty.
How long will the finished geodes last?
If you seal them with a thin coat of clear glue and keep them dry, they will last for months or years as display pieces. Do not place them where humidity is high or where they can get knocked and fall. If crystals flake, a light seal fixes many small issues.
A Final Helpful Note
If this is your first time, pick one or two shells to try. Watch closely for the first day, and then step back and enjoy checking in each morning. If a batch does not look like the pictures, treat it as part of the process. Small surprises and less-than-perfect clusters are normal and make the next try more fun. Trust what you can control: clean shells, warm water, a saturated mix, and a steady, still place to grow crystals. You will learn a little each time, and the kids will love telling the story of how something ordinary turned sparkly.
Conclusion
For a quick refresher or another complete how-to, this step-by-step method pairs well with other geode projects like How to Make a Crystal Geode – Parenting Chaos, which explores similar crystal-making basics. If you want a different hands-on take with eggshells and experiments, check out Make Eggshell Geodes – Little Bins for Little Hands for alternate tips and pictures.
PrintPink Crystal Eggshell Geodes

Create beautiful, sparkly pink geodes using empty eggshells and common household supplies.
- Prep Time: 15 minutes
- Cook Time: 2880 minutes
- Total Time: 2895 minutes
- Yield: 4 servings
- Category: Craft
- Method: Crafting
- Cuisine: N/A
- Diet: N/A
Ingredients
- Empty eggshell halves, cleaned and dried
- Table salt, Epsom salt, borax, or alum powder
- Warm water
- Pink food coloring or powdered dye
- Small cup or container for stirring
- Wooden stir stick or spoon
- Tweezers or a toothpick
- Clear glue or white craft glue (optional)
- A shallow box or egg carton
- Paper towels and a soft brush
- Safety gloves and eye protection
Instructions
- Gently rinse the eggshell halves and let them dry completely.
- Wipe the inside with a soft brush if there is any membrane left.
- Dry them upside down on paper towels for at least an hour.
- Heat water until comfortably hot and stir in your chosen salt until it stops dissolving. Add pink dye as you stir.
- Use a small cup to fill each shell with the salt solution to just below the rim.
- Set the shells in a stable, warm place to rest.
- Wait a few hours to check for crystal formation; add more solution if no crystals appear.
- Let the crystals grow over 2 to 5 days, avoiding moving them.
- When satisfied with the crystals, drain excess liquid and let them dry.
- Optionally, seal the crystals with a light coat of clear glue for durability.
Notes
Use a shallow box or egg carton to catch spills. Keep shells steady while crystals grow, and remember that slower evaporation results in better crystal formation.
Nutrition
- Serving Size: 1 geode
- Calories: 0
- Sugar: 0g
- Sodium: 0mg
- Fat: 0g
- Saturated Fat: 0g
- Unsaturated Fat: 0g
- Trans Fat: 0g
- Carbohydrates: 0g
- Fiber: 0g
- Protein: 0g
- Cholesterol: 0mg