

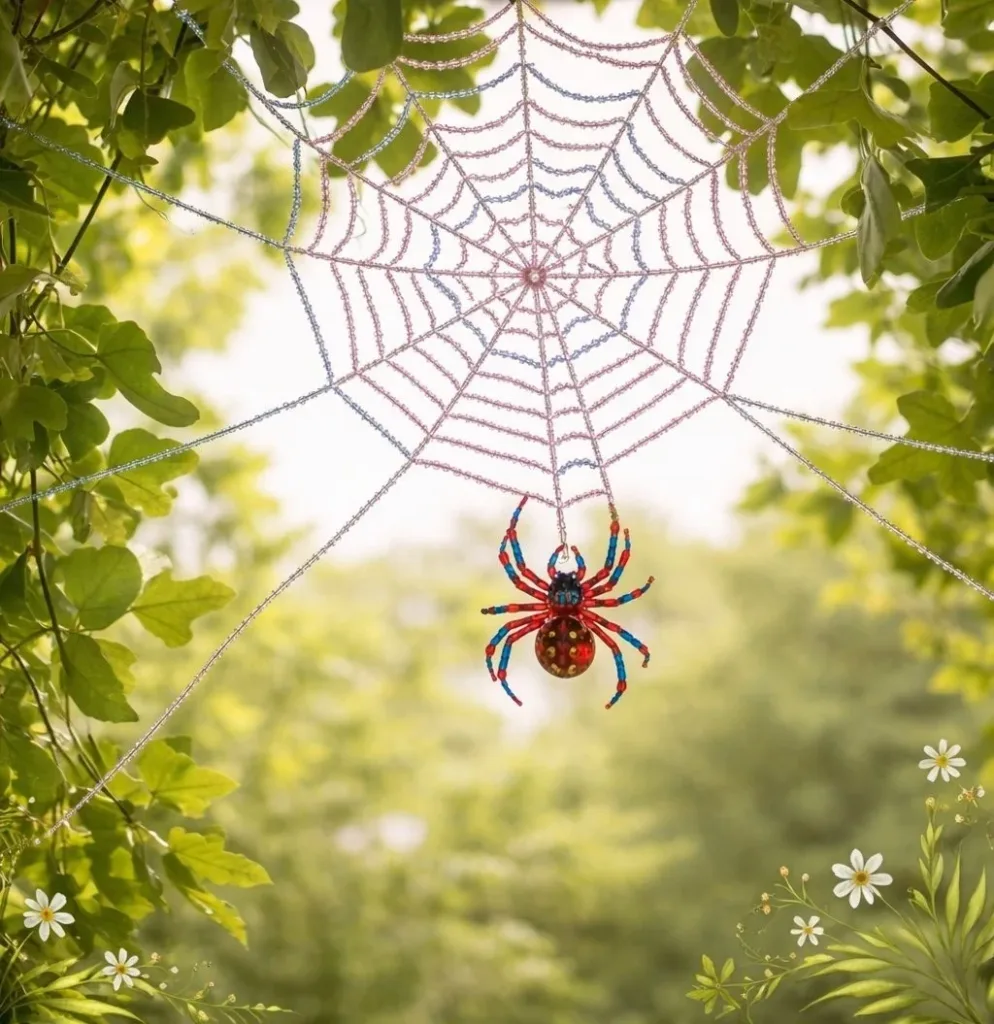
A busy afternoon, damp with the kind of heat that makes kids melt into couches, turned into a quick, satisfying craft around our kitchen table. The request was simple: make something shiny to hang on the porch right now. We pulled out a metal hoop, a handful of beads, and a spool of strong thread and that is how our Sparkling Beaded Spider Web Porch Decoration came alive. If you want a similar quick win, try this sparkly spider suncatcher project to get your hands busy and your porch catching light. This project fits those last-minute needs and gives a beautiful, weather-friendly accent that feels made with care.
Why You’ll Love Making Sparkling Beaded Spider Web Porch Decoration

This project works because it blends small steps you can pause and return to with a clear, visible reward after each minute of effort. It needs just a few materials you probably already have or can find easily. You get the sparkle and movement of beads without a lot of fuss or sticky glues. The structure of the hoop plus radial anchors gives you a reliable frame so parents can set up the anchor stage for little hands to finish with the beads.
It stays approachable because you do not need fancy tools or special skills. Kids learn by threading beads while adults handle the tighter knots and finishes. You see progress quickly: the first round of beads already looks like a mini masterpiece. If you want more inspiration for sun-catching projects around the house, check out our spider suncatcher guide for similar ideas and color mixes that catch light beautifully. This project fits real life where time is short, hands are busy, and the goal is simple joy.
Create with the Seasons
Celebrate every time of year with hands-on ideas. Explore our Seasonal DIY Projects and enjoy creative crafts perfect for holidays and seasonal moments.
How This DIY Comes Together
Plan for about 30 to 90 minutes depending on how detailed you want the beadwork to be. Setup takes five to ten minutes: clear a small work area, lay down a soft cloth, and organize beads in little dishes. Mess stays low. Beads roll, so a cloth or tray makes clean up simple. You may need an adult for tight knots or to thread a tiny needle, but older kids can manage most of the weaving themselves.
You can split the work across a few sittings. The anchor loops and radial threads set the frame and can wait while you gather beads later. The weaving itself is calming and repetitive, great for an after-dinner activity. If you like step-by-step photos as you go, our making similar porch decor page shows photos of a related project that uses many of the same ideas and finishes. This one keeps the mess small, the tools safe, and the results bright.
Materials You’ll Need
Metal or wooden hoop (6 to 10 inches)
Strong beading thread, nylon cord, or invisible monofilament
Small glass or acrylic beads in mixed sizes and finishes
Scissors
Needle for threading beads (if needed)
Small pliers for metal hoops or crimping (optional)
Ruler or flexible tape for measuring
Small jump rings or a length of thin ribbon for hanging
Clear craft glue or a tiny dab of hot glue for securing knots (optional)
Soft cloth for protecting the work surface
Notes on the materials
- Metal or wooden hoop (6 to 10 inches): Common craft hoops work great and set the scale for the final piece.
- Strong beading thread, nylon cord, or invisible monofilament: Choose strength over stretch so the web keeps shape.
- Small glass or acrylic beads in mixed sizes and finishes: Mix matte and shiny beads for contrast.
- Scissors: A good, sharp pair helps make clean trims.
- Needle for threading beads (if needed): Use a beading needle if your thread is fine.
- Small pliers for metal hoops or crimping (optional): Helpful for opening jump rings or flattening small crimps.
- Ruler or flexible tape for measuring: Keeps anchor spacing even.
- Small jump rings or a length of thin ribbon for hanging: Pick a ribbon color that complements your beads.
- Clear craft glue or a tiny dab of hot glue for securing knots (optional): Useful in windy areas or for heavy bead loads.
- Soft cloth for protecting the work surface: Keeps beads from rolling and makes cleanup fast.
Step-by-Step Directions

- Prepare your hoop and thread by cutting a length of thread about four times the hoop diameter.
Knot one end securely and tuck it to avoid fraying so the thread sits neatly against the hoop. - Create anchor loops around the hoop by tying evenly spaced loops to form radial supports.
Use your ruler to set spacing, and aim for 6 to 10 anchors depending on the hoop size. - Reinforce each anchor with a second wrap to keep the web stable while weaving.
Wrap again and press the wraps flat so they do not slip while you work. - Thread your needle and slide on a selection of beads, selecting a sequence that feels pleasing to the eye.
Lay beads in small piles by color and size so you can grab a rhythm during weaving. - Begin the first round of weaving by attaching the threaded strand to one anchor, pulling beads toward the hub, and wrapping around the next radial thread.
Keep a gentle tension so the beads sit near the center without pulling the anchors out of line. - Continue round after round, adding beads as desired, adjusting spacing while maintaining gentle tension.
If a bead cluster feels too heavy, space the next beads out a bit to keep the web balanced. - Vary bead placement for texture and light play by using clusters and sparse spacing to create contrasts.
Use larger beads at focal points and smaller beads as connectors for a layered look. - Finish the center with a secure knot, tying the end to the final radial thread and adding a dab of glue for security if needed.
Press the knot down flat and give glue a moment to set if you use it. - Trim excess thread and tuck knots neatly, using scissors for a smooth cut.
Tuck the cut end into a nearby wrap so it hides and does not catch on clothing. - Add hanging hardware and final touches like a jump ring or ribbon for hanging, then hang on the porch.
Check balance and adjust ribbon length so the piece hangs straight. - Step back and admire how the beads catch sun and porch light, and make small tweaks if a strand looks loose.
Enjoy the way shadows and shimmer change through the day and evening.
Skills This Activity Supports

This project trains fine motor skills because threading tiny beads requires a steady finger and small movements. Kids learn hand-eye coordination as they guide the needle and bead to the right radial thread. The repeated wrapping teaches rhythm and patience. You also get simple planning practice by choosing bead patterns, which offers early design thinking.
There is a mild dose of cause and effect. If you pull too tight, the web smiles inward and the anchors bow. If you leave a strand too loose, beads sag. Those small failures teach quick fixes like tightening a wrap or adding a supporting stitch. If you want to see the same basic techniques in a different decorative form, our spider suncatcher tutorial shows similar steps for arranging beads into light-catching patterns that help reinforce these skills.
Troubleshooting Common Issues
What to Do If Results Look Off
If anchors slip or gather together, the usual cause is uneven tension or an uneven number of wraps. Re-tie a loose anchor, add a small extra wrap, and smooth the thread with your fingers. If beads slide and bunch, stop and re-distribute them before moving on. Work slowly around the hoop to keep spacing even.
If the needle will not pass through a bead, try a thinner thread or a slightly larger bead hole. Threading needles can bend; choose a fresh needle if the eye has widened or snagged the thread. If a knot feels bulky at the center, trim closer and tuck it under a wrap, or apply a tiny dab of clear craft glue and press flat so it disappears.
If the hoop twists when hung, the ribbon or jump ring might be off-center. Slide the hanging loop a little along the hoop until the piece hangs straight. If the decoration sways too much in porch wind, shorten the hanging ribbon or move it closer to a sheltered spot. These fixes help you get a neat, stable result without redoing the whole piece.
Easy Variations to Try
Simple Ways to Change It Up
- Use a wooden hoop and earth-toned beads for a rustic porch vibe that feels warm and homey.
- Pick only iridescent or clear beads for a delicate, sun-catching look that shifts color in light.
- Add a small charm or pendant at the center after finishing the knot for a personal touch.
- Make a set of three hoops in graduated sizes and hang them together for a layered mobile effect.
Treat these as suggestions, not rules. Try a variation that fits your porch style, the season, or the colors your kids love. You can make a quick version for an afternoon or a more detailed set over a weekend.
Storing or Reusing This Project
What to Do With It After
When you take your piece down for storage, slide it onto a flat shelf or hang it inside a closet where it will not catch on jackets. If beads come loose, keep a small bag with spare beads and a short length of thread so you can fix it faster than starting over. Reuse the hoop and stronger beads for another project if the thread looks worn; metal and wood hoops last for years.
To clean the beads, wipe them with a soft damp cloth. Avoid soaking the thread if you used glue on knots. If a bead loses its shine, swapping a few beads with newer ones refreshes the look without remaking the whole decoration. These small habits keep your supplies working longer and cut down on waste.
FAQs About Sparkling Beaded Spider Web Porch Decoration
Will this be too messy for the kitchen table with kids?
It does not make a big mess, though beads like to roll. Lay a soft cloth and work over it so stray beads stay put. We often use shallow bowls to hold beads and every session ends with a quick sweep and a few minutes of picking up beads with the kids. That tidy finish keeps the table usable for dinner.
Is it safe for little hands?
Young children should avoid sharp needles and scissors. You can pre-thread a needle or do the knotting steps for them, and let kids do the fun part: sliding beads and choosing colors. If metal hoop edges feel rough, sand them gently or use a wooden hoop. Supervise closely when small parts are involved.
What if I do not have the exact thread or beads?
Strong beading thread works best, but nylon cord or invisible monofilament do fine in a pinch. If a bead hole is too small for your thread, use fewer beads or try a larger-hole bead. Real results come from balancing what you have with how you want it to look. If you want ideas, this spider suncatcher page gives examples of beads and threads that create similar effects.
I do not have much time. Can I make a smaller version?
Yes. Use a 6-inch hoop instead of a larger one, and reduce the number of anchors. A smaller hoop takes less time to weave and still catches light. Smaller projects often finish faster and feel just as special on the porch.
How long will this hold up outdoors?
Beads and hoop survive a season easily if hung in a sheltered porch spot. Rain and heavy wind shorten life, so place it under eaves or a covered area. Replace thread or redo knots after a year if needed. The decoration looks great for a season and can be refreshed simply.
A Final Helpful Note
One Last Tip Before You Go
This craft rewards small, calm steps. If a round feels off, pause, breathe, and make one small correction rather than starting again. The best results come from steady hands, a sense of play, and accepting that handmade charm sometimes includes a little wobble. Trust the process, enjoy the sparkle, and know a beautiful porch accent can come from a single quiet afternoon with the kids.
Conclusion
If you want a fuller Halloween mantel look to go with your porch decorations, this tutorial pairs nicely with ideas from DIY Halloween Mantel with Spider Webs | Dans le Lakehouse for a cozy seasonal display. For inspiration on ready-made ornaments and different styles you might like to echo or adapt, check out Spider Web Ornament – Etsy to see variations that spark color and texture ideas.
PrintSparkling Beaded Spider Web Porch Decoration

Create a beautiful and sparkly spider web decoration for your porch using simple materials like beads and a metal hoop.
- Prep Time: 10 minutes
- Cook Time: 30 minutes
- Total Time: 40 minutes
- Yield: 1 decoration
- Category: Craft
- Method: Crafting
- Cuisine: N/A
- Diet: N/A
Ingredients
- Metal or wooden hoop (6 to 10 inches)
- Strong beading thread, nylon cord, or invisible monofilament
- Small glass or acrylic beads in mixed sizes and finishes
- Scissors
- Needle for threading beads (if needed)
- Small pliers for metal hoops or crimping (optional)
- Ruler or flexible tape for measuring
- Small jump rings or a length of thin ribbon for hanging
- Clear craft glue or a tiny dab of hot glue for securing knots (optional)
- Soft cloth for protecting the work surface
Instructions
- Prepare your hoop and thread by cutting a length of thread about four times the hoop diameter.
- Knot one end securely and tuck it to avoid fraying so the thread sits neatly against the hoop.
- Create anchor loops around the hoop by tying evenly spaced loops to form radial supports.
- Use your ruler to set spacing, and aim for 6 to 10 anchors depending on the hoop size.
- Reinforce each anchor with a second wrap to keep the web stable while weaving.
- Wrap again and press the wraps flat so they do not slip while you work.
- Thread your needle and slide on a selection of beads, selecting a sequence that feels pleasing to the eye.
- Begin the first round of weaving by attaching the threaded strand to one anchor, pulling beads toward the hub, and wrapping around the next radial thread.
- Continue round after round, adding beads as desired, adjusting spacing while maintaining gentle tension.
- Vary bead placement for texture and light play by using clusters and sparse spacing to create contrasts.
- Finish the center with a secure knot, tying the end to the final radial thread and adding a dab of glue for security if needed.
- Trim excess thread and tuck knots neatly, using scissors for a smooth cut.
- Add hanging hardware and final touches like a jump ring or ribbon for hanging, then hang on the porch.
- Step back and admire how the beads catch sun and porch light, and make small tweaks if a strand looks loose.
Notes
Enjoy a calm, creative activity with kids and watch how this decoration sparkles in the sun. It’s easy to adjust the design if needed.
Nutrition
- Serving Size: 1 decoration
- Calories: None
- Sugar: 0g
- Sodium: 0mg
- Fat: 0g
- Saturated Fat: 0g
- Unsaturated Fat: 0g
- Trans Fat: 0g
- Carbohydrates: 0g
- Fiber: 0g
- Protein: 0g
- Cholesterol: 0mg