

A busy afternoon, a kitchen counter, and a pair of kids asking for something to make right now is a familiar scene in our house. I often reach for quick, simple projects that use what we already have, and DIY Bioplastic Suncatchers fit that bill perfectly. They take a little adult help at the stove, a few common pantry items, and a calm stretch of time to dry. If you want a project that feels like a real craft and not a mess, this one lands just right. For the full recipe and tips, I like to keep a link handy to our full recipe and tips so families can revisit measurements and photos while they work.
Why You’ll Love Making DIY Bioplastic Suncatchers

This project works on busy days because it asks for a short burst of adult attention, then lets the suncatchers finish on their own while you move on to other things. The materials are low-prep and kitchen-friendly, and the steps follow a gentle rhythm most kids enjoy. You heat a small pot, stir, pour into a flat puddle, and decorate. That sequence keeps little hands busy without chaos.
It also fits real-life schedules. The active time is under 15 minutes for mixing and pouring. Then you wait for the pieces to cool and dry at room temperature. You can set the drying plate in a quiet corner and check back every hour. The overall mess level stays low because the mixture stays mostly in the pan and on the mat. That makes cleanup quick and doable after snacks and homework.
The result looks homemade and pretty without demanding perfection. Expect some variations in thickness or tiny bubbles. Those small differences give each suncatcher its own character. If you want more detailed photos and notes on the project, the general project page has a clear overview at project overview and photos that can be a helpful reference before you start.
A Quick Look Before You Begin
This project needs a short setup and a calm adult to do the heating. Plan for three parts of time: prep, mixing and pouring, and drying. Prep takes just a few minutes to gather ingredients and pick decorations. Mixing and pouring takes about 10 minutes, including warm-up. Drying can take several hours to overnight depending on how thick you pour.
Mess stays minimal if you use a silicone mat or a piece of parchment paper and keep towels handy. Have tweezers or a spoon nearby to place dried flowers. The stove step is the part that needs adult hands; kids can help pick pigments, press petals, or thread the finished ribbon later. If you want a step-by-step with photos of each pour, the blue crayon suncatchers article shows some similar pouring tips that transfer well here: blue crayon suncatchers tips.
Materials You’ll Need
1 tablespoon unflavored gelatin
- common household item, often in the baking aisle
3 tablespoons distilled water
- distilled keeps clarity, tap water can work in a pinch
A few drops of glycerin (optional)
- optional for extra flexibility, small bottle lasts a long time
Natural pigments or food coloring (optional)
- optional for color, a few drops go a long way
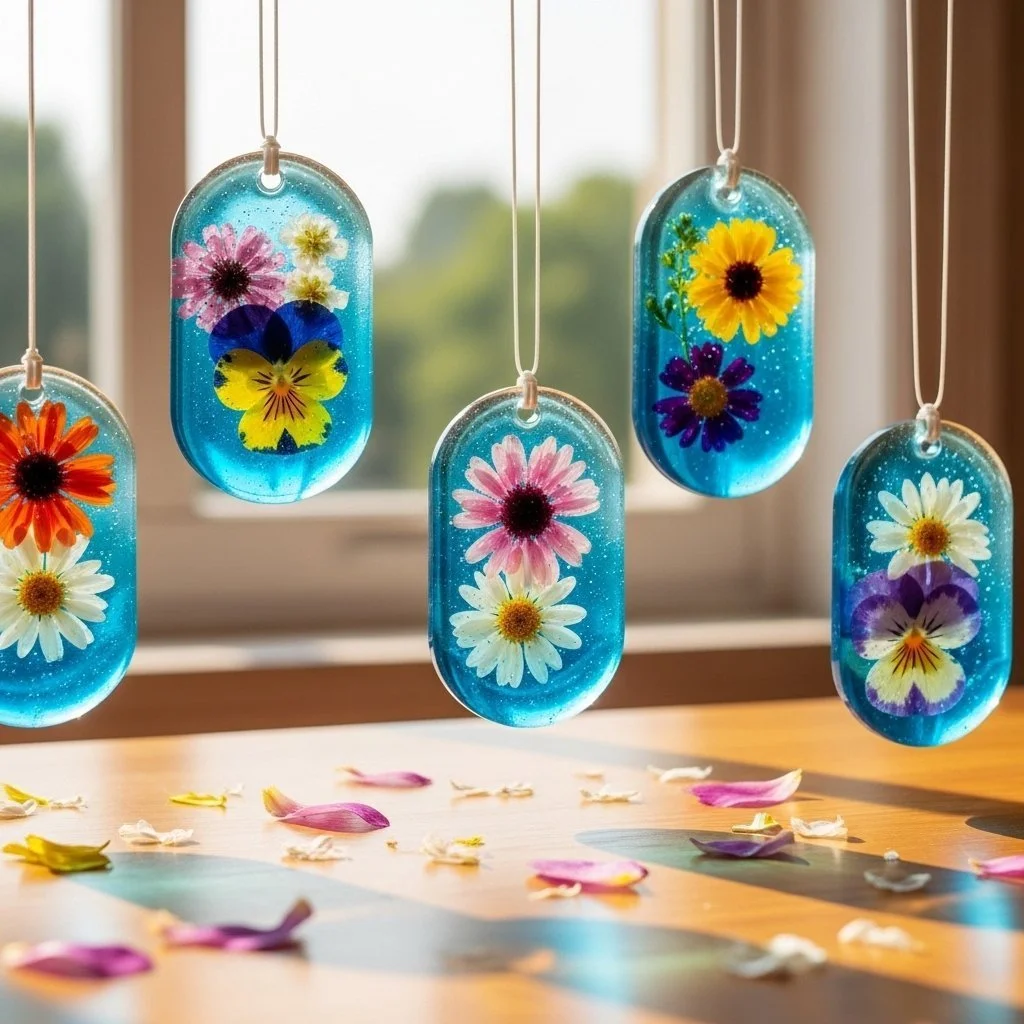
Dried flowers or leaves (optional for decoration)
- optional and beautiful, press or dry them ahead of time
Step-by-Step Directions

- Gently combine gelatin and water in a saucepan.
Stir them together until the powder looks evenly damp. Let the mix sit for a minute so the gelatin blooms. - Heat slowly on low, stirring until the mix becomes clear and smooth.
Keep the heat low and stir often to avoid lumps. The mixture will go from cloudy to a glossy, clear liquid; that is your cue it is ready. - Add glycerin and color while warm, stirring gently.
Add only a few drops of glycerin and the color you like, then stir until it blends. The warm mix will carry the pigment easily so the color spreads evenly. - Cool slightly, then pour a small puddle onto a silicone mat or parchment.
Let it sit off the heat for a short moment so it is warm but not burning hot. Pour a small puddle and avoid pouring too quickly to keep splashes off your counter. - Spread into a circle or press into cookie cutters.
Use the back of a spoon to gently flatten into a shape, or set a cookie cutter and press the gel into it. Thinner pours dry faster; thicker pours make chunkier pieces. - Press dried items on the surface with tweezers and poke a hole if desired.
Arrange dried flowers or leaves carefully so they sit flat in the warm gel. Use a skewer or clean straw to make a small hole for hanging while the gel is still soft. - Let cool completely at room temperature.
Leave the mat in a safe spot without drafts or pets. Drying time varies; thin pieces can be ready in a few hours, thicker ones may need overnight. - Peel from the mat when dry and thread a ribbon through the hole to hang.
Lift the edge gently to check dryness; it should feel firm and not tacky. Thread a ribbon or string and hang in a sunny window to enjoy the glow.
The Simple Science or Skills at Work

This project quietly practices simple science and useful skills. The gelatin dissolves in warm water and then sets into a flexible, clear film as it cools. That change from liquid to solid shows cause and effect in a way kids can watch and predict. Adding glycerin makes the end piece a bit more bendable because glycerin helps retain moisture.
Kids also work on fine motor skills when they pick and place tiny dried petals with tweezers. Pressing shapes and making a neat hole exercises hand control and coordination. Watching the mixture clarify on the stove teaches patience. You point out the visual cue that tells them when it is ready: the cloudy mix turns glossy and see-through. Those small observations build confidence in handling a kitchen task safely.
Troubleshooting Common Issues
If the mixture has lumps, it probably did not bloom long enough or it heated unevenly.
Warm it gently and stir; most lumps dissolve with steady, low heat. Avoid high heat that can bubble or burn the gelatin.
If you see bubbles on the surface after pouring, wait a minute and gently tap the mat to bring them to the edge.
Small bubbles add texture and catch light in a pretty way. If large bubbles appear while heating, lower the heat and stir more slowly next time.
If the suncatcher stays tacky after the expected drying time, it may be too thick or the room may be humid.
Try making thinner puddles next time or leave the pieces in a dry spot for longer. A fan on low, out of direct draft, can help speed drying without causing warps.
If decorations float or shift, press them a touch deeper into the warm gel while it is still soft.
Use tweezers and a gentle hand so petals do not tear. Slight sinking looks natural once the piece dries firm.
Easy Variations to Try
Try layering a second thin pour after the first layer fully dries to trap small objects mid-depth.
This creates a tiny window effect and lets you experiment with depth without changing the basic steps.
Swap food coloring for natural pigments like beet juice or turmeric for softer, earthy tones.
Test a tiny drop first; natural colors sometimes change slightly as they dry.
Make tiny ornaments by pouring small puddles on the mat and cutting once set.
Smaller shapes dry faster and make sweet gift tags or window garlands.
Mix in a tiny pinch of glitter for a subtle shimmer that catches light.
Use very little so cleanup stays easy and the look remains soft, not heavy.
For more creative project ideas that follow similar simple steps and materials, you might enjoy our take on crystal-like crafts in the crystal seashells recipe which shows how a few small changes make a different finished piece.
Storing or Reusing This Project
Store finished suncatchers flat in a dry place to keep them from warping.
A shallow box lined with paper works well and keeps pieces safe between seasons.
If a piece cracks or breaks, you can repurpose the fragments in a collage or glue them to a card for a small sun-catching accent.
Broken bits still catch light and make charming mosaics.
Clean up the saucepan and spoon right away with warm soapy water before the gel cools and sets.
If the gel sets in the pan, soak it in warm water for a few minutes and it will wipe away easily. Distilled water rinses help keep the pan clear and streak-free.
If you have leftover gelatin mix that you cannot use immediately, do not refrigerate it for this craft.
The gel will set and lose the pourable texture needed for shaping. It is easier to make fresh batches as needed since the materials are small and inexpensive.
FAQs About DIY Bioplastic Suncatchers
Can young kids help with this project or should I do the whole thing?
Kids can absolutely join in, but the stove step needs an adult. Let children handle the safe, cool parts like choosing colors and placing dried petals. They enjoy pressing and arranging; you do the heating and pouring. That split keeps everyone involved and safe.
Will these suncatchers last a long time in a sunny window?
They look lovely for months, but expect some change over time. Direct, hot sun and humidity can make them more flexible or cause slight fading. Treat them gently and store them flat when not in use to keep them looking good longer.
What if I do not have glycerin or want to skip it?
Glycerin is optional. Without it, the suncatcher still forms and looks nice but it will be a bit stiffer. Most families skip glycerin and are happy with the result. If you want extra bend, a few drops help.
How messy is this and what should I prepare for cleanup?
The mess stays small if you pour onto a silicone mat or parchment and wipe spills quickly. Keep paper towels and a small bowl of warm soapy water nearby for tools. The pan cleans up easily if you wash it while the gel is still warm. Expect some sticky spots if a child touches the warm gel, so supervise closely and have wipes ready.
A Final Helpful Note
This project rewards a calm pace. Take the time to bloom the gelatin, watch the mix go clear, and let the pieces dry without rushing. Small imperfections like tiny bubbles, minor color shifts, or thin edges make each suncatcher uniquely yours. Be flexible, enjoy the hands-on bits, and remember that the goal is a simple, bright moment in a busy day.
Conclusion
If you want a detailed classroom-style writeup, this clear external guide shows the chemistry and step photos in a kid-friendly way at How To Make A Bioplastic Suncatcher – Chemistry for Kids. For a botanical take with pretty pressed plants and inspiration, this project writeup is a lovely reference at Botanical Bioplastic Sun Catchers – Wineberry Woods.
PrintDIY Bioplastic Suncatchers

A fun and simple project for kids to make colorful suncatchers using common pantry items and a little adult supervision.
- Prep Time: 5 minutes
- Cook Time: 10 minutes
- Total Time: 60 minutes
- Yield: Varies according to size
- Category: Craft
- Method: DIY Craft
- Cuisine: N/A
- Diet: N/A
Ingredients
- 1 tablespoon unflavored gelatin
- 3 tablespoons distilled water
- A few drops of glycerin (optional)
- Natural pigments or food coloring (optional)
- Dried flowers or leaves (optional)
Instructions
- Gently combine gelatin and water in a saucepan.
- Heat slowly on low, stirring until the mix becomes clear and smooth.
- Add glycerin and color while warm, stirring gently.
- Cool slightly, then pour a small puddle onto a silicone mat or parchment.
- Spread into a circle or press into cookie cutters.
- Press dried items on the surface with tweezers and poke a hole if desired.
- Let cool completely at room temperature.
- Peel from the mat when dry and thread a ribbon through the hole to hang.
Notes
Keep cleanup supplies handy and supervise closely during the stove step to ensure safety.
Nutrition
- Serving Size: 1 suncatcher
- Calories: N/A
- Sugar: 0g
- Sodium: 0mg
- Fat: 0g
- Saturated Fat: 0g
- Unsaturated Fat: 0g
- Trans Fat: 0g
- Carbohydrates: 0g
- Fiber: 0g
- Protein: 0g
- Cholesterol: 0mg