

A busy afternoon, a cupboard of eggs, and kids asking to make something sparkly now often become the best kind of DIY moment. The Sparkling Crystal Geodes Experiment fits that exact scene: a quick kitchen setup, simple steps, and a real, showy result by the next day. If you like projects that feel like a small kitchen science win, this one sits right between a snack and a craft. For a related idea you can compare timing and materials with our crystal growing experiment, which uses many of the same tricks and gives you more ways to experiment with color and size.
Why This Sparkling Crystal Geodes Experiment Works So Well

This project works because it focuses on one clear idea: dissolve more solute than water wants to hold, then let crystals form as the solution cools and water evaporates. That keeps prep short and results visible fast. You do not need special tools or hours of mixing.
It stays low-prep because most families already have a few of the materials. You warm a cup of water, stir in a spoonful at a time, and pour. No fancy measuring tools or lab equipment makes it easy to start even when time is tight.
It feels approachable because kids handle most of the fun parts. Measuring and stirring build confidence quickly. The adult role centers on safety and the warm solution step, so you stay nearby without micromanaging.
It feels reliable because crystals form when a solution is saturated and allowed to sit undisturbed. Follow the simple saturation test and give the mixture time. That combination gives repeatable results you can expect in a weekend or less.
A Quick Look Before You Begin
This is a short project but not an instant one. Plan a 10 to 20 minute prep window and then a hands-off wait from one day up to five days for bigger crystals. Most families find this fits well into a weekend morning. You do one clear session of mixing and pouring, then check a couple times over the next days.
Setup needs a shallow tray lined with paper towels to catch drips and keep eggshells stable. Expect small spills and some crusty residue as the solution dries. That is normal and wipes up easily while still wet.
Mess stays controlled. You get a little salt ring and tiny spills around the tray. Have a paper towel and a shallow bowl of warm water handy for quick cleanup. Adult help is useful for warming the water and handling alum if you choose it.
If you want a longer recipe or another look at crystals in different shapes, this page links well to our guide on how to make crystal eggshell geodes, which walks through a few extra tips for shaping and display.
Materials You’ll Need
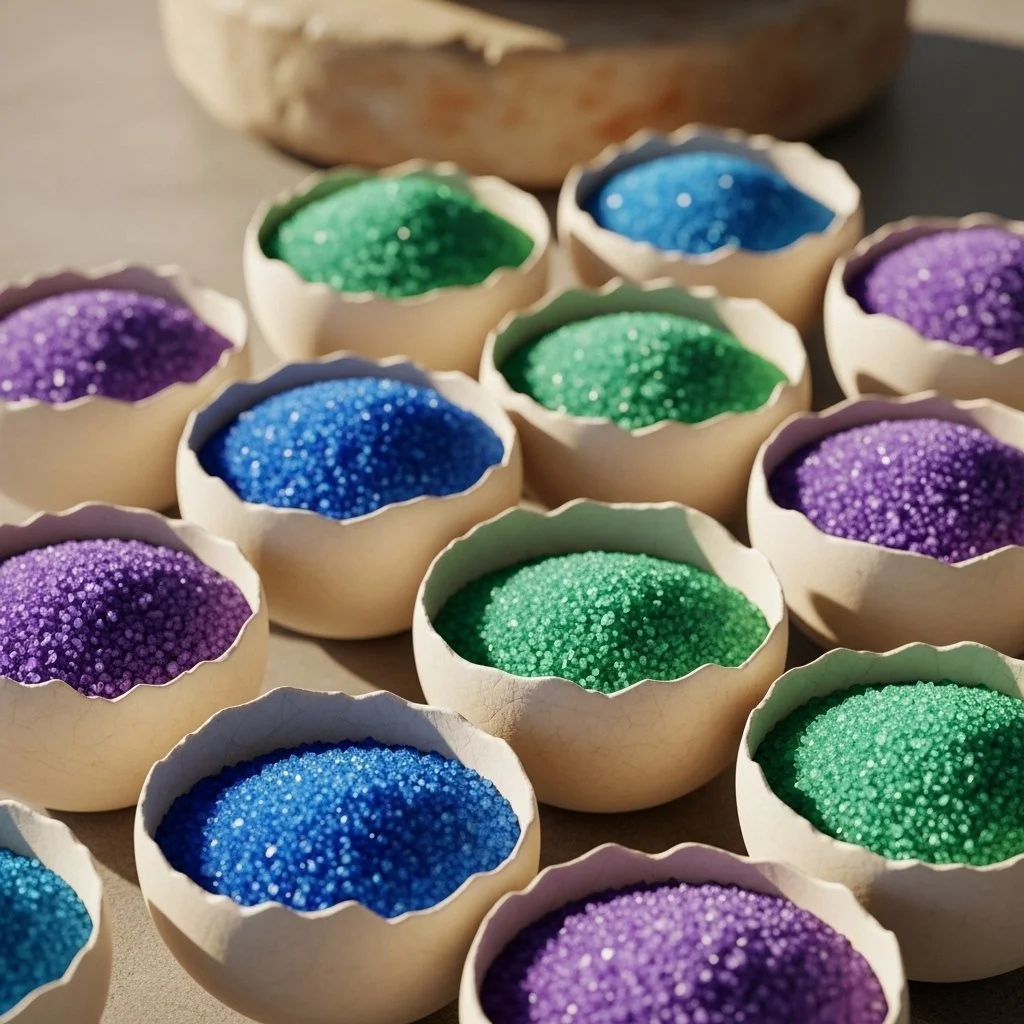
- Eggs or small hollow molds (eggshells are preferred) – common household item, eggshells add natural shape and charm.
- Table salt, Epsom salt, alum, or sugar – choose one; alum gives sharper crystals but handle with care.
- Distilled or filtered water – cleaner results than tap water and helps crystals form well.
- Food coloring or watercolor paint (optional) – safe way to add color.
- Glitter or mica powder (optional) – adds sparkle; use sparingly for safety.
- Small spoons or stirring sticks – for dissolving and testing.
- Tweezers or a small brush (optional) – helpful for placing shells or cleaning edges.
- Paper towels – for lining your tray and quick cleanup.
- A shallow tray for drying – keeps shells steady and spills contained.
- Protective gloves and eyewear (if using hot solutions or alum) – safety first when handling warm liquids or alum.
- A warm, undisturbed place – a cupboard, shelf, or spot by a radiator helps crystals form.
Step-by-Step Directions

- Prepare your hollow base and surface by placing eggshell halves or molds on a shallow tray lined with paper towels.
Gently clean the eggshells and leave the inside slightly rough so crystals have texture to grab onto.
Set shells in shallow indentations in the towel so they do not roll when you pour. - Warm 1 cup of distilled water until warm and a little glossy.
You want it warm, not boiling. Warm water dissolves more salt or sugar faster.
If a child helps, an adult should do this step and check the temperature. - Dissolve 2 to 3 tablespoons of your chosen salt or sugar at a time, stirring until clear.
Add a spoonful, stir, then add more. The liquid should look clear, not cloudy.
Stir patiently; some salts take longer to dissolve than sugar. - Test saturation by ensuring a thin layer of undissolved crystals remains at the bottom.
If crystals remain, you are saturated and can stop adding more.
This small layer is the visual cue that you have as much solute in the water as it can hold. - Add food coloring or glitter for color and sparkle if desired.
A drop or two of food coloring goes a long way. Mix gently to avoid bubbles.
Glitter or mica gives surface sparkle but keep quantities small. - Carefully pour the solution into your hollow base.
Pour slowly so the shells do not tip and so the surface stays even.
If a shell leaks, use tweezers to steady it and dab the tray with a paper towel. - Place somewhere undisturbed to rest.
Move the tray to a warm, quiet spot out of direct drafts and away from pets.
Disturbing the solution can slow or change crystal formation. - Check after 12 to 24 hours and allow to grow for 2 to 5 days for larger clusters.
Start with a peek at one day to watch small crystals appear along the edges.
For thicker, more gem-like clusters, let them sit for several days without moving. - Remove the shells and let them air dry, then seal or display gently.
Lift shells carefully and set them on clean paper towels to dry fully.
Seal with a clear spray or place on a small stand for display to protect delicate crystals.
The Simple Science or Skills at Work

This project blends simple science and handy skills. Crystals grow when a solution holds more dissolved material than it can keep once cooled or when water slowly leaves the mix. The warm water dissolves extra salt or sugar. As the solution cools and water evaporates, the dissolved bits gather and form solid crystals.
Kids practice fine motor skills by pouring carefully, stirring to dissolve, and placing shells. They learn cause and effect. Stir more and the solution clears; leave it still and crystals form. They also get a feel for texture when they sand or clean shells slightly before filling.
This activity supports patience. You do a short active stage and then wait to see growth. That waiting teaches observation and delayed gratification in a satisfying way. It also allows small, safe steps that boost confidence with each clear result.
Troubleshooting Common Issues
If nothing shows after a day, check whether the solution was saturated. If no undissolved grains sat at the bottom, you had too little solute. Dissolve a bit more into warm water, test again, and try another pour.
If crystals form only around the edges, that often means the solution cooled more at the rim or air flow hit the tray. Move the tray to a calmer spot and consider a more even fill next time.
If the crystals look powdery or crumbly, the solution may have been too cool when poured or too concentrated in a way that forms tiny crystals instead of larger ones. Try making a slightly less saturated solution or warm the water a touch more before dissolving.
If shells crack or tip while pouring, use a small cup with a spout and pour very slowly. You can also nestle shells in a small indentation in the paper towel or use a folded towel to create a mini cradle.
If you used alum and feel unsure, wear gloves the next round and rinse skin promptly if it touches. Alum works well but needs a bit more careful handling than table salt or sugar.
Easy Variations to Try
Try different salts to see how crystal shapes change. Table salt gives blocky crystals, Epsom salt yields needle-like shapes, and sugar makes softer, sparkly crystals. You do not need all at once; pick one and compare across days.
Make layered color geodes by pouring a thin layer, letting it set, and then adding a second color once the first begins to firm. This takes patience but gives beautiful banding like real geodes.
Add tiny treasures inside the shell before pouring. A little bead or a small piece of mica can become embedded in the crystal for a surprise inside. Use tweezers to place items gently.
Try seasonal themes. Make pastel shells for spring or deep jewel tones for winter holidays. You can adapt colors to birthdays or classroom themes.
If you want a related variation using a different shell shape, our guide to seashell crystal geodes shows how to use sea shells and gives ideas for display.
Storing or Reusing This Project
Once your geodes dry, display them in a low-humidity area. Crystals can attract moisture and dull if you expose them to damp air. A simple glass cloche or a small shadow box keeps them safe and visible.
If you plan to reuse materials, pour any leftover solution back into a jar and cover it. You can reuse it to try another shell the same day. Do not mix different types of salts in the same jar for reuse.
Cleaning up is straightforward while the solution is still wet. Wipe trays and tools with warm water and a scrap of cloth. If residue dries, soak the tray briefly to soften before scraping.
To reduce waste, save extra paper towels for future projects and keep small leftover salts in labeled containers. Recycle any empty packaging and use a small, dedicated tray for crystal work to avoid contaminating kitchen dishes.
FAQs About Sparkling Crystal Geodes Experiment
Will this make a real geode that looks like a store bought one?
This makes a fun, sparkly faux geode with real crystals on the inside of a shell. It will not exactly match natural geodes, but it gives the same surprise and sparkle that kids love. Think of this as a handmade version that celebrates color and texture rather than an exact mineral match.
Is this safe for young children to do?
With supervision, yes. Young children can help with stirring, coloring, and placing shells. An adult should warm the water and handle any alum. If you use alum, wear gloves and keep it away from little hands and mouths. Table salt and sugar are the gentlest options for younger kids.
How messy will this get and what cleans up best?
You will get small drips and a salt line on the tray. Keep a damp cloth and paper towels nearby for quick wipes. Use a tray to contain spills. Cleanup is easiest while the solution is still wet; once it dries, soak the tray briefly to soften the residue.
Can I change the recipe if I do not have distilled water or alum?
Distilled water helps make clearer crystals, but tap water usually works, especially if you use table salt or sugar. If you do not want to use alum, choose Epsom or table salt for safer handling. Be honest about results: tap water and different salts may change crystal clarity and shape.
How long do I need to wait and how do I tell it is done?
Expect visible crystals in 12 to 24 hours. For larger, more defined clusters, plan on 2 to 5 days. The crystals are ready when you see a firm, sparkly layer inside the shell and the solution has mostly evaporated. Take care when handling; let them air dry fully before sealing or moving.
A Final Helpful Note
Trust that simple steps give solid results. This project rewards patience more than precision. Keep measurements loose, watch for the visual cue of undissolved crystals, and let time do the rest. If a batch does not turn out the way you hoped, treat it like an experiment and try a small change next time.
Enjoy the process with kids. Let them choose colors and glitter amounts. Celebrate the small surprises when crystals start forming overnight. The project fits well into a busy life because it asks for a few focused minutes and then hands you a few days of delight.
Conclusion
If you want more step-by-step photos or a slightly different method, I like the clear visual walk-through in Artsy-Fartsy Mama’s DIY Crystal Egg Geodes tutorial which shows filling and drying tips you can borrow. For another trusted take with classroom-friendly notes, see Make Eggshell Geodes – Little Bins for Little Hands which offers variations and safety pointers for group settings.
PrintSparkling Crystal Geodes Experiment

A fun DIY project that combines science and crafts to create sparkling crystal geodes using eggshells and simple household materials.
- Prep Time: 15 minutes
- Cook Time: 2880 minutes
- Total Time: 2895 minutes
- Yield: Multiple geodes
- Category: Craft
- Method: Experiment
- Cuisine: N/A
- Diet: N/A
Ingredients
- Eggs or small hollow molds (eggshells preferred)
- Table salt, Epsom salt, alum, or sugar
- Distilled or filtered water
- Food coloring or watercolor paint (optional)
- Glitter or mica powder (optional)
- Small spoons or stirring sticks
- Tweezers or a small brush (optional)
- Paper towels
- A shallow tray for drying
- Protective gloves and eyewear (if using hot solutions or alum)
- A warm, undisturbed place
Instructions
- Prepare your hollow base and surface by placing eggshell halves or molds on a shallow tray lined with paper towels.
- Gently clean the eggshells and leave the inside slightly rough so crystals have texture to grab onto.
- Set shells in shallow indentations in the towel so they do not roll when you pour.
- Warm 1 cup of distilled water until warm and a little glossy.
- Dissolve 2 to 3 tablespoons of your chosen salt or sugar at a time, stirring until clear.
- Test saturation by ensuring a thin layer of undissolved crystals remains at the bottom.
- Add food coloring or glitter for color and sparkle if desired.
- Carefully pour the solution into your hollow base.
- Place somewhere undisturbed to rest.
- Check after 12 to 24 hours and allow to grow for 2 to 5 days for larger clusters.
- Remove the shells and let them air dry, then seal or display gently.
Notes
Consider using different salts to observe how crystal shapes change. Ensure safety for kids when handling warm liquids, and supervise during the project.
Nutrition
- Serving Size: 1 geode
- Calories: 0
- Sugar: 0g
- Sodium: 0mg
- Fat: 0g
- Saturated Fat: 0g
- Unsaturated Fat: 0g
- Trans Fat: 0g
- Carbohydrates: 0g
- Fiber: 0g
- Protein: 0g
- Cholesterol: 0mg