

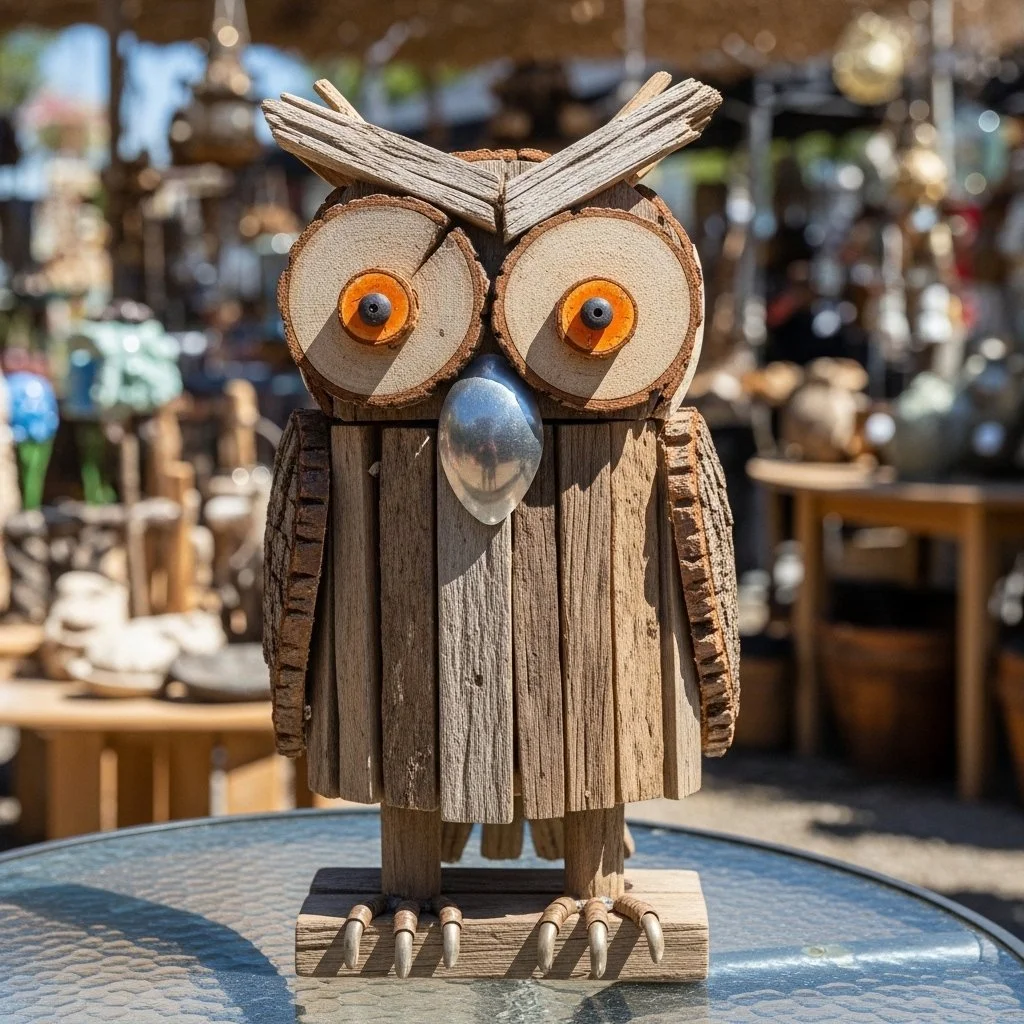
A busy afternoon turned into a mini workshop when my son asked for something to make right after school, and I had a pile of odd scrap boards on the garage shelf. We pulled out a larger board for the body, grabbed smaller offcuts for wings and a beak, and set up on the kitchen table with a bowl of water for quick hand rinses.
That little scramble became the Rustic Wood Owl Made from Scrap Wood Garden Art we still walk past in the yard, and it taught me how simple materials, a short list of tools, and a calm plan make a project that feels finished and proud in one afternoon. If you want a gentle, hands-on project that uses what you already have, this owl fits the bill and cleans up easy when the kids are done. For a different kind of heart-shaped challenge later this week, you might like our build heart stem challenge tutorial at Build Heart Stem Challenge.
Why This Rustic Wood Owl Made from Scrap Wood Garden Art Works So Well

This project stays low-prep because the materials come from the scrap pile or a single small trip to the garage. You do not need fancy wood or perfect tools. The cut shapes hide a lot of small mistakes, and rough edges add to the rustic look on purpose.
It feels approachable because each step is short and concrete. Trace, cut, sand, glue, mount, finish. You can pause at any stage without losing progress, which matters on busy afternoons or when kids join in.
It proves reliable for outdoor display. A light stain and a clear outdoor sealant keep the wood from weathering too fast. You do not need expert painting or woodworking skills to get a result that lasts through a season.
This craft fits real family schedules. You can split it into two short sessions: a cutting and assembly time, and a finishing session after paint or stain dries. That makes it easy to start now and finish later without pressure.
How This DIY Comes Together
This owl makes sense in small, steady pieces. Plan for about an hour of focused work for the cutting and assembly, plus drying time for glue and paint. Expect extra time if you stain carefully or seal in multiple coats.
Setup stays simple: clear a table or use a garage bench, lay down scrap paper for stain drips, and keep the small bowl of water for quick hand cleanup. Sanding usually makes the biggest mess, so a drop cloth under the sanding area helps.
The mess level stays low. You will find sawdust, some glue strings, and a little paint or stain on rags. That cleans up with a brush, a damp cloth, and the bowl of water for sticky hands.
Plan for adult involvement during the cutting and nailing steps. Kids can trace, sand, paint, and help glue. This mix keeps things safe and lets younger helpers take part without handling the saw or nails.
Materials You’ll Need
- Assorted scrap wood pieces (larger for body, smaller for wings and beak) common household offcuts, reclaimed boards work well
- Wooden garden stake or thin post (optional) optional if you want it freestanding or stuck in soil
- Sandpaper (coarse and fine grits) coarse for shaping, fine for smoothing for paint or stain
- Wood glue budget-friendly and strong for small garden art
- Small nails or screws use what fits your boards for extra hold after glue
- Hand saw or jigsaw hand saw works fine for soft wood scraps
- Pencil and ruler simple marking tools everyone has on hand
- Stain or outdoor paint stain gives a rustic look; paint adds color easily
- Clear outdoor sealant protects against rain and sun for longer life
- Small drill bit (optional) helpful for pilot holes if using screws or thin wood
- Cloth for wiping excess stain an old T-shirt or rag will do fine
- Small bowl of water for cleaning hands quick cleanup for fingers and glue
STEP-BY-STEP DIRECTIONS

- Choose a body board and trace an owl silhouette. Cut the silhouette with a saw.
Pick a larger scrap for the body. Trace a simple owl shape with a pencil, keep curves gentle, and saw slowly to follow the line. - Mark and cut eye shapes and a triangle for the beak.
Draw two round eyes and a small triangle notch for the beak. Cut out carefully and keep the eye holes clean with light sanding. - Cut wing shapes and sand all edges.
Use smaller scraps for wings. Sand both coarse and fine over rough cuts until the pieces feel smooth and sit flat. - Attach wings with wood glue and a small nail.
Spread glue thinly, hold each wing in place, and tap a small nail for extra hold. Wipe away any glue strings right away. - Glue and fix the beak into its notch, wipe excess glue.
Fit the beak into the notch and press until it seats. Remove extra glue with a damp cloth before it dries. - Mount the owl to a stake or backboard.
Center the owl on the stake or backboard and fix it with screws or nails through the back. Make sure it stands straight and steady. - Apply a light stain or paint, allowing each coat to dry.
Brush a thin stain or paint coat and watch it soak in or level out. Let it dry fully between coats for even color. - Seal with a clear outdoor sealant.
Spray or brush on a clear sealant and let it cure per the label. Two thin coats usually work better than one thick coat. - Place the owl in a suitable spot in the garden.
Choose a spot that shows off the face and keeps it somewhat sheltered from heavy weather for best longevity.
What Kids Practice While Making This

This simple project builds hand-eye coordination when kids trace and sand the pieces. Cutting and gluing give a safe taste of planning and sequencing. When they sand edges and match wing placement, they practice fine motor control and judgment.
Kids also learn cause and effect with drying times. They see glue go clear, watch stain darken wood, and understand why you wait between coats. That slow, visible change builds patience in a hands-on way.
If a child paints a little outside the lines, use that moment to talk about repair and fixing. A light sanding spot and a tiny touch-up coat show them how small fixes help a project look finished.
Troubleshooting Common Issues
If the cut looks uneven, you likely moved the saw too fast or the board shifted. Clamp the wood next time or saw more slowly along the line. Small waviness blends into the rustic look if you sand lightly.
If glue squeezes out and dries white, that means you used too much or did not wipe it quickly. Soak a cloth in warm water and rub gently before it fully cures, and sand lightly after drying if needed.
If the beak does not sit flush, check the notch depth. Remove the beak and shave a little wood off the back of the beak with sandpaper until it fits snugly. A small amount of glue behind the beak helps hold it without showing.
If paint or stain puddles or looks blotchy, stop and sand the area lightly once dry. Apply a second thin coat instead of a heavy first coat. Thin layers dry more evenly and show the grain better.
Easy Variations to Try
Painted eyes and feathers. Add simple painted patterns with a small brush for a playful look that kids love. Try a white ring around the eyes to make them pop.
Stacked body boards. Use two thinner boards glued together for a taller, sturdier board look and a more dimensional silhouette.
Seasonal accents. Tie a small ribbon, add a tiny felt hat, or glue a leaf collar in autumn for a seasonal touch that keeps the project fresh.
Different beak materials. Use a small broken pallet slat for a darker beak or paint the beak a contrasting color to highlight the face.
Making This Work for Different Ages. Young kids can trace, sand, and paint. Older kids can practice cutting with supervision and drive small nails or pilot screws under adult guidance.
Storing or Reusing This Project
If you plan to store the owl for winter, coat it with a generous sealant before storing in a dry shed. Remove the stake and wrap the owl in an old sheet to avoid scratches.
Reuse leftover pieces from the project for other small signs or markers in the garden. That keeps waste down and gives you a stash for easy future projects.
Clean brushes and cloths with water if you used water-based paint or stain. For oil-based products, follow label instructions and keep materials in labeled containers for next time.
Small nails and screws go into a jar for future use. Keep extra glue in a cool place so it lasts longer and stays ready for the next project.
FAQs About Rustic Wood Owl Made from Scrap Wood Garden Art
Can young kids help without getting hurt while you use a saw?
Yes. Kids can take part safely by tracing, sanding, and painting while an adult does the cutting and nailing. Keep the saw and nails away from small hands, and set a clear work zone so kids know where to stand.
How messy will this be and how long to clean up?
Expect sawdust, some paint or stain drips, and glue spots. Lay down scrap paper, keep a small bowl of water for hands, and use a damp cloth for glue. Most of the cleanup takes 10 to 20 minutes once the big pieces are done.
What if I do not have a jigsaw; can we still make this?
Yes. A simple hand saw works well for softwood scraps and keeps the pace calm. Cut slowly on marked lines and sand edges to tidy up the shape.
Will this survive outside or need regular upkeep?
With a light stain and a clear outdoor sealant, it will hold up through a season. Check the sealant each year and touch up paint or seal to keep it looking fresh. This is a garden accent more than a permanent fixture.
A Final Helpful Note
Keep expectations gentle and enjoy the small wins. If a wing sits a bit off or paint goes outside the line, that becomes part of the rustic charm. Split the work into short sessions when you need to, and let kids own the simpler parts. The whole point is to make something together that looks great in the garden and gives you a few quiet, hands-on minutes of creativity.
Conclusion
If you want to see other makers’ reclaimed bird art for inspiration, the Reclaimed Wood Owl – Etsy listings show different styles and finishes that spark ideas. For a tutorial that is similar in spirit and shows how others arrange small garden stakes, check this Scrap Wood Owl Garden Stakes – Homeroad guide.
PrintRustic Wood Owl Made from Scrap Wood Garden Art

A simple and approachable DIY project to create a rustic wood owl using scrap wood, perfect for hands-on creativity with kids.
- Prep Time: 15 minutes
- Cook Time: 45 minutes
- Total Time: 60 minutes
- Yield: 1 rustic wood owl
- Category: Craft
- Method: DIY Crafting
- Cuisine: N/A
- Diet: N/A
Ingredients
- Assorted scrap wood pieces (for body, wings, and beak)
- Wooden garden stake or thin post (optional)
- Sandpaper (coarse and fine grits)
- Wood glue
- Small nails or screws
- Hand saw or jigsaw
- Pencil and ruler
- Stain or outdoor paint
- Clear outdoor sealant
- Small drill bit (optional)
- Cloth for wiping excess stain
- Small bowl of water for cleaning hands
Instructions
- Choose a body board and trace an owl silhouette. Cut the silhouette with a saw.
- Mark and cut eye shapes and a triangle for the beak.
- Cut wing shapes and sand all edges.
- Attach wings with wood glue and a small nail.
- Glue and fix the beak into its notch, wipe excess glue.
- Mount the owl to a stake or backboard.
- Apply a light stain or paint, allowing each coat to dry.
- Seal with a clear outdoor sealant.
- Place the owl in a suitable spot in the garden.
Notes
This project is suitable for all ages with adult supervision for cutting and nailing. Offers a great chance to teach kids about patience and cause-effect relationships.
Nutrition
- Serving Size: 1 finished owl
- Calories: N/A
- Sugar: N/A
- Sodium: N/A
- Fat: N/A
- Saturated Fat: N/A
- Unsaturated Fat: N/A
- Trans Fat: N/A
- Carbohydrates: N/A
- Fiber: N/A
- Protein: N/A
- Cholesterol: N/A