

One busy afternoon, when the kids asked for something sparkly to make right now, I cleared a corner of the kitchen table, rolled out a parchment mat, and set out shells and glitter. Galaxy Crystal Seashells with Sparkling Colors felt like the perfect quick rescue: low prep, wildly pretty, and something everyone could help with while dinner simmered.
We worked in short bursts, wiped shells with alcohol, mixed a small batch of resin, and watched the tiny crystals settle like stars. If you want a calm, creative moment that finishes with a little shelf-worthy treasure, this is the kind of project that fits into a real afternoon. For more gentle ideas that pair well with this, check the quiet joy-making guide for a similar slow-craft vibe.
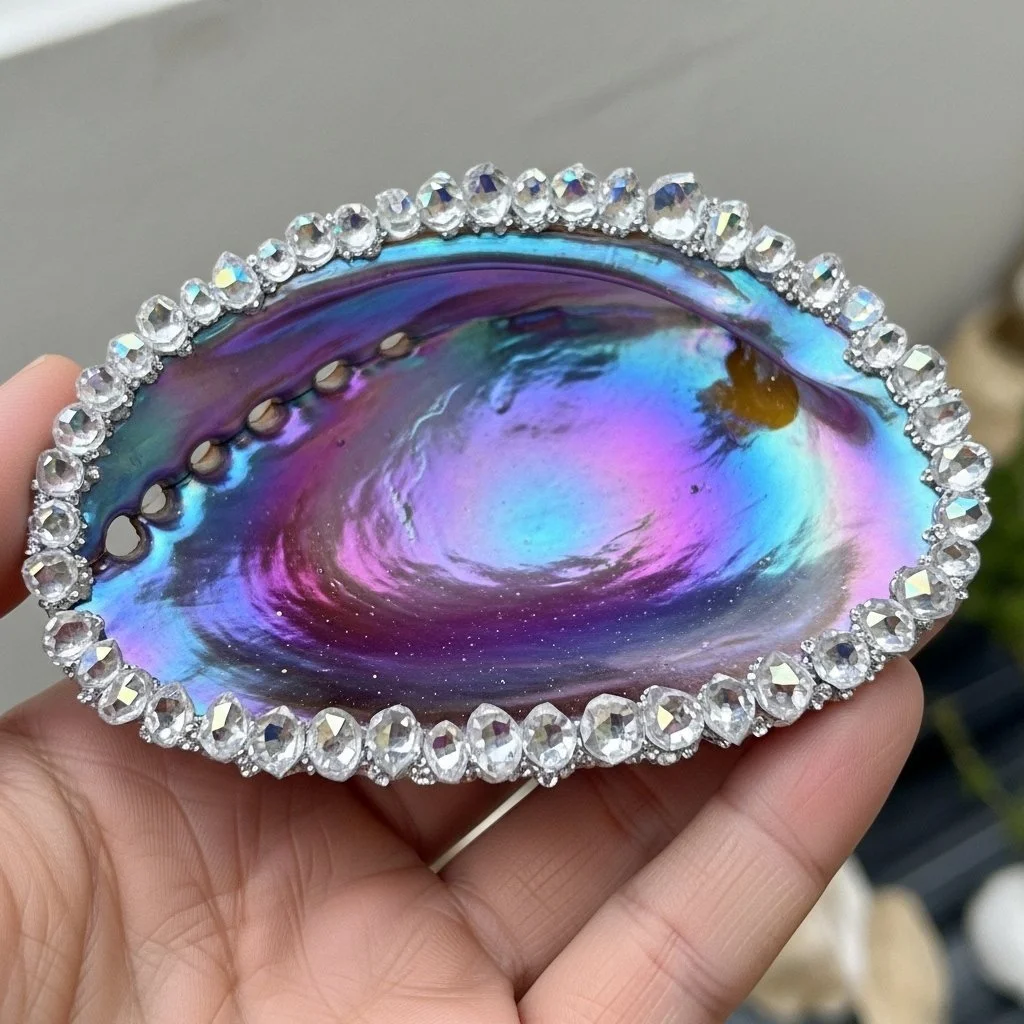
Why You’ll Love Making Galaxy Crystal Seashells with Sparkling Colors

This project works because it keeps things small and simple. You only need a few shells and a small mix of clear resin to get a big payoff. The materials sit ready on the table, so you can start in ten minutes and still be home in time for bedtime stories.
It fits real life schedules. Mix one cup, pour three shells, and pause while they cure. That break gives you time to prep snacks, answer a text, or tuck away messy bits. The project is low-prep and approachable, so kids and adults both feel like they can help.
It also feels reliable. Resin sets in predictable ways if you follow measurements and simple cues. You will see quick wins right away when the glitter catches the light and the crystals nest in the shells. If you want to experiment more, you can bring in colors and layouts slowly and confidently.
If you like recipes that reward small effort with pleasing results, this will become a go-to. For an alternate take with a similar technique, try the crystal seashells recipe that shares tips on color mixes and display ideas.
The Flow of Making Galaxy Crystal Seashells with Sparkling Colors
Start to finish, plan on about 30 minutes of active work and several hours of curing time. You do the hands-on parts first, then let the shells rest while the resin firms up. That makes this project easy to slot into a busy day.
Setup is low-mess. Lay a parchment mat, line up supplies, and work in small batches. You will want adult supervision for mixing and pouring because resin needs careful handling, but kids can place glitter and crystals and take charge of decorative choices.
Mess level stays manageable when you use disposable cups and keep stir sticks single-use. Any sticky drips wipe away with alcohol before they harden. Cleanup usually takes under ten minutes if you have a trash bag and paper towel handy.
Adult involvement is light but important. Measure and pour the resin, watch for bubbles, and handle the heat tool if you use one. Kids can arrange crystals, choose glitter, and admire the finished pieces.
Materials You’ll Need
Small clean seashells
Common household item: shells you or your kids collected, or craft-store shells.
Clear casting resin and hardener
Follow the manufacturer instructions for safe mixing ratios.
Disposable mixing cups
One cup per small batch keeps cleanup easy.
Stir sticks
Wood or plastic single-use sticks work well.
Fine glitter in pearlescent or iridescent tones (optional)
Optional for a soft shimmer; a little goes a long way.
Tiny crystal chips or crushed glass
Adds sparkle and weight; choose small pieces for best results.
Alcohol for cleaning
Simple rubbing alcohol to wipe shells and remove sticky fingers.
Nitrile gloves
Protect skin while handling resin.
Small funnel or pipette
Helps control pouring into small shell hollows.
Toothpicks
For nudging crystals and creating tiny designs.
Small soft brush
For dusting shells before and after pouring.
Sanding paper in fine grits (optional)
Optional for smoothing edges after curing.
Parchment or silicone mat to protect work surface
Prevents gluey resin from sticking to your table.
Small sealant spray (optional)
Optional for extra protection, especially if shells will get handled a lot.
Step-by-Step Directions

- Prepare your space and shells by laying a parchment mat on the table and wiping each shell with alcohol until clean.
Work in natural light if you can so you see dust. A quick brush before the alcohol helps. - Put on nitrile gloves and ensure your workspace is well-ventilated.
Open a window or use a fan to move air; safety keeps the project calm. - Measure resin and hardener according to manufacturer instructions, then pour into a disposable cup.
Use the exact ratio on the bottle; small errors change cure time and clarity. - Stir the mixture slowly and gently until well combined, watching for bubbles.
Stir for the time the manufacturer suggests and stop when the mix looks clear. - Add fine glitter or mica and crystal chips into the mixture, stirring slowly.
Add tiny amounts and watch how they float; too much can make the resin cloudy. - Test a small drop in a practice shell to see how it behaves.
This quick test shows how fast the resin levels and whether glitter settles. - Pour the resin into each shell using a pipette or funnel.
Fill gently to the level you want; small shells take only a spoonful. - Use a toothpick to arrange the crystals and glitter in desired patterns.
Work quickly but gently so things do not sink where you do not want them. - Pop any visible bubbles with warm breath or a heat tool.
Brief, gentle warmth helps bubbles rise; avoid blasting the resin. - Cover the shells to keep dust away while they cure.
A shoebox or plastic container works as a simple dust cover. - After curing, sand any sharp edges if necessary.
Use fine-grit paper and light strokes for smoothness. - Optionally, apply a sealant spray for added protection and let it dry.
A light coat preserves shine and keeps crystals in place. - Enjoy your finished Galaxy Crystal Seashells and experiment with different displays.
Place them on a dish, glue one to a hair clip, or nestle them in a glass bowl.
For more step ideas and close photos, the DIY crystal seashells guide shows a few layout tricks that work well with this flow.
The Simple Science or Skills at Work

This project gives kids a chance to watch cause and effect in a calm way. They see how mixing two liquids makes a hard surface later. That change feels almost like a small kitchen experiment.
Fine motor skills get practice when children place tiny crystals and use a toothpick to nudge things into place. Those small motions build coordination and patience.
You also get a bit of sensory learning. Resin feels forgiving while it flows, then becomes firm and glossy. Glitter and crystals add texture and light play. Talking about what you see helps build language and observation skills.
Finally, this project shows simple timing and planning. You mix, pour, and then wait. Waiting becomes part of the fun because the result rewards patience.
Troubleshooting Common Issues
If the resin looks cloudy after curing, it often means the mix ratio was off or you stirred too fast. You can usually avoid this by measuring carefully and stirring slowly. If cloudiness appears, try a small light sand and a thin top coat of resin or a sealant spray to restore clarity.
If glitter or crystals sink more than you expected, the resin likely took a bit too long to thicken. Next time, add fewer heavy pieces or pour in shallower layers. You can also arrange the crystals on a thin film of resin first, let that tack up slightly, then add a final clear layer.
Bubbles can be stubborn if you stir vigorously. Warm breath or a quick pass with a heat tool will pop most bubbles. If bubbles persist, wait a few minutes after mixing to let them rise, then pop them before pouring.
Dust settling on the surface happens if you do not cover the shells. A simple box cover removes this worry. If dust still lands, you can sand lightly after cure and add a thin topcoat for a clean finish.
If edges feel sharp, sand with fine-grit paper. Go slowly and check often. The shells will smooth out without losing their shine if you use light pressure.
If a shell cracks or chips during handling, keep a few extras on hand. Small accidents happen and extras save time and frustration. This project rewards a forgiving mindset.
Easy Variations to Try
Try a layered look by pouring a thin clear layer, letting it rest until tacky, then placing crystals and pouring a final layer. This helps heavier pieces float where you want them.
Use different crystal colors for small stories. Keep cool tones like blue and purple for a night-sky feel, or warm tones like gold and rose for a sunset vibe. Let kids pick a color story.
Make tiny gifts by gluing a shell onto a small magnet or hair clip after the resin cures. A quick accessory swap turns the shells into wearable or useful pieces.
Create a group display by arranging several shells in a shallow tray. Mix sizes and colors to make a little seaside galaxy.
For a quieter option, skip glitter and let the crystals do the sparkle. The shells look more natural but still have that jewel-like shine.
Storing or Reusing This Project
Store finished shells in a shallow box lined with tissue paper. Keep them flat so crystals do not knock against each other. Small compartments help avoid scratches.
Unused resin usually locks into a solid mass if left open. If you have a tiny leftover in a sealed cup, check the manufacturer instructions about saving it. Most people mix small batches to avoid waste.
Clean tools while the resin is still wet. Wipe stir sticks and cups with paper towel and alcohol before the resin sets. That stops hardened messes and saves time later.
If a shell loses a crystal, a tiny dot of fresh resin or clear craft glue will reattach it. Keep a small repair kit with a pipette and a tiny bottle of glue for quick fixes.
Think about reuse when planning. Keep extra shells for practice drops and let kids experiment with placement on a scrap shell before touching the real piece. You avoid waste and build confidence this way.
For a color-focused follow-up project, check ideas inspired by the turquoise crystal seashells collection to see how different tones change the look and storage needs.
FAQs About Galaxy Crystal Seashells with Sparkling Colors
How messy is this project and what should I expect for cleanup?
Resin can stick and look messy if you let it cure on your work surface. Lay down a parchment mat, use disposable cups and sticks, and wipe spills immediately with alcohol. Most cleanup takes five to ten minutes while the resin is still wet. If something cures on your table, gently scrape with a plastic scraper and sand the residue smooth.
Is this safe for young children to help with?
Kids can help with placing glitter and crystals, but an adult should handle the resin mixing and pouring. Wear nitrile gloves and work in a well-ventilated area. If a child has sensitive skin or breathing issues, keep them at a distance during mixing and curing. With those precautions, children can participate safely and enjoy the sparkly parts.
What if I do not have the exact materials on the list?
You can make small swaps for convenience, but stick to the main items: clear casting resin and hardener, shells, and small decorative pieces. If you skip glitter, the shells still look lovely with just crystal chips. Do not substitute unknown chemicals for resin. The materials list is short by design to keep things simple and predictable.
Will my finished shells look like the pictures every time?
Results vary a little. Crystal placement, glitter amounts, and how you pour the resin change the final look. That is part of the fun. Expect beautiful, handmade pieces rather than factory-perfect copies. Small flaws often add character and make each shell unique.
How long do the shells last and can I reuse the crystals?
Finished shells last a long time if you keep them dry and avoid dropping them. Crystals glued into cured resin usually stay put. If you need to remove a crystal, you can use a tiny amount of heat or careful prying, but that risks chipping the shell. Treat the shells gently and they will brighten a shelf or craft box for months or years.
A Final Helpful Note
One small habit makes this project easier: work slowly and in small batches. Mixing only as much resin as you need keeps stress low and mess small. If a step goes sideways, remember that a light sand or a thin topcoat will often save the piece.
Trust your eyes and fingers. If glitter looks too heavy, scrape a little out with a toothpick. If bubbles gather, give a gentle warm pass and wait. These tiny adjustments make a big difference and keep the project feeling calm and fun.
Most of all, enjoy the process. Kids remember the sparkle and the time you spent together more than perfect edges. Relax, let the shells cure, and then enjoy the shiny results.
Conclusion
If you want to see how others dress up shells, you can browse handmade options on Crystal Embellished Seashells – Etsy for inspiration. For a different crystal craft that uses similar sparkle and a short video walkthrough, try the Magical Crystal Ball Craft (with Video) – Sugar, Spice and Glitter.
PrintGalaxy Crystal Seashells with Sparkling Colors

A fun and creative project that turns seashells into sparkling treasures using clear resin and glitter.
- Prep Time: 10 minutes
- Cook Time: 0 minutes
- Total Time: 180 minutes
- Yield: Multiple shells
- Category: Craft
- Method: Crafting
- Cuisine: N/A
- Diet: N/A
Ingredients
- Small clean seashells
- Clear casting resin and hardener
- Disposable mixing cups
- Stir sticks
- Fine glitter in pearlescent or iridescent tones (optional)
- Tiny crystal chips or crushed glass
- Alcohol for cleaning
- Nitrile gloves
- Small funnel or pipette
- Toothpicks
- Small soft brush
- Sanding paper in fine grits (optional)
- Parchment or silicone mat to protect work surface
- Small sealant spray (optional)
Instructions
- Prepare your space and shells by laying a parchment mat on the table and wiping each shell with alcohol until clean.
- Put on nitrile gloves and ensure your workspace is well-ventilated.
- Measure resin and hardener according to manufacturer instructions, then pour into a disposable cup.
- Stir the mixture slowly and gently until well combined, watching for bubbles.
- Add fine glitter or mica and crystal chips into the mixture, stirring slowly.
- Test a small drop in a practice shell to see how it behaves.
- Pour the resin into each shell using a pipette or funnel.
- Use a toothpick to arrange the crystals and glitter in desired patterns.
- Pop any visible bubbles with warm breath or a heat tool.
- Cover the shells to keep dust away while they cure.
- After curing, sand any sharp edges if necessary.
- Optionally, apply a sealant spray for added protection and let it dry.
- Enjoy your finished Galaxy Crystal Seashells and experiment with different displays.
Notes
Keep adult supervision while handling resin. Use disposable materials for easy cleanup.
Nutrition
- Serving Size: 1 shell
- Calories: 50
- Sugar: 0g
- Sodium: 0mg
- Fat: 0g
- Saturated Fat: 0g
- Unsaturated Fat: 0g
- Trans Fat: 0g
- Carbohydrates: 0g
- Fiber: 0g
- Protein: 0g
- Cholesterol: 0mg