

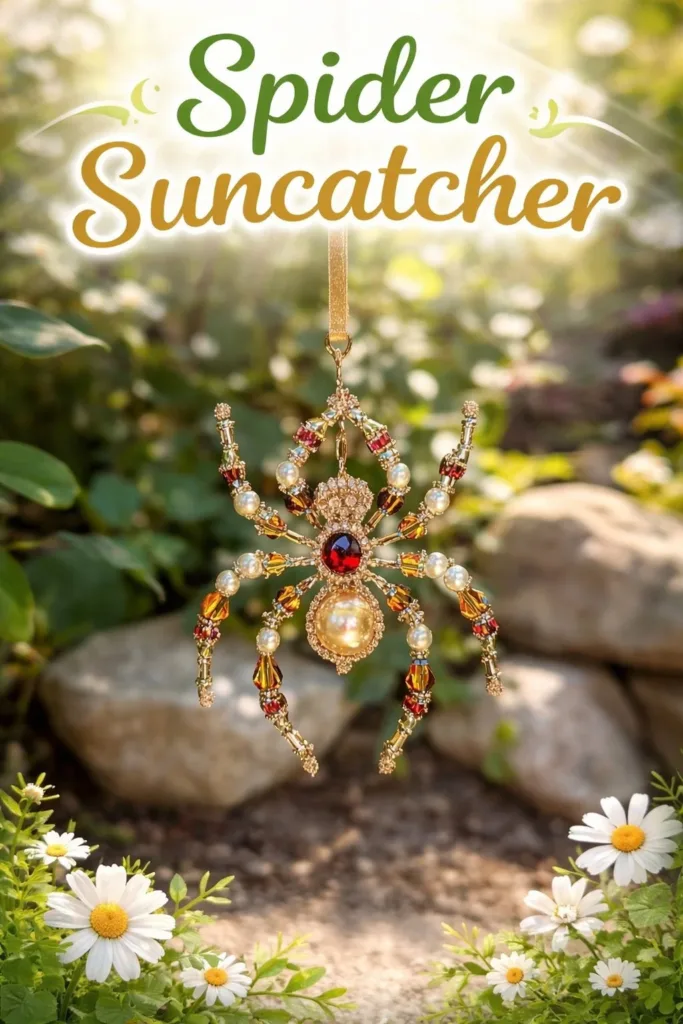
It was one of those busy afternoons when the kids burst in with, I want to make something now, and you have five minutes to set up a quick activity. I pulled a small tray of beads and thin craft wire and within ten minutes we had a Spider Suncatcher that caught our attention and the sunlight. This project fits that in-between moment: low-prep, satisfying, and forgiving when little fingers get involved. If you like quick, sunny crafts that look great on the first try, this Spider Suncatcher feels like an instant win, much like our favorite crayon suncatchers that work well for mornings when you need something cheerful and simple crayon suncatchers.
Why You’ll Love Making Spider Suncatcher

This suncatcher works so well because it asks for very little upfront and gives a clear, beautiful result. You only need a short length of wire and a couple of beads and you already have the main idea. No glue to dry, no paint to clean up, and no long waiting for anything to set.
It stays approachable for a wide range of ages. A young child can string beads, while an older child or adult shapes the legs with the pliers. That mix makes it a good team activity when time is tight but you still want something that looks made with care.
This craft is reliable. Wire stays where you put it, and beads catch the light even when they are simple acrylic ones. If you plan for a sunny window, you get an instant small art piece that rewards the effort the moment you hang it.
The materials are easy to find and most of them are reusable. You will not use a whole spool of wire or half a pack of beads for one spider. That low-waste setup keeps this project realistic for busy families who want a nice result without a big investment.
A Quick Look Before You Begin
Timing is short. From setup to hanging, plan 15 to 30 minutes depending on how detailed you want the legs and beads to be. That makes this ideal for an after-school activity or a calm weekend craft session.
Setup stays tidy. Use a small towel or shallow dish to catch rolling beads and a felt pad under your hands to protect surfaces. That simple prep cuts cleanup to a minute or two, which matters when you have other things to do afterwards.
Mess stays low. You might find a stray bead on the floor or a little wire scrap, but nothing wet or staining. That makes this project easy to do at the kitchen table without worrying about long cleanup.
Adult involvement depends on age. Younger kids will need help with wire cutting and bending. Teens and adults will handle everything on their own and can make more detailed leg shapes. If you want a quiet activity with low stress, this fits well and pairs nicely with other easy crafts like no-curl suncatchers for a full afternoon of making no-curl suncatchers.
Materials You’ll Need
Thin craft wire, 20 to 26 gauge
common and easy to bend, pick thicker for sturdier legs or thinner for more detail
Glass or acrylic beads in assorted colors and sizes
mix bright and clear beads for sparkle, acrylic is lighter for kids
A small round bead for the spider body
choose a noticeably larger bead so the body reads clearly
A tiny bead for the spider head (optional)
optional if you want a two-part look
Round-nose pliers
for making smooth loops and curves, not strictly heavy-duty
Wire cutters
for clean cuts; cheap ones work fine for thin wire
Flat-nose pliers
for pressing and flattening ends so nothing pokes
A jump ring or small metal loop for hanging (optional)
optional if you want an easy attach point
Fishing line, thin cord, or thread for hanging the finished piece
choose what matches your window and how invisible you want the hanger to be
A small piece of felt or cloth to rest your hands on
protects surfaces and gives a soft place to bend the wire
A soft towel or shallow dish to keep beads from rolling away
keeps tiny beads from disappearing under the table
Step-by-Step Directions

- Gather a small tray of beads and your tools.
Set the tray on a towel so beads do not roll away. Have pliers and cutters within easy reach. - Cut a length of wire about 8 to 12 inches long.
Measure roughly with your hand if you do not want to use a ruler. Longer wire gives longer legs and more shaping. - Thread the larger bead for the spider body onto the middle of the wire.
Center the bead so equal wire sticks out each side. You should feel the bead settle in the wire fold. - If using a head bead, thread it next to the body bead.
Slide the smaller bead up snug against the body so the two beads sit together. This adds a clear head and body shape. - Bend the wire under the beads and form a tight loop beneath the body.
Bring both wire ends down and under, then twist a small loop just under the beads to hold them in place. The loop should feel secure but not pinch the beads. - Divide the remaining wire into four segments for the legs.
Use your fingers to visually split each side of the loop into two leg sections. Small marks or finger spacing helps keep legs even. - Shape each leg by bending the wire at gentle angles.
Use round-nose pliers to create soft angles that look like spider legs. Aim for two bends per leg to mimic jointed limbs. - Add beads to the ends of some legs for weight and decoration.
Slide a small bead onto a leg and push it toward the end so it adds sparkle and a bit of weight. This helps legs hang nicely. - Wrap excess wire around the base beneath the body to secure the legs.
Take any extra wire and coil it neatly under the spider body. Wrap until the legs feel stable and do not slide. - Create a small hanging loop above the spider.
With round-nose pliers, make a simple loop at the top center of the wire so you can attach fishing line or a jump ring. Keep it small so it is neat in the window. - Trim any sharp ends and press them flat.
Use wire cutters to snip off leftover bits then press the ends against the base with flat-nose pliers. Run your fingers over the area to check for snags. - Attach a jump ring or tie fishing line to the hanging loop.
If you use a jump ring, open it gently with pliers and connect to the loop. If you use fishing line, tie a small knot and trim the tail. - Hang the suncatcher in a sunny window.
Pick a spot where light hits directly for at least part of the day. Step back and enjoy the way beads scatter color across the room.
Skills This Activity Supports

This little project gives hands-on practice in several useful areas. Kids work on fine motor control when they pick up tiny beads and thread them, which helps with handwriting and hand-eye coordination. Adults and older kids get to practice spatial thinking when they plan where each leg should sit around the body.
You also get a gentle lesson in cause and effect. Adding a bead to the end of a leg changes how the leg hangs. Wrapping wire tighter at the base makes the spider more stable. Those small, visible outcomes teach planning and quick adjustments.
There is a little science too. The beads refract and reflect light differently based on material and color. Glass beads tend to throw clearer, brighter little specks than acrylic, and clear beads often create tiny rainbows if the angle and sun cooperate.
Finally, this project offers a calm chance to practice patience. The steps happen slowly and clearly. That makes it a nice tool for teaching kids to follow a short sequence and see a quick result.
Troubleshooting Common Issues
If beads keep sliding to one side, it usually means the loop under the body did not sit tight enough.
You can reopen the loop slightly, reposition the beads, and tighten it again. Use flat pliers to press the wire down so the beads stay put.
If legs look uneven, do not panic; wire is forgiving.
Gently bend the legs one at a time until they match more closely. Small adjustments make a big visual difference without redoing anything.
If sharp ends poke your fingers, trim and file them flat.
Use cutters to snip closely, then press the short tail down with flat-nose pliers. You can also tuck it under a coil so nothing sticks out.
If the suncatcher twists and the spider faces sideways, your hanging line may be off-center.
Shift the knot or jump ring slightly until the spider hangs straight. Sometimes adding a tiny bead to one side balances it.
If you are worried about safety with little ones, keep cutters and pliers out of reach and let an adult do those parts.
Kids can still do the fun bits like choosing beads and threading them on when the wire pieces come back for the shaping.
You can also find inspiration and related ideas if you want to expand this into a small display. I like to pair multiple suncatchers to make a little window mobile, which balances visual interest across the glass.
Crayon suncatchers were a helpful go-to when I wanted a second, non-wire option for a younger group, and that planning often saves time and frustration during busy craft sessions.
Easy Variations to Try
Make a family of spiders in different sizes.
Use larger beads for big spiders and smaller beads for tiny ones so the display looks intentional.
Add a single bead on each leg for a beaded fringe look.
This gives movement and a little extra sparkle as the pieces sway in a breeze.
Use all-clear or all-dark beads for a mood shift.
Clear glass beads make more sparkles while dark or metallic beads feel more autumnal and dramatic.
Turn the spider into a Halloween ornament by adding a small ribbon loop.
Use black and orange beads for a seasonal look, but do not glue anything to the beads so you can reuse them later.
Try a double-body spider by using two larger beads and a tiny spacer.
That creates a chunkier, whimsical look and gives you an easy way to teach symmetry.
Storing or Reusing This Project
Store finished suncatchers on a soft cloth in a shallow box so they do not tangle or chip.
Lay them flat with a sheet of tissue paper between each piece if you have several.
Keep extra beads and small lengths of wire in a small tackle box or bead container.
Labeling compartments helps you find the colors quickly the next time you want to make more.
Reuse beads by carefully cutting the wire and sliding them off if you want to refresh the design.
Glass beads can be repurposed many times as long as you trim any damaged wire.
If cleanup is needed, a quick sweep of the towel usually gathers dropped beads and wire scraps.
Throw wire scraps away safely, and keep tools in a designated spot so they are ready next time.
This approach reduces waste and keeps your stash tidy and useful for future quick crafts.
FAQs About Spider Suncatcher
Is this safe for young children, and what should I watch for?
This is a great project for older toddlers with plenty of supervision, but wire cutting and pliers are for adults. Keep small beads away from children who still put things in their mouths. I often let the kids choose beads and hand them to me while I shape and cut the wire. That keeps them involved and safe.
How messy will this be and how long does cleanup take?
Cleanup is short. Most beads stay on the towel or dish you set up. If one or two roll off, they usually hide under a chair and come out with a quick sweep. I budget five minutes for cleanup so it does not feel like a big chore afterward.
Can I substitute materials if I do not have glass beads?
Yes. Acrylic beads work fine and are lighter for small hangings. I only recommend sticking to beads that have holes large enough for your wire gauge. If a bead is snug, do not force it; choose a different one to avoid breaking the bead or the wire.
What if my suncatcher does not look like the photos or others I have seen?
That is normal. Every spider will have its own character. Wire bends and bead sizes vary, so results will vary too. The goal is a pleasing, sun-catching piece that you and the kids enjoy. Small imperfections often give the piece personality, and most days I prefer those uniquely shaped spiders.
A Final Helpful Note
One last tip: work slowly the first time. Take a minute to feel how the wire bends and where the beads sit. That small pause saves frustration and gives you choices for leg angles and bead placement.
Be flexible with the result. If a leg bends the wrong way, adjust it. If a bead refuses to sit right, slide it and try again. The project rewards gentle corrections and curiosity.
Trust the process. This craft fits into a busy day and still gives a bright, proud result you can hang right away. Have fun, and know that you can easily make more variations next time.
Conclusion
If you want to see other handmade versions for inspiration, check out this collection of handmade designs on Etsy at Spider Suncatcher – Etsy which shows a range of sizes and colors to spark ideas. For a ready-to-hang option you can compare to your homemade version, take a look at this decorative idea at Hanging Spider Suncatcher – 8269.
PrintSpider Suncatcher

Create a vibrant spider suncatcher using beads and craft wire, a perfect quick activity for kids.
- Prep Time: 10 minutes
- Cook Time: 20 minutes
- Total Time: 30 minutes
- Yield: 1 suncatcher
- Category: Craft
- Method: Crafting
- Cuisine: N/A
- Diet: N/A
Ingredients
- Thin craft wire (20 to 26 gauge)
- Glass or acrylic beads in assorted colors and sizes
- A small round bead for the spider body
- A tiny bead for the spider head (optional)
- Round-nose pliers
- Wire cutters
- Flat-nose pliers
- A jump ring or small metal loop for hanging (optional)
- Fishing line, thin cord, or thread for hanging
- A small piece of felt or cloth
- A soft towel or shallow dish to keep beads from rolling
Instructions
- Gather a small tray of beads and your tools.
- Cut a length of wire about 8 to 12 inches long.
- Thread the larger bead for the spider body onto the middle of the wire.
- If using a head bead, thread it next to the body bead.
- Bend the wire under the beads and form a tight loop beneath the body.
- Divide the remaining wire into four segments for the legs.
- Shape each leg by bending the wire at gentle angles.
- Add beads to the ends of some legs for weight and decoration.
- Wrap excess wire around the base beneath the body to secure the legs.
- Create a small hanging loop above the spider.
- Trim any sharp ends and press them flat.
- Attach a jump ring or tie fishing line to the hanging loop.
- Hang the suncatcher in a sunny window.
Notes
Use a towel or shallow dish to catch rolling beads and create a tidy setup.
Nutrition
- Serving Size: 1 suncatcher
- Calories: 0
- Sugar: 0g
- Sodium: 0mg
- Fat: 0g
- Saturated Fat: 0g
- Unsaturated Fat: 0g
- Trans Fat: 0g
- Carbohydrates: 0g
- Fiber: 0g
- Protein: 0g
- Cholesterol: 0mg