

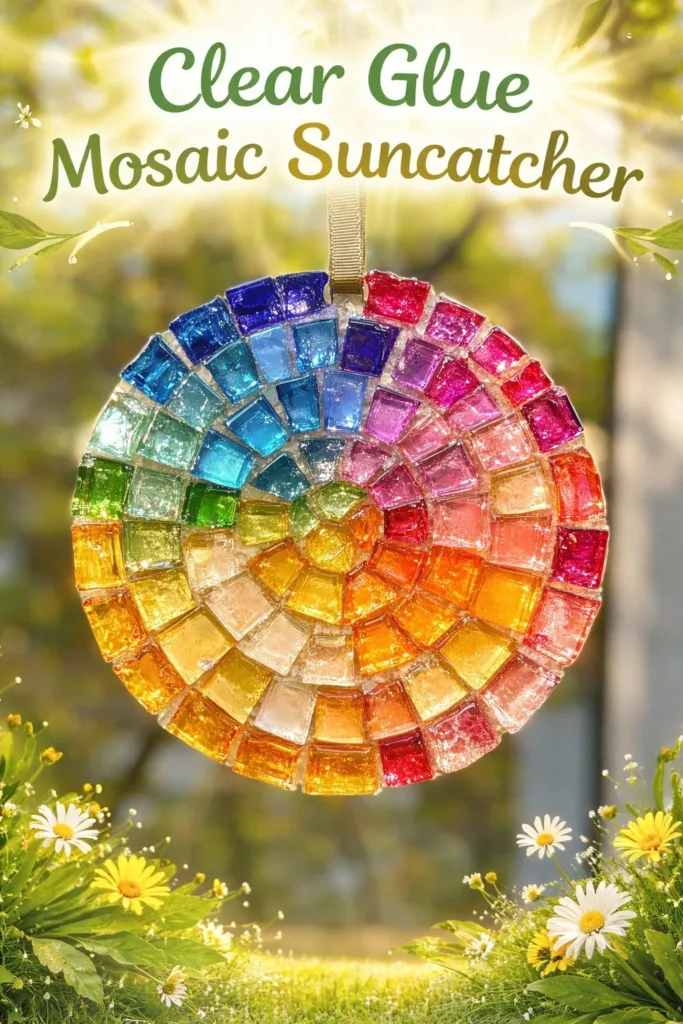
It was one of those busy afternoons when the kids announced they needed something to do right now and all you had was a kitchen table and a handful of craft bits. I cleared a small patch of counter, spread wax paper, and we turned a plain sheet of acetate into a Clear Glue Mosaic Suncatcher.
The glue setting, the clink of glass gems, and the surprise when sunlight finally hit the finished piece made the quick setup feel like a tiny holiday. If you want a low-stress, high-joy project that uses simple materials and gives real sparkle, this is it. For a similar, colorful twist, try the step-by-step ideas in this crayon suncatcher project that uses many of the same easy habits.
Why You’ll Love Making Clear Glue Mosaic Suncatcher

This project fits into short afternoons and last-minute craft urges because it needs little prep. The materials mostly come from home or a quick craft run. You do not need a special table or a fancy tool kit. That makes it easy when time is short or when kids want to start right away.
The steps let you work in small chunks. You can set a first layer, walk away while it firms up, and come back to add depth. That makes it handleable for busy caregivers or for short attention spans. It also produces reliable results. Clear glue hides glue lines well and the acetate stays flat, so when the sun hits the gems you get bright reflections without much fuss.
This project also scales for ages and patience levels. Young children can place larger beads while an adult adds smaller detail. Older kids can plan color patterns and layering. You get a satisfying finished piece that catches real light without complex cutting or kiln work.
The Flow of Making Clear Glue Mosaic Suncatcher
This project moves in clear stages: setup, placement, layering, finishing, and hanging. Setup takes only a few minutes. Placement is calm and tactile. Layering gives you a moment to step back and decide on detail.
You will see the glue shift from shiny wet to tacky to fully clear and cured. Those changes give good cues about timing. Cleanup stays simple if you use wax paper and a damp cloth. Expect a light mess from a few drips and some glue on fingers. That is normal and easy to handle.
If you want a different approach to simple window crafts that use household supplies, check out how we keep things tidy in our no-curl swirled heart suncatchers guide.
Materials You’ll Need
Clear craft glue (thick or gel finish)
Clear plastic sheet or thin acetate
Small glass beads, flat marbles, or glass gems (assorted colors)
Transparent craft gems or acrylic shapes (optional)
Craft sticks or palette knife
Trim scissors
Wax paper or nonstick craft mat
Fine-tip squeeze bottle or pipette (optional)
Small mixing tray or disposable plate
Lightweight string or clear fishing line
Small hole punch or heated needle
Paper towels and a damp cloth
Protective gloves (optional)
Each item keeps the project simple and honest. The glue forms the mosaic base, the acetate gives a stable, clear surface, and the gems supply the sparkle. The palette knife or craft stick helps move glue without sticking your fingers. Wax paper protects the table. The optional squeeze bottle helps if you want tidy puddles, but you can drop glue straight from the bottle and still get good results.
Step-by-Step Directions

- Prepare your workspace and base by laying wax paper on the table and placing the acetate sheet flat. Keep glue and gems within reach.
Set everything in a small circle so you do not have to stand up often. A damp cloth nearby helps wipe tiny drips right away. - Plan a loose design with scattered beads.
Talk with kids or helpers about colors and balance. Keep the design relaxed; mosaics look best with small gaps and natural spacing. - Place a small glue puddle for each piece and set a gem into the glue, pressing gently until it adheres.
Work slowly at first to get a feel for glue amount. Press just enough so the gem sits flush without sliding. - Continue adding pieces, leaving gaps for a mosaic effect.
Let the gaps create light breaks. You do not have to fill every space to make it look finished. - Use glue to connect pieces if needed.
Add tiny beads of glue between larger gems to anchor them. Use the craft stick to smooth any stray glue or to nudge things into place. - Let the first layer dry until tacky.
This usually takes 20 to 60 minutes depending on glue and humidity. The surface should feel slightly sticky but not wet. - Add a second layer for depth, placing smaller pieces carefully.
Work from larger to smaller pieces so the small ones sit on top. Use the palette knife to set the tiniest gems without smudging wet glue. - Create a hanging point by punching a hole or melting one with a needle.
If using a heated needle, have an adult handle this step and do it over a safe surface. Aim for the edge where the acetate is least crowded. - Allow to cure fully in a dust-free space for at least 24 hours.
Cover lightly with a box or a clean tray to keep dust off. Avoid moving it while curing for the clearest finish. - Clean edges with a damp cloth and trim as needed.
Trim the acetate to shape with scissors and wipe away glue smears while they are still soft. For small rough spots, a light rasp with scissors can help. - Hang in a window and enjoy the light reflections.
Use a short piece of fishing line or string looped through the hole. Watch the gems throw color across the room on a sunny day.
The Learning Behind This DIY

This activity practices several simple skills. Kids build fine motor control by picking up and placing small gems. They learn patience as they wait for glue to go from wet to tacky.
They also get early lessons in planning and cause and effect. If a gem slides when pressed, they learn to use less glue or hold it a little longer. If the layer looks flat, adding a second layer changes depth and the way light travels through the pieces.
There is gentle science at work too. Clear glue dries as water evaporates and the polymers set. That shift from glossy to tacky to solid gives a visible timeline children can observe. When light hits the finished suncatcher, refraction and reflection create bright spots and tiny rainbows. You do not need to use technical words to enjoy the result. Just pointing out how light moves through color helps kids notice simple optical effects.
If Something Doesn’t Go as Planned
If gems slide after placement, it usually means too much glue or the surface was tilted. Hold the gem in place for a few extra seconds or lift and reset using the craft stick. If a gem sinks slightly into the glue and looks dull, let it cure then add a tiny dab on top to bring back shine.
Bubbles can form in puddles if you squeeze too hard or stir. Tap the acetate gently on the table to lift bubbles to the surface. Use the flat end of a craft stick to smooth any large ones before the glue skins over.
If pieces fall off after curing, clean both surfaces with a damp cloth and reapply a tiny glue puddle behind the loose piece. Press and hold until the glue grabs. If edges look ragged after trimming, use a little glue along the cut edge and smooth with your finger to seal it.
Easy Variations to Try
Try a theme. Pick related colors like ocean blues or autumn tones and group gems to reinforce the theme. This keeps choices simple for younger kids.
Make a layered sun motif. Start with large central gems as a sun and scatter small beads outward as rays. Adults can guide the hole placement so it hangs centered.
Create mini suncatchers. Use small acetate circles and fewer gems for quick crafts that finish faster. These make great gifts or ornaments.
Seasonal accents. Add transparent acrylic shapes like leaves or stars for holidays. Because they are optional, you can tune complexity to your time and helpers.
Storing or Reusing This Project
If you want to reuse leftover gems, keep them in small containers or egg cartons. That keeps colors separate and makes picking faster next time.
Store unfinished suncatchers flat in a covered box while they cure. Do not stack finished ones until fully dry. For long term care, dust occasionally with a soft cloth and avoid direct heat near the glue.
To reduce waste, save small palette spills on wax paper and let them cure into textured bits for a future collage or filling for clear ornaments. Reuse the wax paper once if it is still clean to protect your table.
FAQs About Clear Glue Mosaic Suncatcher
What if my kids are messy and I am worried about glue everywhere?
I hear you. Expect a few drips and sticky fingers, especially the first time. Use wax paper under the acetate and keep a damp cloth and paper towels handy. Put paint shirts or old T-shirts on kids and work in small bursts. The cleanup usually takes a few wipes and a rinse, not a full sink overhaul.
Is this safe for younger children?
With supervision, yes. Young children do well placing larger gems. Keep an adult to handle the heated needle if you choose that option for the hanging hole. Small beads are a choking hazard, so do not use them unsupervised with toddlers. If you worry about edges, trim and sand any sharp acetate bits before giving it to a little one.
Can I substitute the clear glue or gems with something else?
Use only clear craft glue for the look and drying behavior we rely on here. Thinner white school glue may not stay clear or hold heavier glass pieces well. If you do not have glass gems, flat marbles or acrylic shapes work fine, but the final sparkle will vary. Be honest about what you have and expect the finished light play to match the materials.
How long will these last in a window?
If you hang them out of direct, extreme heat and do not drop them, these suncatchers can last for seasons. Sun will slowly age glue over long periods, so keep copies or plan to make another next year. They are meant to be enjoyed rather than kept perfect forever.
What if my result looks cloudy or has a lot of glue strings?
Cloudiness usually comes from trapped moisture or too thick a glue layer. Let it cure fully and avoid overly thick glue spots next time. If you have stray strings, use a damp cloth to pick them away while they are tacky or carefully trim them once dry.
A Final Helpful Note
You do not need perfect symmetry to get a beautiful result. The charm of a mosaic suncatcher comes from irregular spacing and the way light finds tiny gaps. Give yourself and the kids permission to experiment. Keep the workspace small, the steps clear, and the timing relaxed. If something goes sideways, treat it as part of the process. Most fixes are small and forgiving.
Conclusion
If you want a walk-through with slightly different materials and colorful design ideas, take a look at the clear techniques in this Colorful DIY Glue Suncatcher Craft at Mombrite for inspiration. For a focused look at mosaics with children and more context on simple mosaic methods, read this helpful guide on Making mosaic suncatchers at Glittering Shards.
You can do this in an afternoon, and you will finish with something that brightens a window and sparks a little pride.
PrintClear Glue Mosaic Suncatcher

Create a beautiful and colorful suncatcher using simple materials like clear glue and glass gems. Perfect for a fun afternoon project with kids!
- Prep Time: 15 minutes
- Cook Time: 1440 minutes
- Total Time: 1455 minutes
- Yield: 1 suncatcher
- Category: Craft
- Method: Crafting
- Diet: N/A
Ingredients
- Clear craft glue (thick or gel finish)
- Clear plastic sheet or thin acetate
- Small glass beads, flat marbles, or glass gems (assorted colors)
- Transparent craft gems or acrylic shapes (optional)
- Craft sticks or palette knife
- Trim scissors
- Wax paper or nonstick craft mat
- Fine-tip squeeze bottle or pipette (optional)
- Small mixing tray or disposable plate
- Lightweight string or clear fishing line
- Small hole punch or heated needle
- Paper towels and a damp cloth
- Protective gloves (optional)
Instructions
- Prepare your workspace and base by laying wax paper on the table and placing the acetate sheet flat. Keep glue and gems within reach.
- Plan a loose design with scattered beads, discussing colors and balance with kids.
- Place a small glue puddle for each piece and set a gem into the glue, pressing gently until it adheres.
- Continue adding pieces, leaving gaps for a mosaic effect.
- Use glue to connect pieces if needed, adding tiny beads of glue between larger gems.
- Let the first layer dry until tacky (20 to 60 minutes depending on glue and humidity).
- Add a second layer for depth, placing smaller pieces carefully on top.
- Create a hanging point by punching a hole or melting one with a needle.
- Allow to cure fully in a dust-free space for at least 24 hours.
- Clean edges with a damp cloth and trim as needed.
- Hang in a window and enjoy the light reflections.
Notes
Make sure to supervise young children, especially during the hole punching step. If using small beads, ensure they are not left unattended with toddlers to avoid choking hazards.
Nutrition
- Serving Size: 1 suncatcher
- Calories: N/A
- Sugar: 0g
- Sodium: 0mg
- Fat: 0g
- Saturated Fat: 0g
- Unsaturated Fat: 0g
- Trans Fat: 0g
- Carbohydrates: 0g
- Fiber: 0g
- Protein: 0g
- Cholesterol: 0mg