

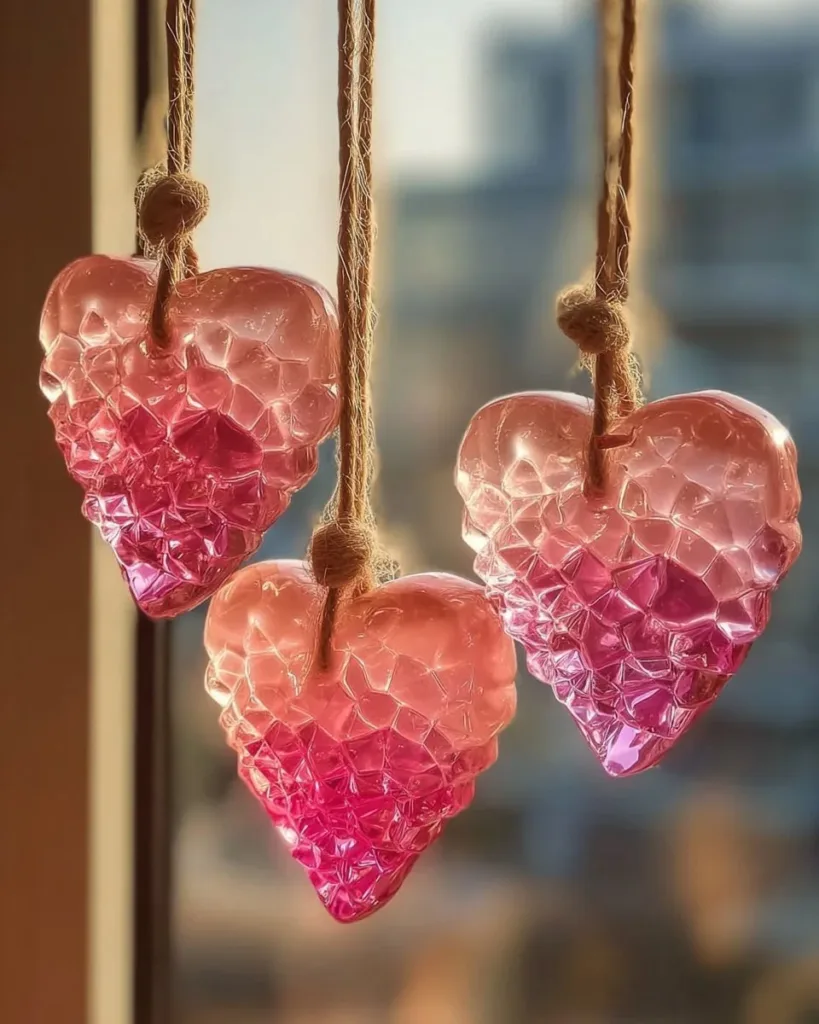
A busy afternoon, a kid at the table saying, I want to make something now, and a quick kitchen setup with items you already have that is where Growing Crystal Ornaments shine. These sparkly ornaments come together from simple pipe cleaners and a jar of borax solution, and they make a satisfying, hands-on project that feels special without a big prep fuss. If you like quick ornament ideas for family projects, try our birdseed ornaments later for a different kind of handmade holiday fun.
Why You’ll Love Making Growing Crystal Ornaments

This craft works well because it stays low-prep and flexible. You shape a design from pipe cleaners, mix a hot borax solution, and let time do most of the work. You get real crystals, not glued glitter, and that feels honest and impressive to kids.
The process fits small windows of time. An adult handles the boiling water and the mixing. Then you step back and let the jar sit. That means kids do the fun parts shaping, coloring, and checking the crystals without needing constant help.
This project also feels approachable because it uses everyday items. You do not need specialty tools. The materials are inexpensive and often already in the house. That makes this craft repeatable for another afternoon when someone asks to make something shiny.
A Quick Look Before You Begin
This activity takes about 10 minutes of hands-on preparation and then several hours to a day while crystals grow. Expect to spend under 30 minutes in active work, and then leave the jar undisturbed for best results. Plan on using a tray or paper towels to catch drips during the setup and removal.
Setup stays compact. Use a wide-mouth jar or heatproof cup that fits your shaped ornament without touching the sides. You will want a place to set the jar where curious hands will not bump it. A windowsill, a quiet shelf, or a high counter works well.
The mess level stays low if you work carefully with the hot water and keep paper towels handy. You will rinse and wipe things afterward, and the cleanup is mostly washing the jar and spoons. An adult should always handle boiling water and borax mixing. Kids can help with shaping, threading, and watching the crystals form.
Materials You’ll Need
Pipe cleaners in desired shapes
Cotton thread or thin fishing line
Wide-mouth glass jar or heatproof cup
Borax powder
Boiling water
Measuring cup and spoon
Pencil or clothespin
Heat-safe spoon
Small bowl (optional)
Gloves and safety glasses (recommended)
Food coloring or liquid watercolors (optional)
Paper towels
Tray
Notes: The pipe cleaners form the base and you can bend them into stars, hearts, or icicles. The cotton thread or fishing line suspends the shape without dissolving. Use a wide-mouth jar so the ornament hangs freely. Borax is the crystal-forming ingredient; handle it carefully and keep it away from small children and pets. Boil water only under adult supervision. Gloves and safety glasses protect hands and eyes while mixing hot solutions. Food coloring is optional and can tint crystals subtly. A tray catches spills and makes cleanup easy. If you enjoy crystal projects, see the rainbow crystal heart for another colorful idea.
Step-by-Step Directions

- Shape your ornament gently with your hands into a desired form (star, heart, icicle).
Make the shape smooth and avoid too-thin wire ends that could poke through later.
Keep the size small enough to sit inside your jar without touching the sides. - Tie a short loop of thread at the top.
Secure the loop with a tight knot so the ornament hangs straight.
Leave a little slack so the ornament can move slightly in the solution. - Boil water and measure one cup into your jar.
Pour carefully and keep the jar steady on a tray or heatproof surface.
An adult should handle the boiling water at all times. - Stir in 3-4 tablespoons of borax until dissolved.
Use a heat-safe spoon to stir and watch the powder disappear into the water.
If the borax keeps settling, add the extra tablespoon until it dissolves. - Optionally, add a tiny drop of food coloring and stir.
One drop gives a hint of tint; avoid adding too much or the color hides crystal detail.
Stir gently until the color looks even. - Suspend the shaped ornament in the jar using a pencil or clothespin.
Lay the pencil across the jar top and tie the thread so the ornament hangs freely.
Make sure the ornament does not touch the jar walls or the bottom. - Set the jar undisturbed on a shelf or windowsill.
Choose a quiet spot where the jar will not be bumped or jostled.
Keep the jar away from direct drafts or fans that might disturb the solution. - Wait and watch for crystals to form, checking after an hour and observing the next day as they grow.
You will see tiny crystals start on the wire within an hour on a warm day.
Check again the next morning to see larger, sparkly growth. - Carefully remove the ornament, let excess liquid drip off, and dry for 24 hours.
Lift the ornament straight up to avoid disturbing crystal patterns.
Set it on a paper towel or tray to drain and dry fully before handling. - Optionally trim rough edges and attach a final ribbon.
Use small scissors to tidy any prickly bits and make the shape comfortable to hang.
Add a pretty ribbon or loop for hanging on a tree or in a window. - Clean your materials and wash your hands.
Dispose of leftover borax solution down the sink with plenty of water, wiping the jar clean.
Wash hands with soap and water and rinse any tools used in the tray or sink.
The Simple Science or Skills at Work

This activity gives a gentle introduction to crystal growth and cause and effect. When you dissolve borax in hot water, the solution holds more borax than cold water can. As the jar cools, the extra borax leaves the solution and turns back into a solid. It collects on the pipe cleaner as tiny crystals. That is simple chemistry without complicated words.
Kids practice fine motor skills while bending pipe cleaners into shapes and tying knots in the thread. They learn patience while waiting for the crystals to build. They also get comfortable with observation as they check the jar after an hour and then again the next day. Those quick check-ins build scientific thinking without pressure.
The project also teaches careful handling of hot materials. An adult stirs and pours boiling water while explaining how safety gear helps. That models safe behavior around kitchens and makes the activity a real-life lesson as well as a craft.
Troubleshooting Common Issues
If crystals form only lightly or not at all, the solution may not have dissolved enough borax. Try adding the extra tablespoon and stir while warm. The solution should look clear with no granules sitting on the bottom.
If the ornament touches the jar side or bottom, crystals will grow differently and may get crushed when you remove the shape. Make sure the ornament hangs in the middle of the jar and has room to grow on all sides.
If crystals look dull or lumpy, they may have formed too quickly from a very hot or very cool drafty spot. Move the jar to a stable, room-temperature shelf and give it time. If you see weird clumps on the surface, carefully skim them off only after the solution cools and crystal growth slows.
If the color looks uneven, the food coloring may have mixed poorly. Next time add the drop before suspending the ornament and stir gently until the color spreads evenly. Small droplets give a subtle effect and usually look more natural.
Easy Variations to Try
Try tiny themed sets for a holiday display. Make small stars and hearts in matching colors and hang them together for a layered look. You can group several jars in one spot and compare how the crystals differ.
Experiment with different shapes and sizes. Thick shapes grow bigger crystals while thin wire forms fine, delicate crystals. A simple icicle shape makes a natural-looking hanging ornament that catches light.
Use pale color tints instead of bold dye. A single drop of watercolors creates a soft wash that makes the crystals look frosted rather than painted. That looks especially nice for a winter window display.
Adapt the project for older kids by letting them design their own shapes and take notes on timing and crystal size. They can record observations at one hour, four hours, and 24 hours to see how growth changes over time.
If you want a nature twist, make charms to hang in a bedroom window where morning light can catch the crystals. Keep the shapes small so they stay light and sparkly on delicate hooks.
Storing or Reusing This Project
Once dry, the ornaments keep well in a box lined with tissue or paper towels. Store them gently so edges do not rub against each other and break crystals off. For seasonal use, wrap each piece separately in tissue to save the delicate surface.
You can reuse some materials. Rinse the jar and spoon well with warm water. Pipe cleaners you want to reuse might lose crystal detail, so plan to use fresh pipe cleaners for new ornaments if you want a crisp base.
If you have leftover borax, store it in a labeled container out of reach of children and pets. Clean any spilled powder right away and keep the work area tidy. Reuse clothespins, pencils, and trays for future projects.
When you decide to dismantle an old ornament, soak it in warm water to dissolve the crystals and free the wire. That releases the pipe cleaner for recycling or another craft if it still looks usable.
FAQs About Growing Crystal Ornaments
Will this make a big mess?
I worry about borax and drips. I understand that worry. The project tends to stay neat if you use a tray and paper towels. An adult pours the hot water and mixes while kids do the shaping. Most spills wipe up easily, and rinsing the tray and jar finishes the cleanup. Keep borax in a bowl or container while measuring so you avoid scattering powder.
Is this safe for my kids to do?
This craft works best with adult supervision for the boiling water and the borax mixing. Gloves and safety glasses add a layer of protection during the hot steps. Kids can safely shape pipe cleaners, thread the loop, and watch crystals form after the adult handles the heat. If you have very young children or pets, keep borax and the jar out of reach while the solution sits.
Can I substitute borax with something else?
People sometimes ask about other salts. Borax gives reliable, sparkly crystals at room temperature. Other salts like alum or table salt may grow crystals, but they behave differently and may need different ratios or longer time. If you want to try a different material, treat it as an experiment and expect different results.
What if my crystals look small or patchy?
Small or patchy crystals usually mean the solution did not have enough dissolved borax or the ornament touched the jar. Add the extra tablespoon of borax next time and be sure the ornament hangs in the center. Moving the jar while crystals form can also cause patchiness, so set it somewhere steady.
How long will the ornaments last?
Properly dried ornaments can last for years if you store them carefully. They are fragile, so keep them wrapped and avoid jostling. If a crystal breaks, you can dissolve the remaining crystals and remake a fresh ornament using the same idea.
A Final Helpful Note
Take your time and enjoy the watching part. The best moment in this project is the gentle surprise when a plain pipe cleaner turns into a sparkly shape. It may not be perfect on the first try and that is okay. Each attempt teaches a little more about timing, temperature, and how crystals like to grow.
If something goes wrong, that is part of the process. Try again with a slightly warmer solution or give the jar a quieter spot. You will get reliable results with a little patience and careful handling.
Trust the simple steps, and remember that the point is the experience. Kids remember the making and the magic more than a flawless finish. Keep supplies handy, and you will have a go-to project for rainy afternoons and last-minute craft needs.
Conclusion
If you want a step-by-step example and photos that match this method, the Crystallized Icicle Ornaments with Borax tutorial shows a similar approach and helpful photos. For a bit more background on crystal growth and other ways to grow crystals at home, check How to Make Crystals: Grow Your Own Crystals for clear science notes and experiment ideas.
PrintGrowing Crystal Ornaments

A fun and engaging craft that teaches kids about crystal growth using simple materials like pipe cleaners and a borax solution.
- Prep Time: 10 minutes
- Cook Time: 60 minutes
- Total Time: 24 hours
- Yield: 1 ornament
- Category: Craft
- Method: Crafting
- Diet: N/A
Ingredients
- Pipe cleaners in desired shapes
- Cotton thread or thin fishing line
- Wide-mouth glass jar or heatproof cup
- Borax powder
- Boiling water
- Measuring cup and spoon
- Pencil or clothespin
- Heat-safe spoon
- Small bowl (optional)
- Gloves and safety glasses (recommended)
- Food coloring or liquid watercolors (optional)
- Paper towels
- Tray
Instructions
- Shape your ornament gently with your hands into a desired form (star, heart, icicle).
- tie a short loop of thread at the top and secure it with a tight knot.
- Boil water and measure one cup into your jar.
- Stir in 3-4 tablespoons of borax until dissolved.
- Optionally, add a tiny drop of food coloring and stir.
- Suspend the shaped ornament in the jar using a pencil or clothespin.
- Set the jar undisturbed on a shelf or windowsill.
- Wait and watch for crystals to form, checking after an hour and the next day.
- Carefully remove the ornament, let excess liquid drip off, and dry for 24 hours.
- Optionally trim rough edges and attach a final ribbon.
- Clean your materials and wash your hands.
Notes
Use a tray to catch drips. An adult should handle the boiling water and borax mixing. Kids can help with shaping and observing the crystals.
Nutrition
- Serving Size: 1 ornament
- Calories: 0
- Sugar: 0g
- Sodium: 0mg
- Fat: 0g
- Saturated Fat: 0g
- Unsaturated Fat: 0g
- Trans Fat: 0g
- Carbohydrates: 0g
- Fiber: 0g
- Protein: 0g
- Cholesterol: 0mg