

A busy afternoon had just settled in. The kids wanted something hands-on and there was only a short window before homework time. I pulled a clear heart ornament from a drawer and set up a simple crystal bath on the kitchen counter. Crystal Heart Craft fit the moment perfectly: low fuss, quick setup, and a striking result to show at dinner. If you like easy, family-friendly projects, you might also enjoy our build heart stem challenge, which uses the same make-it-together energy and simple supplies.
Why You’ll Love Making Crystal Heart Craft

This project works because it asks for almost nothing and gives something beautiful in return. You use items you likely have at home or can find at a corner store. The setup takes less than ten minutes, and then the real magic happens quietly while you do other things.
It stays calm and contained. You do not need a full workshop or fancy tools. The jar keeps the process tidy, so the mess stays small. That makes it great for school nights, rainy afternoons, or a weekend craft session.
It also fits different attention spans. Little ones can help with stirring and tying the string. Older kids can measure the solution and watch the crystals grow like a slow-motion surprise. The result looks impressive without demanding perfect technique.
A Quick Look Before You Begin
You should plan for an active setup time of about 10 minutes and a waiting window of several hours to overnight. The experiment needs a steady, undisturbed spot, so choose a place where your jar will sit undisturbed for the day.
Setup sits on the low-mess side. You may get a few drips when pouring warm solution, so keep a paper towel or cloth handy. Adult help works best during the hot water step and the pouring step. Kids do great with tying the string, holding the ornament, and watching the crystals form.
The process feels slow and rewarding. You will check on the jar, notice tiny sparkles, and feel pleased as the crystals grow. If you want more hands-on time, plan other small activities nearby that do not require moving the jar.
Materials You’ll Need
Clear glass or plastic heart ornament
common item; glass gives crisper crystals, plastic works for safety with young kids
Borax powder or baking soda
borax usually makes bigger, clearer crystals; baking soda works more slowly and forms different textures
Hot water
comfortably hot from a kettle or tap; adult handling recommended
Heat-safe jar
mason jar or old jam jar; must withstand hot water
String or thin fishing line
thin and steady; fishing line hides in clear crystals
Small spoon or stirring stick
for mixing; a chopstick or wooden stirrer works well
Measuring cup
simple measuring cup or a mug for estimating
Pencil or chopstick
to suspend the heart across the jar rim
Paper towel or cloth
easy cleanup for spills and drying the finished piece
Optional: food coloring, glitter, or small LED tealight
optional decorations; add color or a gentle glow once dry
STEP-BY-STEP DIRECTIONS

- Prepare your workspace in a calm, stable spot. Gather your materials.
Lay a towel under your jar to catch drips. Clear a small area so the jar can sit undisturbed.
Keep the measuring cup, spoon, ornament, and powder within arm’s reach. - Warm a cup or two of water until comfortably hot.
Use a kettle or microwave briefly, then test with your hand to ensure it is hot but not scalding.
Only adults handle the hot water step; let kids help with cooler parts. - Dissolve your chosen powder into the hot water, starting with one tablespoon at a time.
Stir each tablespoon thoroughly so the powder disappears before adding more.
Watch for a smooth, mostly clear solution as you mix. - Test saturation by ensuring some powder remains undissolved.
Stop adding powder once a little grit or sediment stays at the bottom after stirring.
That grit is a good sign that your solution holds as much mineral as it can. - Place the heart on a clean surface and tie a string to it.
Tie the string near the top of the heart so it hangs balanced and straight.
Trim any excess string so it does not dip into the solution twice. - Suspend the heart using a pencil or chopstick across the jar rim.
Lay the pencil across the jar and let the heart hang so it will not touch the jar sides or bottom.
Make sure the heart sits centered and has a small gap around it for crystal growth. - Pour the warm solution into the jar around the hanging heart carefully.
Pour slowly to avoid splashing and dislodging the string or heart.
Leave a little air space at the top so the heart does not hit the rim when it settles. - Find a quiet place for the jar to rest undisturbed, covering it loosely.
Cover the jar with a paper towel to limit dust but allow air to escape.
Place the jar where pets and curious hands cannot knock it over. - Watch for crystals to form, which may take several hours to overnight.
Check after a few hours for tiny crystals and then again the next morning.
You will notice a texture change on the heart surface as crystals attach and grow. - When the crystals look good to you, remove the heart and let it dry on a soft cloth.
Lift the pencil straight up to avoid breaking delicate crystal strands.
Blot gently with a cloth and let the heart air dry completely before adding glitter or a tealight.
The Simple Science or Skills at Work

This project uses a simple idea called saturation. Warm water holds more dissolved powder than cold water. When the solution cools, the extra powder comes out of the water and forms crystals. The heart acts like a little scaffold where these crystals find a place to stick.
You also practice measuring and observing. Stirring and measuring teach careful hands and steady attention. Watching crystals grow teaches cause and effect. The quiet waiting builds patience in a gentle, real way.
Fine motor skills benefit too. Tying a small knot, centering the heart, and lifting the pencil without jostling the jar help kids build careful movements. Those skills translate to other crafts and everyday tasks.
Troubleshooting Common Issues
If crystals stay tiny or sparse, you probably need a stronger solution. Make sure you stirred in powder until some remained undissolved, then try again with a fresh small batch. That extra saturation gives the crystals material to grow bigger.
If crystals look cloudy or dull, the jar or heart might have oil or dust. Rinse the heart with warm, soapy water and dry it, then restart. Clean surfaces give cleaner crystals.
If the heart touches the jar sides or bottom, the crystals may grow flat or only on one side. Re-suspend the heart so it floats free and centered. A little adjustment now saves disappointment later.
If the jar tips or spills, act quickly and safely. Wipe up hot liquid and rinse the area. If you used borax, avoid letting pets or small children touch the spill; borax can irritate. Use a damp cloth to clean and rinse with water.
If you see no change after a full day, check the solution temperature and saturation. Cooler rooms slow growth. Try a second jar with a slightly warmer solution and a small increase in powder to compare results.
Easy Variations to Try
Add a tiny drop of food coloring to the warm solution if you want colored crystals. Keep the color light so the crystals still look glassy and bright.
Mix a pinch of glitter into the solution after it cools slightly. The glitter catches light inside the crystal clusters and gives a bit of sparkle without changing the chemistry.
Try a plastic heart for younger kids. Plastic handles bumps better and still shows crystal texture. Glass tends to give sharper, clearer crystals but needs careful handling.
Hang several small ornaments in the same jar on different strings, spaced evenly. You will see crystals form on each and can compare how size and shape change with placement.
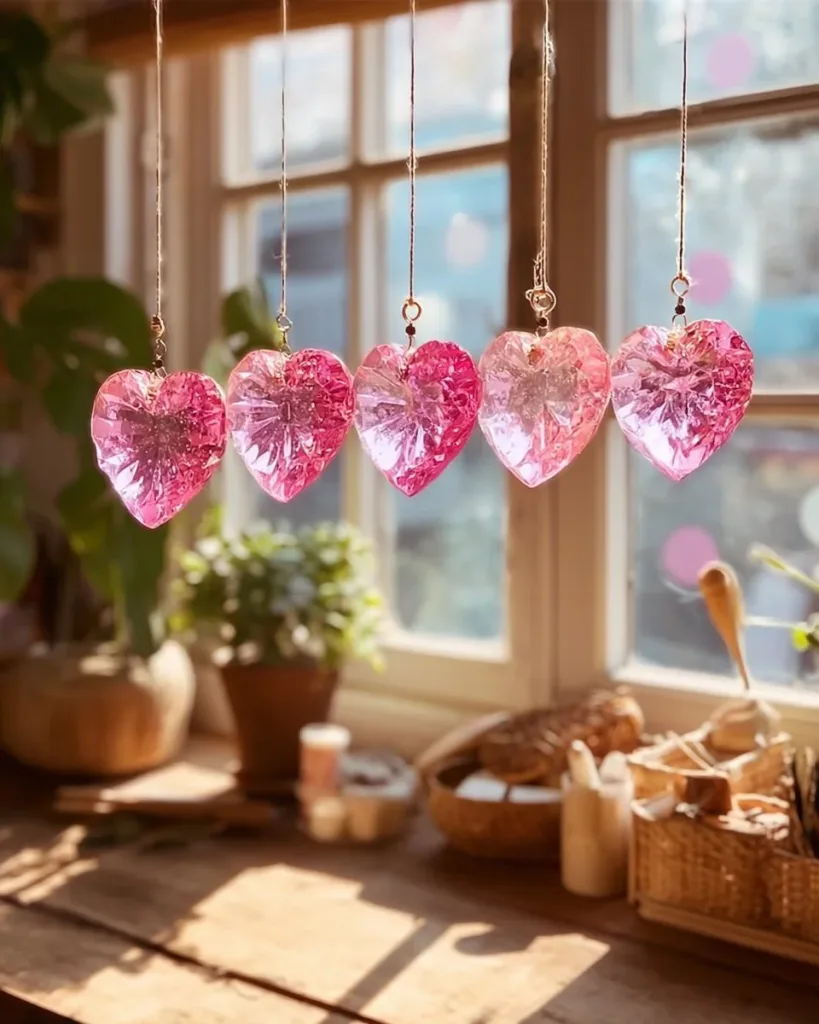
After the heart dries, tuck a small LED tealight behind it when displaying in a window. The light brings out depth in the crystals and makes the heart glow in the evening.
Storing or Reusing This Project
Store finished crystal hearts on a soft cloth or in a box with tissue to prevent nicks or broken crystals. Glass gets more fragile once crystals stick to it, so handle with care.
You can reuse the string and pencil for another round, but cleanup matters. Rinse the string well and let it dry. If the string has heavy crystal buildup, tie a new one for a cleaner result.
Dispose of leftover solution carefully. Let it cool, then pour it down the sink with plenty of water if you used baking soda. If you used borax, check local guidance and avoid giving the solution to pets or plants. Wipe spills and wash hands after handling.
Save clean jars and measuring tools for future projects. A dedicated jar for crystal experiments works well if you plan to repeat this craft. It keeps everything ready and cuts setup time.
FAQs About Crystal Heart Craft
Will this project make a big mess that I need to worry about?
You should expect only a few drips while pouring. The jar contains most of the action, and a towel underneath handles small spills. If you keep the jar covered loosely and pick a stable spot, cleanup stays simple. I have done this at the table several times with only one quick wipe afterward.
Is this safe for young children to do?
Kids love helping, but an adult must handle the hot water step. Little hands can tie the string, stir cooled solution, and watch the growth. If you use borax, keep it out of reach of pets and very young children and wash hands after contact. For preschoolers, consider using baking soda and a plastic heart.
Can I use something other than a clear heart?
This craft works best with a clear surface so the crystals show through. Plastic hearts work fine for safety. If you try colored glass, crystals still form but the color can change how the crystals look. Simpler is better for reliable results.
What if my crystals look different from pictures online?
Real crystals vary. They depend on solution strength, temperature, and how still the jar stayed. Tiny changes make different textures. That variety is part of the fun. If you want larger crystals, aim for a very saturated hot solution and place the jar somewhere stable and slightly warm.
How long will the crystals last on the heart?
Crystals hold for a long time if you keep the heart dry and handle it gently. Humidity or rough handling can dull or break them. Store the finished piece away from damp rooms and curious hands for the best display life.
A Final Helpful Note
This craft rewards calm and small care. You do the simple setup, then let time and steady molecules do their work. Expect imperfect but lovely results on the first try, and treat each attempt as a fun experiment, not a test. If something seems off, a small fix usually gets you back on track.
Trust your eye more than perfect measurements on the first go. With a little practice you will learn how saturated to make the solution for the size and shape you like. Most of all, enjoy the quiet surprise of watching ordinary things become sparkly.
Conclusion
If you want a photo guide that matches this project step for step, see this helpful tutorial for growing borax crystal hearts at Left Brain Craft Brain: How to Grow Valentine Borax Crystal Hearts. For another kid-friendly write-up that includes extra tips and pictures, Little Bins for Little Hands offers a clear walkthrough here: Borax Crystal Hearts (Easy Crystal Growing Experiment for Kids).
PrintCrystal Heart Craft

A fun and easy craft project to create beautiful crystal hearts using simple household materials.
- Prep Time: 10 minutes
- Cook Time: 480 minutes
- Total Time: 490 minutes
- Yield: 1 crystal heart
- Category: Craft
- Method: Crafting
- Cuisine: N/A
- Diet: N/A
Ingredients
- Clear glass or plastic heart ornament
- Borax powder or baking soda
- Hot water
- Heat-safe jar (mason jar or old jam jar)
- String or thin fishing line
- Small spoon or stirring stick
- Measuring cup
- Pencil or chopstick
- Paper towel or cloth
- Optional: food coloring, glitter, or small LED tealight
Instructions
- Prepare your workspace in a calm, stable spot. Gather your materials.
- Warm a cup or two of water until comfortably hot.
- Dissolve your chosen powder into the hot water, starting with one tablespoon at a time.
- Test saturation by ensuring some powder remains undissolved.
- Place the heart on a clean surface and tie a string to it.
- Suspend the heart using a pencil or chopstick across the jar rim.
- Pour the warm solution into the jar around the hanging heart carefully.
- Find a quiet place for the jar to rest undisturbed, covering it loosely.
- Watch for crystals to form, which may take several hours to overnight.
- When the crystals look good to you, remove the heart and let it dry on a soft cloth.
Notes
Adult supervision is required during the hot water step. Optionally, you can add food coloring or glitter for decorative effects.
Nutrition
- Serving Size: 1 heart
- Calories: 0
- Sugar: 0g
- Sodium: 0mg
- Fat: 0g
- Saturated Fat: 0g
- Unsaturated Fat: 0g
- Trans Fat: 0g
- Carbohydrates: 0g
- Fiber: 0g
- Protein: 0g
- Cholesterol: 0mg