

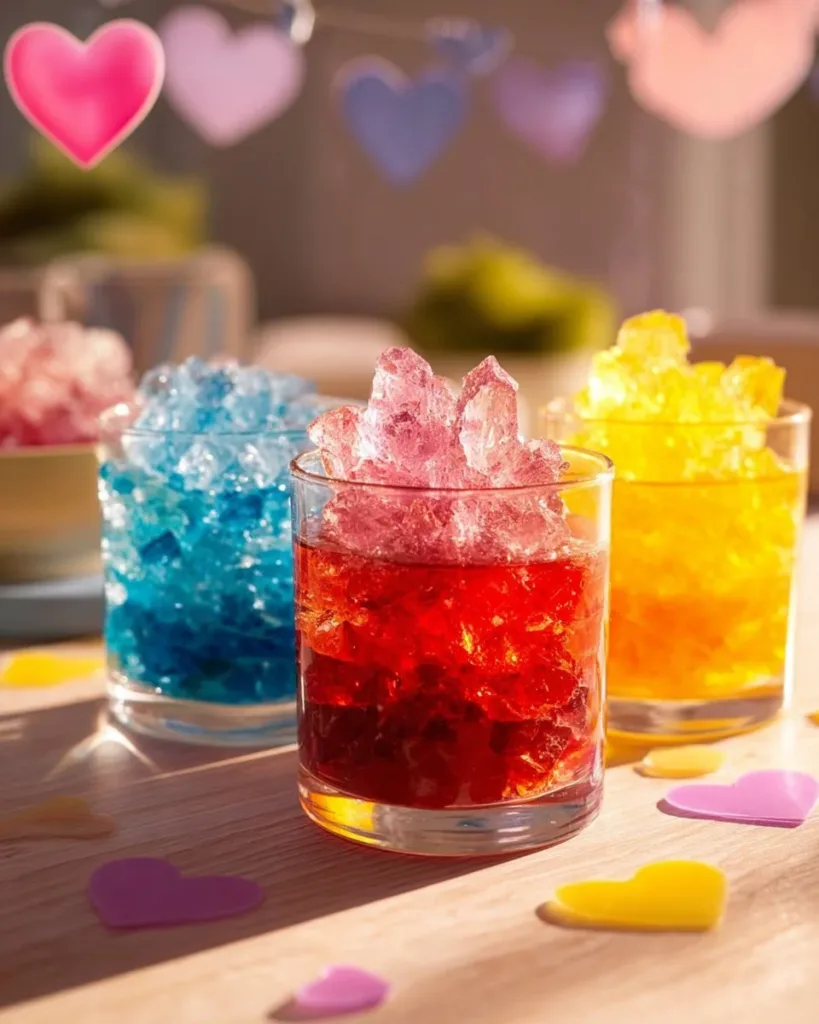
A busy afternoon, a last-minute “what can we make now?” from the kids, and a small stack of clear jars on the counter that is where Rainbow Crystal Rocks (No Borax!) fits in perfectly. I remember one Saturday when I had a load of laundry in the dryer and two hungry kids asking for an activity.
We pulled together salt, a little food coloring, and some old glass beads, and within a day we had bright, glassy crystals that felt like tiny trophies. This project lives in those small real-life moments: quick to set up, gentle on the schedule, and satisfying when the first sparkly flakes appear on a stone. If you like low-prep kitchen science that still looks like real art, this one will feel right at home with your weekend rhythm and the rest of our playful experiments like the Rainbow Light Show project.
Why You’ll Love Making Rainbow Crystal Rocks (No Borax!)
 30")
This activity shines because it keeps things simple and real. You use items that live in most kitchens. Warm water, one of three common salts or sugars, and a few jars do most of the work. You do not need special chemicals or long prep. That makes it easy to start on a weekday or after dinner.
The process fits short attention spans and busy grown-ups. Much of the work is hands-off waiting, so you do a little mixing and then let time do the rest. That means you can tidy up, serve a snack, or switch laundry loads while the crystals grow.
It also gives reliable, visible results. You usually see tiny crystal films form within the first day and larger, sparkly clusters after a couple of days. The outcome rarely disappoints when you follow the simple steps and keep the jars in a quiet spot.
This project appeals across ages. Little hands can stir and drop in color while older kids measure and label jars. Adults can guide safety and the more careful steps, like draining crystals without chipping them. It makes a great family pause that ends with something pretty to display.
A Quick Look Before You Begin
You will spend about 10 minutes preparing and then step back for 12 to 48 hours of quiet growth. Set up on a tray or a towel to catch drips. Expect a little salt or sugar residue around the jars as the liquid evaporates. That wipes up easily with a damp cloth.
Mess level stays low if you use a tray and paper towels. Kids will want to stir and poke at things. That is normal. Give them a small job like holding the stirring stick or dropping beads into jars. You will need to check the jars after the first day and then again every day or two.
Adult involvement matters at the beginning and when you lift the finished crystals. Heat and splashes can happen, and heavy glass jars need steady hands. Otherwise, plan to enjoy watching crystals form while you do other small chores.
Materials You’ll Need
Table salt, sugar, or Epsom salts
common household item; choose one to experiment with
Warm water
from a kettle or microwave; warm to the wrist
Clear jars or shallow dishes
recycled jars work well
Small pebbles, glass beads, or stones (optional)
use found stones or craft beads
Food coloring or liquid watercolors
a few drops will do
A stirring stick or spoon
for mixing and gentle placement
Measuring cup and teaspoon
to keep amounts consistent
Paper towels and a tray
for catches and easy cleanup
A fine-mesh strainer (optional)
helps remove undissolved grains
Labels or small sticky notes
use to record which jar has which color
STEP-BY-STEP DIRECTIONS
 31")
- Warm gentle water in a kettle or microwave until it feels warm to the wrist.
Pour into a measuring cup slowly. Warm, not hot, helps dissolve more salt or sugar. - Stir in salt or sugar slowly until a few grains remain undissolved at the bottom.
Work in small spoonfuls and watch the solution get clearer as it dissolves. - Let the solution settle until it looks clear.
Bubbles and foam calm down in a few minutes; wait so crystals start from a calm liquid. - Add a few drops of color and stir.
Start light color concentrates as the liquid evaporates. A little goes a long way. - Place stones or beads in the bottom of your jars or tray.
Arrange them how you like; they give crystals something to cling to. - Pour the colored solution over the stones or into the shallow dish.
Fill to a level that covers the stones but leaves some air at the top of jars. - Cover loosely with a paper towel and let air move.
Paper towels let air in and dust out. Do not seal tightly. - Find a quiet place to leave the jars where they will not be disturbed.
A shelf away from drafts and direct sunlight works well. - Check after 12 to 24 hours; resist the urge to rearrange stones.
You will see tiny crystals at first. Moving things can break them or slow growth. - When crystals reach a size you like, lift them carefully and let excess liquid drain.
Use the stirring stick or a spoon to support the piece as you lift it out. - If growth slows, refresh the solution by adding more salt or sugar.
Saturation drops as liquid evaporates. Top up gently to encourage more crystals. - Enjoy the finished piece by displaying or arranging them.
Set them on a tray or in a glass bowl. They make cheerful little decorations.
The Simple Science or Skills at Work
 32")
This activity practices clear, simple science ideas in a hands-on way. When warm water holds more dissolved salt or sugar than cool water, we call it a saturated solution. As the water cools and slowly evaporates, the dissolved material needs a place to go. It comes out of solution as solid crystals.
Kids learn cause and effect by watching change across time. They see how stirring, temperature, and surface area affect crystal formation. They also get small measurement practice when they add spoonfuls of salt or sugar and learn to pour without spilling.
Fine motor skills get a workout too. Dropping beads into jars, stirring without splashing, and lifting crystals carefully all build control. Older kids can practice labeling jars and noting which material makes the biggest crystals.
You get a visual reward for patience. The slow build of crystals helps children learn to wait and check back. That waiting time gives room for curiosity, observation, and more conversation about what they notice.
Troubleshooting Common Issues
If the solution looks cloudy and stays that way, it likely has too many undissolved grains. Let it sit longer or strain it through a fine-mesh strainer. Warm the liquid gently and stir again if needed.
If you see no crystals after a couple of days, check the temperature and placement. Too much air movement or a spot that gets direct sun can slow even growth. Move a jar to a stable shelf and avoid windy areas.
If crystals form but flake off easily, they probably grew too quickly. Too-fast evaporation or very hot starting water can cause fragile crystals. Try a slightly cooler solution next time and cover more snugly with a paper towel.
If colors look pale or muddy, you may have mixed colors that bleed together. Use single colors per jar for the cleanest hues. If you want layered color, wait for one layer to set slightly before adding a different color on top.
If a jar spills or drips on counters, salt or sugar will leave gritty residue once it dries. Wipe up spills right away with a damp cloth, then dry the surface. A tray under the jars prevents this problem.
Easy Variations to Try
Try different bases. Use table salt, sugar, or Epsom salts in separate jars to compare crystal shapes and speed. Each material grows a little differently. Note which you prefer.
Make a color gradient. Pour pale color in one jar and stronger color in another. When crystals are ready, arrange them in order on a shallow dish for a rainbow display.
Use tiny toys or trinkets as bases. Small plastic figures that can stand safely in jars make crystals form around them. This creates a frozen-in-time look kids love.
Try shallow dishes for flatter crystals. A wide, shallow pan creates broad crystal sheets rather than tall clusters. These look pretty laid flat on a tray.
Adjust the waiting time for different ages. For very young children, check after 12 hours and celebrate small, early growth. Older kids can plan for multi-day observation and measurements.
For a related twist, try a sugar-based activity that makes colorful sugar art, like our fireworks approach to sugar experiments with a similar tabletop setup and playful results at different temperatures and stirring speeds. See the step-by-step fun in our fireworks rainbow sugar explosion guide.
Storing or Reusing This Project
If you want to keep your crystals on display, place them on a plate or in a dry glass bowl. Avoid very humid rooms like a steamy bathroom; moisture can soften crystals over time.
To store crystals long term, let them dry completely and keep them in a sealed container with silica gel if you have it. Otherwise, an airtight jar or box in a cupboard keeps dust off and slows any moisture changes.
You can reuse the beads and stones once you dissolve the crystals. Soak them in warm water and then scrub gently to loosen the residue. A soft brush helps remove stubborn bits. Let stones dry completely before starting a new batch.
If you need to clean jars for another project, fill them with warm water and a little dish soap, let them soak, then rinse and dry. Paper towels and a tray make cleanup quick.
To reduce waste, use recycled jars, reuse paper towels where possible, and keep leftover solution in a labeled container for a day or two if you plan to refresh jars. Always discard any solution you do not plan to reuse after a few days.
FAQs About Rainbow Crystal Rocks (No Borax!)
Will this make a huge crystal like the ones in photos?
Those large single crystals take special conditions and time. With table salt, sugar, or Epsom salts you get clusters and sparkly coatings that look beautiful but usually stay small. Expect charming, decorative crystals rather than giant mineral specimens. That said, they look very pretty when grouped together.
Is this messy or hard to clean up?
It can leave gritty residue where drips happen, but I find a tray and a damp cloth keep mess low. If kids drip a colored solution, wipe it up right away. Jars rinse easily. Plan a small cleanup time after you lift the crystals and you will not be stuck with sticky counters.
Can little kids do this on their own?
Kids can do many parts, like stirring, dropping beads, and adding a few drops of color. An adult should handle warming water, pouring, and lifting heavier jars. For preschoolers, make tasks short and step in for any hot-water steps.
What if I do not have food coloring?
Liquid watercolors work too. If you have only powdered colors or spices, test a tiny amount first some materials do not dissolve well and can make the solution cloudy. Clear, liquid color gives the best bright crystals.
How long will these crystals last?
When kept dry and out of humid air, the crystals can keep their look for weeks or months. They can soften if you leave them in damp rooms. If they dull, you can gently dry and refresh them, or make a fresh batch using the same stones and jars.
A Final Helpful Note
This project rewards a steady, patient approach rather than perfection. Expect trial and error in color strength, crystal size, and placement. That is part of the fun. If one jar gives tiny crystals and another gives big clusters, celebrate both outcomes and talk about why they differed.
Keep a small notebook or sticky notes to record what you used in each jar: salt, sugar, or Epsom salts; how warm the water felt; and how many spoonfuls you added. Those little notes help you repeat your favorite results next time.
Most of all, enjoy that quiet, curious time with your kids. The mixing and waiting teach observation and calm. The finished crystals make a bright reminder that simple kitchen science gives big joy.
Conclusion
If you want a deeper read on growing colorful crystals and the classic borax method for comparison, check out this helpful tutorial on how others grow rainbow crystals with borax in a step-by-step guide: Grow Your Own Rainbow Crystals. For a clear, picture-rich walkthrough of the borax crystal process and what to expect from that approach, this Instructables guide covers the method in detail: How to Grow Borax Crystals : 7 Steps (with Pictures) – Instructables.
PrintRainbow Crystal Rocks (No Borax!)
 33")
Create colorful crystals using common kitchen items for a fun and educational activity with kids.
- Prep Time: 10 minutes
- Cook Time: 720 minutes
- Total Time: 730 minutes
- Yield: Varies
- Category: Craft
- Method: Crafting
- Cuisine: American
- Diet: N/A
Ingredients
- Table salt, sugar, or Epsom salts
- Warm water
- Clear jars or shallow dishes
- Small pebbles, glass beads, or stones (optional)
- Food coloring or liquid watercolors
- A stirring stick or spoon
- Measuring cup and teaspoon
- Paper towels and a tray
- A fine-mesh strainer (optional)
- Labels or small sticky notes
Instructions
- Warm gentle water in a kettle or microwave until it feels warm to the wrist.
- Pour into a measuring cup slowly, ensuring it’s warm, not hot, to help dissolve more salt or sugar.
- Stir in salt or sugar slowly until a few grains remain undissolved at the bottom.
- Let the solution settle until it looks clear.
- Add a few drops of color and stir.
- Place stones or beads in the bottom of your jars or tray.
- Pour the colored solution over the stones or into the shallow dish.
- Cover loosely with a paper towel and let air move.
- Find a quiet place to leave the jars where they will not be disturbed.
- Check after 12 to 24 hours; resist the urge to rearrange stones.
- When crystals reach a size you like, lift them carefully and let excess liquid drain.
- If growth slows, refresh the solution by adding more salt or sugar.
- Enjoy the finished piece by displaying or arranging them.
Notes
This project teaches kids about chemistry in a fun and hands-on way. Be patient, and enjoy the process of watching the crystals grow.
Nutrition
- Serving Size: Varies
- Calories: 0
- Sugar: 0g
- Sodium: 0mg
- Fat: 0g
- Saturated Fat: 0g
- Unsaturated Fat: 0g
- Trans Fat: 0g
- Carbohydrates: 0g
- Fiber: 0g
- Protein: 0g
- Cholesterol: 0mg