

It was a busy afternoon and the kids announced they wanted to make something right now, not tomorrow. I cleared a small patch of kitchen counter, set out a bowl, and we made Magical Bouncy Balls together. The whole thing felt doable between snacks and a homework break. If you like projects that wrap up fast and leave a little glitter in their wake, this one fits the bill and pairs nicely with other simple crafts like the Magical Snowstorm in a Jar craft for a cozy craft day.
Why You’ll Love Making Magical Bouncy Balls

This project works because it keeps things small and focused. You do not need fancy tools or long prep. The materials live in most homes or run errands that take five minutes. That means you can drop this into a busy afternoon without rearranging your schedule.
It is approachable for kids who can stir and measure. Younger children enjoy the sensory part and older kids like shaping and customizing color and sparkle. Most of the time the glue and contact lens solution create a nicely stretchy mix that pulls together quickly.
It is also reliable. The chemistry is simple and predictable when you follow the small list of ingredients. With a little patience while the mixture firms, you will get a ball that bounces and feels squishy. Expect some variation in bounce and firmness depending on small differences in stirring, temperature, and how much cornstarch you add.
Finally, it respects real life. Cleanup is straightforward, spills rinse away with warm water, and leftover mixture stores for a short time if needed. You will come away with a fun, quick result and a sense of pride that you made something playful out of everyday items.
A Quick Look Before You Begin
Take about 20 to 40 minutes from start to finish, depending on shaping and drying time. The active mixing and hands-on part usually takes 10 to 15 minutes.
Setup takes just a bowl, a spoon, and a wipeable surface. Lay down a paper towel or a silicone mat if you want to limit glitter trails. Have a small cup of water and wet wipes nearby for quick fingers.
Mess level is low to moderate. Glue is sticky, so expect a little on hands and spoons. Glitter can escape, so sprinkle only what you want. Most spills rinse away with warm water. If you want less cleaning, use a tray to contain materials.
Adult involvement depends on age. For preschoolers, measure and pour for them and let them stir. School-age kids can handle most steps with a quick safety reminder about the contact lens solution. If you want a quieter moment, plan this during a snack and let older kids run it themselves. And if you like combo craft sessions, this pairs well with paper crafts like the Magical Snowstorm in a Jar craft for a two-part afternoon activity.
Materials You’ll Need
1/2 cup white school glue
common household item; the standard PVA glue used in schools
1/4 teaspoon baking soda
common pantry item; helps set the glue and change texture
1 tablespoon contact lens solution (must contain boric acid)
necessary activator; check the ingredient label for boric acid
1 tablespoon cornstarch
optional thickener; smooths the texture and helps with shaping
1/2 cup warm water
simple and easy to measure; helps dilute the glue for a smoother mix
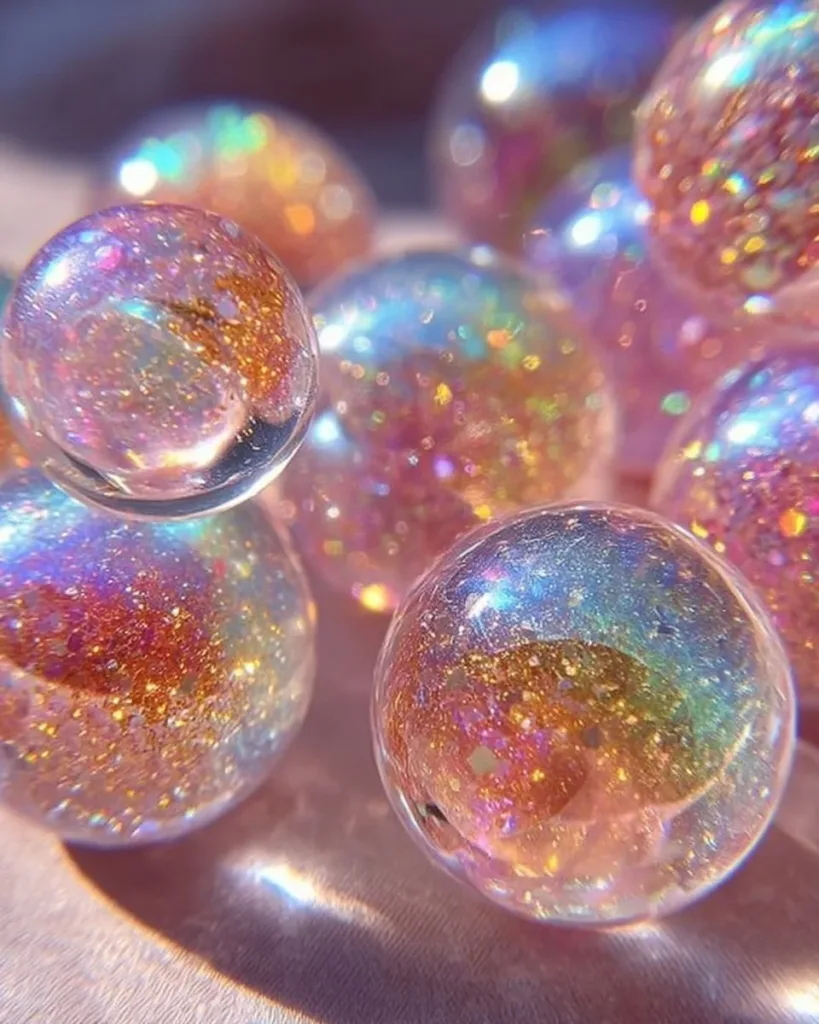
Fine glitter (any color or a mix for fairy dust effect)
optional; adds sparkle and visual fun, use sparingly for easier cleanup
Food coloring (optional, for added color)
small drops go a long way; gel or liquid both work
STEP-BY-STEP DIRECTIONS
- Start by taking a small mixing bowl and combining the white school glue with the baking soda.
Stir well until the baking soda fully dissolves into the glue. You will see a slightly thicker, cream-colored mix. - Now, pour in the warm water, followed by the contact lens solution!
Give it a good stir as the mixture starts to thicken into a gel-like consistency. Tiny bubbles may appear; that is normal. - Gradually mix in the cornstarch, continuing to stir until the mixture is well combined.
The mix should come away from the sides and feel less sticky. Add glitter or a drop of food coloring while stirring if you like.
The three steps above are the heart of the process. After step 3 you can shape the ball with clean hands and roll gently until it feels smooth. If the mix still sticks to your fingers, let it rest for a minute, then knead lightly. If you added glitter, roll on a clean surface to avoid losing sparkle to the floor. Trust your hands. They tell you when the ball is ready.
The Simple Science or Skills at Work

This activity works because the glue contains long molecules called polymers that move freely when wet and stick together when we change their environment. The baking soda and contact lens solution change how those glue polymers link up, making the mixture firmer and bouncier.
Cornstarch helps by absorbing extra moisture and giving the ball a denser feel. It also makes the surface less sticky so you can shape it. Glitter and food coloring only change how it looks, not how it behaves.
Beyond chemistry, this project builds useful skills. Kids practice measuring small amounts, stirring with control, and watching cause and effect—add one ingredient and notice how the texture changes. Rolling and shaping exercise fine motor skills and coordination. The clean up teaches responsibility: put lids back on, wipe the counter, and store extras properly.
Troubleshooting Common Issues
If the mixture stays sticky and will not form a ball, it likely needs a little more contact lens solution or a bit more cornstarch. Add a drop or two of solution, stir, and test again. Add cornstarch in small amounts, like 1/4 teaspoon at a time.
If the ball feels crumbly or falls apart, it probably has too much cornstarch or too little glue. Add a small splash of warm water and knead gently to bring it back together. Work in a tiny amount at a time so you do not make it too soft.
If the ball will not bounce much, it may simply be a softer, denser result. Try rolling it tightly in your hands for a minute; the friction often firms the surface. On a later try, reduce the cornstarch slightly for more bounce.
If you notice strands or a slimy residue while stirring, stir more slowly and scrape the bowl sides with a spatula. Sometimes air gets mixed in which shows as bubbles; let the mixture sit for a few minutes to let bubbles settle before shaping.
If glitter flakes fly everywhere, stop and press the glitter into the surface of the ball as you shape it. Or mix glitter into the bowl very gently so fewer particles escape. A tray under your workspace helps with quick cleanup.
If you worry about the contact lens solution, read the label. Use a brand that clearly lists boric acid. If a child touches the solution, wash hands promptly. Do not let kids put their hands near eyes during the activity.
Easy Variations to Try
Try adding a tiny pinch of neon chalk powder for a chalky look that still bounces. Mix it in early so the color spreads well.
Make mini bouncy balls by using smaller measurements in the same ratio. You get bite-sized toys that fit in a pocket.
Create a two-tone ball by splitting the glue mix, coloring each half differently, then roll them together gently without overmixing so you keep a marbled pattern.
Add glow-in-the-dark paint or powder to the glue before adding activator for a night-play version. Test a small amount first to see how it affects texture.
For a seasonal twist, use gold and red glitter for holiday colors or pastels and pastel glitters for spring. Present them in small jars as simple handmade gifts.
These are suggestions, not rules. Small changes affect texture, so try one change at a time and keep notes on what works for you.
Storing or Reusing This Project
Finished bouncy balls keep best at room temperature in a small airtight container or a zip-top bag. They can harden over time but often stay playable for a few weeks.
If a ball dries out or gets tacky, you can try kneading in a drop of warm water and rubbing until the surface softens slightly. If it falls apart, pull the pieces together and press firmly; sometimes gentle heat from your hands rebinds them.
Leftover paste in the mixing bowl can be stored briefly in a sealed container. If it smells off or changes color, toss it. Do not put leftover glue mix down the sink without diluting with a lot of water, and wipe the bowl with a sponge first.
To reduce waste, make small batches that will get used. If a child loses interest mid-project, keep shaped balls in their container for later play rather than throwing them away. When you finish the day, put lids on everything, wipe the surface, and launder any towels that picked up glitter or glue.
If you want ideas for pairing this craft with another simple activity for a whole afternoon, try combining it with our Magical Snowstorm in a Jar craft. The two crafts use similar materials and give kids two different sensory experiences to enjoy.
FAQs About Magical Bouncy Balls
Will this make a big mess in the kitchen?
It can, but it usually does not if you set up a small work area. Use a tray or tablecloth, keep wet wipes handy, and limit glitter. If glue gets on countertops, warm soapy water lifts most of it. I have done this with preschoolers and teenagers and the cleanup was quick when we contained the craft space.
Is it safe for my child to handle the contact lens solution?
Contact lens solution is safe when used as directed but it is not food. It must contain boric acid for this recipe to work. Keep the bottle capped when not pouring, and remind kids not to touch their eyes during the project. If solution gets on skin, wash with soap and water. If it gets in eyes, flush with water and seek advice if irritation continues. I always supervise the step where the solution is added.
Can I swap the cornstarch or baking soda for something else?
These specific ingredients help the texture and set the glue. Using them gives you the predictable results parents and kids enjoy. If you must substitute, do so cautiously and in small trials. For this activity, follow the materials list for the best outcome.
How long do the bouncy balls last?
They will hold up for days to weeks depending on play, storage, and humidity. If you want them to last longer, keep them in a small container and out of direct heat or sunlight. They will not last forever but they will provide several good play sessions.
What if my child is disappointed because their ball does not bounce as much as another child’s?
That happens. Different batches vary a bit. Encourage them to notice texture, color, and feel. Offer to make a new batch together and try a small tweak, like a bit less cornstarch. This teaches problem solving and patience.
A Final Helpful Note
You do not need perfect results to have a successful craft session. Small differences in texture or bounce do not make a project a failure. Focus on the hands-on moments: the stir, the swirl of glitter, the quiet pride when a child rolls a ball smooth.
If you want to keep things calm, prepare materials in small bowls and work in short bursts. Celebrate small wins, and remember that the clean up is as much a part of the routine as the making. Keep it simple, keep it fun, and enjoy the little bit of wonder that comes with a glittery, bouncy creation.
Conclusion
If you want a ready-made option to compare your homemade bouncy balls, you can see a commercial set at Creative Kids Magic Bouncy Balls on Amazon for ideas about size and sparkle. For more variety in store-bought novelty toys, check out this selection at Magic Ball listings at Walmart.
PrintMagical Bouncy Balls

A fun and quick project for kids to make bouncy balls using simple household ingredients. Perfect for a busy afternoon of craft and play.
- Prep Time: 10 minutes
- Cook Time: 10 minutes
- Total Time: 20 minutes
- Yield: 4 bouncy balls 1x
- Category: Craft
- Method: Mixing
- Cuisine: N/A
- Diet: N/A
Ingredients
- 1/2 cup white school glue
- 1/4 teaspoon baking soda
- 1 tablespoon contact lens solution (must contain boric acid)
- 1 tablespoon cornstarch
- 1/2 cup warm water
- Fine glitter (optional)
- Food coloring (optional)
Instructions
- Combine white school glue and baking soda in a small mixing bowl and stir until dissolved.
- Add warm water and contact lens solution, stirring until the mixture thickens into a gel-like consistency.
- Gradually mix in cornstarch until well combined; the mixture should feel less sticky.
- Shape the mixture into a ball with clean hands, possibly adding glitter or food coloring during shaping.
Notes
Use a tray or tablecloth to contain messes, and have wet wipes handy for cleanup. Adult supervision is advised for younger children, especially when using contact lens solution.
Nutrition
- Serving Size: 1 ball
- Calories: 25
- Sugar: 0g
- Sodium: 10mg
- Fat: 0g
- Saturated Fat: 0g
- Unsaturated Fat: 0g
- Trans Fat: 0g
- Carbohydrates: 6g
- Fiber: 0g
- Protein: 0g
- Cholesterol: 0mg