

It started as one of those busy afternoons when the kids announced they needed something to do right now, and you had two minutes to set up something that would hold their attention. Colorful Chromatography Coffee Filter Butterflies: Fun for Kids fit the bill perfectly. I cleared a corner of the kitchen, grabbed a tray and some markers, and in a few minutes we had a table full of bright, blooming filters and very excited helpers. If you like quick kitchen science that doubles as a craft, this project pairs well with our easy salt volcano science experiment for a full afternoon of hands-on learning and play.
Why This Colorful Chromatography Coffee Filter Butterflies: Fun for Kids Works So Well

This activity needs almost nothing from your supply cabinet and rewards you fast. Kids see color move and change right away, and that visual payoff keeps them engaged. The materials stay familiar and safe, so little helpers feel confident using them. You do not need fancy tools or a perfect setup to get great results.
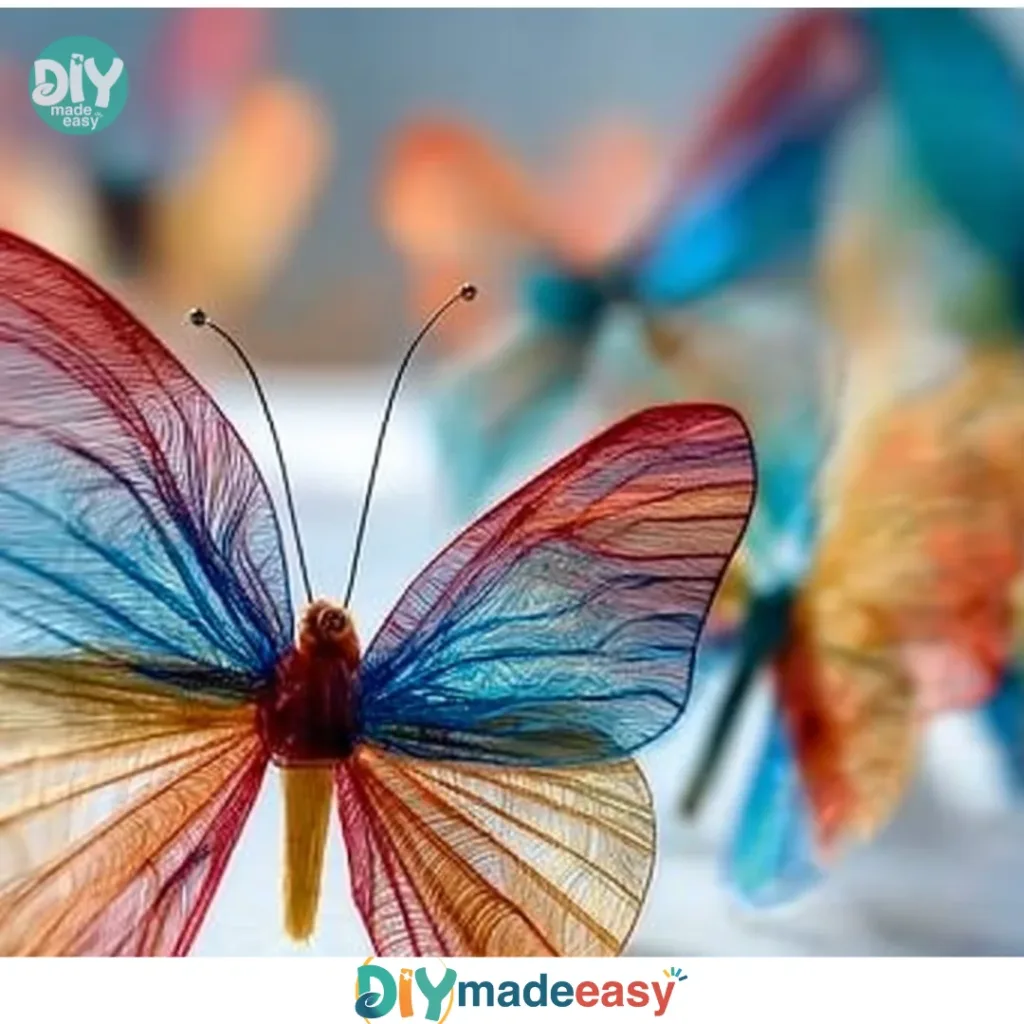
Chromatography with coffee filters gives dramatic, unpredictable colors that still feel controlled. The markers set up the pattern, and water teases the colors apart. That slow, satisfying bloom makes a simple scribble look intentional and artful. The rest of the craft pinching, twisting the pipe cleaner, adding eyes stays easy and clear for young hands.
Because the project spreads across short, repeatable steps, it fits real-life schedules. You can set it up during a snack break, let the filters dry while you tidy up, and finish the butterflies at bedtime. The low-prep start and quick wins help you keep things calm on a busy day.
A Quick Look Before You Begin
This project takes about 30 to 45 minutes from start to display if you work steadily. Expect a bit of extra time if filters need longer to dry or if little ones want to re-spray and experiment. Set aside a tray or baking sheet to catch drips and make cleanup simple.
You will want one adult nearby for younger kids when they spray water and use glue. Older children can do this largely on their own with light supervision. The mess level stays low if you use the tray and keep wipes handy for marker smudges and glitter spills.
Plan for small pauses. Wet filters sit for a few minutes while colors spread and then for drying. Those pauses give you time to move on to decorating or to prepare additional filters for more rounds of color play. If you like projects that feel lively but still manageable, this one fits right in.
Materials You’ll Need
5 pieces White Coffee Filters (Unbleached filters give vibrant results.) common household item, gives best color separation
10 pieces Washable Markers (Use high-quality, water-based markers.) essential for bright blooms, washable helps with cleanup
1 unit Spray Bottle (For applying water to the filters.) refill from faucet, fine mist works best
5 pieces Pipe Cleaners (Choose fun colors for added flair.) acts as the butterfly body and antennae
1 unit Tray or Baking Sheet (To catch excess water.) protects your table, easy to rinse
1 pack Googly Eyes (Optional for adding character.) optional but fun for faces
1 pack Glitter (For extra sparkle, optional.) optional, use sparingly for easier cleanup
1 pack Stickers (For personalization, optional.) simple way to add detail without glue
Step-by-Step Directions

- Flatten each white coffee filter into a circle on the tray.
Draw several dots, rings, or scribbles with washable markers across the top and center.
Use bright, contrasting colors near each other for more dramatic separation. - Hold the spray bottle about 8 to 12 inches away and mist the colored filters lightly.
Aim for an even, fine spray so the ink blooms slowly.
Colors will start to spread outward almost immediately. - Allow the filters to dry flat on the tray or a dry surface until they feel barely damp or dry to the touch.
A warm room speeds drying.
You can also use a hair dryer on low to assist with drying, but keep it moving to avoid blowing the colors away. - Once dry, pinch each filter gently at the center to create a butterfly wing shape.
Hold the center tightly while preparing the pipe cleaner.
The pinch should feel snug enough for the pipe cleaner to hold without tearing. - Wrap a pipe cleaner around the pinched center once or twice and twist to secure.
Bend the ends into antennae shapes.
Trim as necessary. - Add googly eyes to the front with glue, and optionally sprinkle a small amount of glitter on the wings while the glue is still tacky, or use stickers to decorate.
Work quickly with glitter to avoid too much fallout.
Stickers make decoration simple and mess-free. - Allow any glue or glitter to set fully before handling.
Display the finished butterflies on a window, string, or handmade cards.
Give each child time to admire their work and share what surprised them.
The Learning Behind This DIY

Color chromatography introduces cause and effect in a clear, sensory way. When water moves through the paper, it takes marker pigments along with it. Different pigments travel at different speeds and in different directions, so colors separate and form new patterns. Saying this out loud helps kids notice and name what they see.
Fine motor skills improve during the drawing, pinching, and twisting steps. Drawing small dots and rings strengthens control. Pinching the filter and twisting the pipe cleaner develops hand strength and coordination. These small motions add up over several butterflies.
This project also practices patience and prediction. Kids learn to wait while colors spread and dry. They can predict which colors will separate and compare results after the filters dry. That gentle observation builds scientific thinking without pressure.
Troubleshooting Common Issues
If the colors barely spread, you probably used too little water or sprayed unevenly. Try a few more light spritzes from about 8 to 12 inches away. Wait a moment between sprays so the color can move without flooding the filter.
If the colors all run together into a muddy brown, the marker ink likely had too much overlapping dark pigment, or you used alcohol-based permanent markers. Stick to water-based washable markers and space bright, contrasting colors a bit farther apart.
If the filter tears when you pinch it, the paper may have gotten too wet. Let it dry a bit more until it feels barely damp, then try again. You can also pinch gently and use a second pipe cleaner wrapped once for extra hold.
If glitter gets everywhere, sprinkle only a tiny amount and do it over the tray. You can also swap glitter for stickers to keep things tidy. Keep a small cup of soapy water and a towel handy to catch stray glitter or marker smudges quickly.
Easy Variations to Try
Try folding the filter into a heart first and drawing on only the top half to make symmetrical wings once the water spreads.
Use fewer colors near each other for softer blooms, or pick three bold colors for dramatic contrast.
Make mini butterflies by trimming filters into smaller circles before coloring.
Turn them into suncatchers by attaching a loop of thread and hanging them in a sunny window.
Use stickers or small sequins instead of glitter for a cleanup-friendly sparkle.
For more art-forward twist ideas, see our playful take on whimsical bubble painting art and borrow a few decorating ideas.
Storing or Reusing This Project
If you plan to keep butterflies, handle them gently once they dry completely. Store them flat between sheets of paper to prevent bending. A small box works well for a short display rotation.
You can reuse pipe cleaners and googly eyes if the glue does not bond them permanently. Gently unwind the pipe cleaner and wipe away glue spots before reusing. Stickers and glitter usually stick permanently, so treat those as single-use unless you use removable stickers.
To reduce waste, save unused filters for another round of chromatography. Keep markers capped and the spray bottle clean to extend the life of your supplies. If a filter does not turn out as hoped, repurpose it as a colorful collage piece.
PrintColorful Chromatography Coffee Filter Butterflies

A fun and engaging craft project that teaches kids about color chromatography while creating beautiful butterflies.
- Prep Time: 10 minutes
- Cook Time: 30 minutes
- Total Time: 40 minutes
- Yield: 4 to 6 butterflies 1x
- Category: Crafts
- Method: Hands-on Crafting
- Cuisine: N/A
- Diet: N/A
Ingredients
- 5 pieces White Coffee Filters
- 10 pieces Washable Markers
- 1 unit Spray Bottle
- 5 pieces Pipe Cleaners
- 1 unit Tray or Baking Sheet
- 1 pack Googly Eyes (optional)
- 1 pack Glitter (optional)
- 1 pack Stickers (optional)
Instructions
- Flatten each coffee filter into a circle on the tray.
- Draw several dots with washable markers across the top and center.
- Mist the colored filters lightly with the spray bottle.
- Allow the filters to dry flat on the tray or a dry surface.
- Once dry, pinch each filter gently at the center.
- Wrap a pipe cleaner around the pinched center and twist to secure.
- Add googly eyes and optional decorations like glitter or stickers.
- Allow any glue to set before handling and display the butterflies.
Notes
This project is perfect for preschoolers through elementary aged kids and introduces concepts of cause and effect through color mixing.
Nutrition
- Serving Size: 1 butterfly
- Calories: 0
- Sugar: 0g
- Sodium: 0mg
- Fat: 0g
- Saturated Fat: 0g
- Unsaturated Fat: 0g
- Trans Fat: 0g
- Carbohydrates: 0g
- Fiber: 0g
- Protein: 0g
- Cholesterol: 0mg
FAQs About Colorful Chromatography Coffee Filter Butterflies: Fun for Kids
Will this make a big mess in the house?
It can get a little wet and colorful, but the tray keeps drips contained. Use washable markers and a tray, and cleanup will take just a few wipes. I usually keep a damp cloth nearby for fingers and a scrap paper for glitter. The main mess is damp filters that dry into beautiful shapes, not smeared tables.
What age is this good for?
This activity suits preschoolers through elementary ages with adjustments. Younger children need help with the spray bottle and pipe cleaner twisting, while older kids can do the whole project themselves. I have supervised three-year-olds who loved the spraying moment and nine-year-olds who layered colors thoughtfully.
Can I swap out any of the supplies?
Stick to water-based washable markers for chromatography. The rest you can adapt a little. If you do not have googly eyes, a marker will do for faces. If you want less glitter, stickers offer the same fun. I avoid permanent markers because they do not separate the same way and they stain more.
How long do the butterflies last?
If you keep them dry and flat, they last as long as paper crafts do. Sunlight can fade colors a bit over months. I treat these as seasonal decorations or short-term keepsakes kids enjoy showing off for a week or two. They look bright and cheerful for a room display during that time.
What if the colors did not separate the way I expected?
That happens. Sometimes a color like black or brown will dominate, or two colors mix into a muted tone. Try lighter touch with those darker markers next time, or place bold colors a bit farther apart. You can also encourage kids to call those results experimental and try again with a new filter.
A Final Helpful Note
Take a breath before you start and remember this project welcomes surprises. Some butterflies will look like wild tie-dye and some will show neat rings of color. Both outcomes teach something and make great pictures for the fridge. If a child gets frustrated, suggest trying one filter just for fun with no expectations. The best results come from a relaxed table, open curiosity, and a few rinsed hands.
Conclusion
If you want a classroom-ready explanation and a reliable step sequence for the science behind these butterflies, the Michigan State extension walks through the chromatography basics clearly in Inquiring Minds Want to Know: Chromatography Butterflies, which complements the hands-on craft here. For another craft-focused version and display ideas, see the simple step photos and tips at Coffee Filter Butterflies | Celebrating Holidays.
Ready to start? Lay out that tray, pick a few bright markers, and enjoy watching the colors surprise you.