

A busy afternoon, a short window of cold weather, and kids asking for something new to do can feel like a small crisis. That happened to me last winter when my two wanted an instant activity after school. We turned the kitchen into a quick prep station and made How To Make Frozen Bubbles – Winter Activity for Kids with one simple bowl. It took less than ten minutes to mix, and the payoff felt like a little science magic on the driveway. If you like low-fuss projects that use stuff you already have, this fits perfectly with other easy play ideas like low-prep kids activities the family will reach for on chilly days.
Why You’ll Love Making How To Make Frozen Bubbles – Winter Activity for Kids

This project works because it asks for almost nothing and gives a lot back.
You set up in the kitchen, make a quick solution, and head outside where the weather does the rest. It does not require fancy tools or long prep. Kids see instant results when a shimmering bubble turns to patterns of frost. The steps stay the same each time, so the activity feels calm and repeatable. You do not need perfect weather either. A very cold morning gives crisp crystals; a slightly warmer day still lets you explore the forming edges and thin ice lines.
Because it uses everyday items you already own, you can drop everything and try it between errands or after a nap. That low-prep nature keeps the stress light for caregivers and keeps the fun front and center. Small kids can help measure and stir. Older kids enjoy watching patterns and trying small experiments. You will notice hands-on moments, like the sticky feel of soap on a mitten or the soft crack when a frozen bubble lifts from a tray. Those little details keep it memorable for everyone.
A Quick Look Before You Begin
Plan about 20 to 30 minutes total from mixing to play.
Setup takes five to ten minutes in the warm kitchen. You need a flat surface outside that will stay cold, like a tray or a car hood. The actual blowing and freezing happens fast, but you may want to stay out longer to repeat and experiment. Expect a low to medium mess level. Soap can drip, and trays get wet, but cleanup stays simple with a towel and some warm hands.
Adult help depends on ages. A preschooler will need assistance blowing bubbles and lifting fragile frozen bubbles. Older kids can manage most of this themselves with supervision. Keep gloves handy for little fingers. If you plan to photograph the bubbles, have your camera or phone ready before you go outside so you do not miss the delicate freezing moments.
Materials You’ll Need
Dish soap
common household item; any regular liquid dish soap works
Water
tap water works fine; warm water helps mix
Glycerin or light corn syrup (optional)
optional; helps bubbles last longer and freeze with clearer patterns
A shallow bowl or container
easy household bowl; wide mouth makes dipping easier
Bubble wand, straw, or a cut ring
use what you have; a cut ring from cardstock also works
A flat tray or the top of a car hood
smooth, non-windy surface that stays cold; metal car hoods work well
Warm gloves or mittens for kids
keeps little hands comfortable and ready to touch frozen bubbles
Towel or paper towels
for spills and wiping wet mittens
A camera or phone (optional)
optional; great for capturing fragile crystal patterns and sharing with family
If you like combining craft ideas, this pairs nicely with other hands-on projects like make pretty wax paper sun catchers for indoor days when it is too warm to freeze bubbles.
The Flow of Making How To Make Frozen Bubbles – Winter Activity for Kids

- Mix one part dish soap into four parts water in a shallow bowl. Stir gently.
Measure roughly and keep it simple. Stir slowly so you do not make foam. The solution should look clear and slightly glossy, not full of suds. A quiet stir gives fewer bubbles before you start. - Add a splash of glycerin or light corn syrup and stir slowly to combine.
A small splash helps the bubble film thicken and hold shape longer. It makes freezing smoother and gives clearer crystal patterns. You only need a little; stir until the surface looks slightly more viscous. - Pour some solution into a shallow tray.
Fill the tray shallowly so the wand can dip without splashing. Pour slowly to avoid a thin foam ring. The tray gives a firm landing spot for bubbles to rest and freeze. - Dress warmly and go outside.
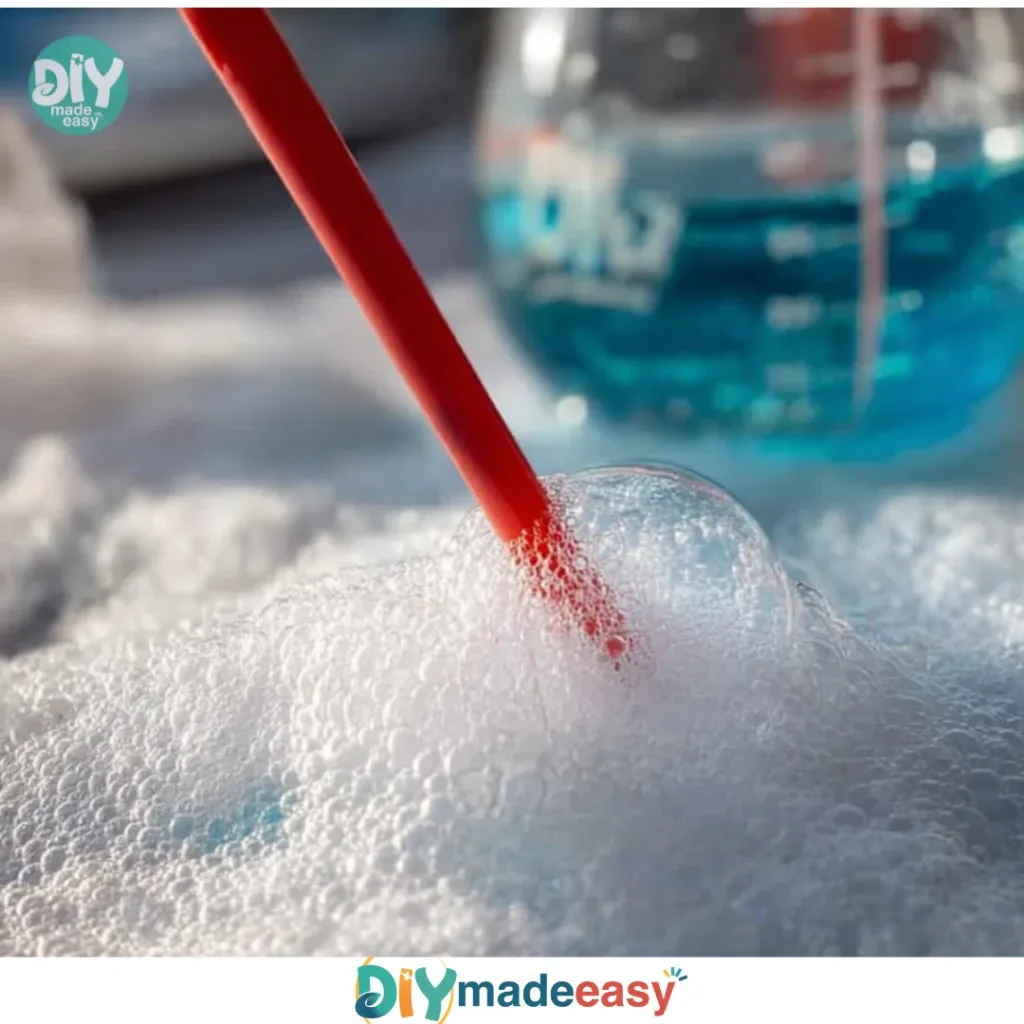
Put on mittens and hats, and bring a towel. Carry the tray carefully. Little hands need warm fingers to stay out until the bubbles freeze. Move calmly and set the tray on the cold surface. - Dip the wand into the solution and blow a bubble onto the flat surface.
Dip fully and lift gently to avoid drips. Blow slowly at first; a steady, gentle stream produces a smooth bubble. Aim to let the bubble sit on the tray or car hood rather than pop on impact. - Watch the bubble freeze into ice crystals.
Look for the first tiny frost lines along the edge. They grow in a few seconds to a minute depending on temperature. You will see veins and feather-like patterns spreading across the film. Pause and let kids point out how the patterns move. - Gently lift the frozen bubble with a flat tool or let kids touch it.
Use a flat spatula or a plastic card to slide the frozen bubble up. If it feels too fragile, let kids touch the top with a gloved finger to feel the crusty surface. Expect a soft crack as it lifts. That sound is part of the fun. - Experiment with blowing bubbles onto different surfaces and observe the patterns.
Try metal, glass, or snow. Each surface changes freezing speed and pattern shapes. Kids love comparing a bubble frozen on a tray to one frozen on fresh snow. Take photos to record differences. - Repeat as desired, refreshing the solution if necessary.
If the solution gets foamy or dirty, pour it out and make a fresh batch. Short runs of mixing keep results crisp. Enjoy repeating until hands get cold or curiosity moves on. For a longer session, warm up inside between rounds.
The Simple Science or Skills at Work

When a soap bubble freezes, simple physics and chemistry work together.
Bubbles form because soap lowers water surface tension and traps a thin film of water between soap layers. Cold temperatures slow the water molecules and let tiny ice crystals form. Those crystals start at the edges and grow into branch-like patterns you can watch form. Adding glycerin or light corn syrup makes the film slightly thicker and helps crystals form in clearer lines instead of breaking into many tiny flakes.
Kids practice careful observation and patience with this activity. They track timing and notice how a slow breath makes a better bubble. Fine motor skills improve when they hold a wand steady and when they lift a fragile frozen bubble with a flat tool. Children also learn cause and effect by testing how different surfaces and temperatures change the patterns. You can casually point out words like crystal, freeze, and edge to help build simple science vocabulary during play.
Troubleshooting Common Issues
If bubbles pop too quickly, the solution might be too watery or too foamy. Stir gently and try adding a bit more dish soap or the optional glycerin. Let the mixture sit for a few minutes before trying again.
If bubbles freeze with dull or grainy patterns, the air may be too moist or the surface too warm. Move to a colder hour if possible and set the tray on a very cold surface like metal. A colder surface helps the crystals form smoothly.
If the bubble splashes instead of landing, you may be blowing too hard. Try a gentle, steady blow and aim for a soft landing. Also check that the wand is not dripping extra solution; tap off excess before blowing.
If little fingers get wet and cold, keep the activity short and have a warm towel ready. A break inside for hot chocolate can reset everyone’s comfort and energy.
If the solution gets sudsy or full of dirt, pour it out and make a small fresh batch. Clean trays give better results and cut down on unexpected pops.
Easy Variations to Try
Blow onto fresh snow for a soft, frosted look. Snow cools the film quickly and gives a different texture than a tray.
Use food coloring in tiny drops to tint the bubble solution for subtle, frozen color lines. Do not add too much; a single drop in a bowl is enough to see a change.
Try different wands: a small straw makes tiny bubbles, while a larger ring makes big ones. Kids like comparing the frozen shapes from each wand.
Pair this activity with a simple night-time walk to spot frost patterns on leaves or car windows. It helps kids connect the bubble patterns to natural ice crystals.
For older kids, time how fast crystals spread at different temperatures and talk through simple comparisons. Keep it playful, not formal.
Storing or Reusing This Project
Leftover bubble solution stores briefly in a sealed container in the fridge. Stir it gently before reuse. If it gathers foam or debris, it is better to make a fresh small batch.
Clean trays with warm water and a little dish soap after you finish. Soap residue can make future batches too foamy. Wipe car hoods clean with a towel to avoid streaks.
If you use glycerin, save a small bottle for future batches. It lasts a long time and helps your next freezing session go smoothly.
Reuse the wand and tray. Dry tools before storing. A small labeled container for the bubble mix keeps things ready for quick, repeat fun on other cold days.
PrintHow To Make Frozen Bubbles – Winter Activity for Kids

An engaging winter activity that combines science and fun by making frozen bubbles with simple household ingredients.
- Prep Time: 10 minutes
- Cook Time: 0 minutes
- Total Time: 30 minutes
- Yield: Unlimited bubbles
- Category: Craft
- Method: N/A
- Cuisine: N/A
- Diet: N/A
Ingredients
- 1 part dish soap
- 4 parts water (warm for mixing)
- A splash of glycerin or light corn syrup (optional)
- A shallow bowl or container
- A bubble wand, straw, or a cut ring
- A flat tray or the top of a car hood
- Warm gloves or mittens for kids
- Towel or paper towels
- A camera or phone (optional)
Instructions
- Mix one part dish soap into four parts water in a shallow bowl. Stir gently.
- Add a splash of glycerin or light corn syrup and stir slowly to combine.
- Pour some solution into a shallow tray.
- Dress warmly and go outside with the tray.
- Dip the wand into the solution and blow a bubble onto the flat surface.
- Watch the bubble freeze into ice crystals.
- Gently lift the frozen bubble with a flat tool or let kids touch it.
- Experiment with blowing bubbles onto different surfaces and observe the patterns.
- Repeat as desired, refreshing the solution if necessary.
Notes
Best to keep the activity short to prevent cold fingers. Have a warm towel ready and consider taking breaks for hot chocolate.
Nutrition
- Serving Size: N/A
- Calories: N/A
- Sugar: N/A
- Sodium: N/A
- Fat: N/A
- Saturated Fat: N/A
- Unsaturated Fat: N/A
- Trans Fat: N/A
- Carbohydrates: N/A
- Fiber: N/A
- Protein: N/A
- Cholesterol: N/A
FAQs About How To Make Frozen Bubbles – Winter Activity for Kids
Will this make a big mess in the driveway? It can drip a little, but the mess stays manageable. I always bring a towel and set the tray on a towel or a small mat. If a bubble splashes, the soap rinses off with water, and any sticky spots wipe clean. Keep the session short if you worry about cleanup.
Is this safe for very young children? It is safe with supervision. The main concerns are cold fingers and soap in the eyes. Have little ones wear mittens and keep towels nearby. I stand close to help with dipping and blowing until they can do it safely on their own.
Can I use any dish soap or do I need something special? Regular liquid dish soap works fine. We use what is in our sink. The optional glycerin or light corn syrup helps the bubbles last longer and freeze more clearly, but it is not essential. I keep a small bottle of glycerin in the craft drawer for days like this.
What if it is not cold enough to freeze? If temperatures sit above freezing, the bubbles will not form solid crystals. You can still enjoy watching them shimmer and pop, and you can save the plan for the next colder day. I sometimes do the mixing step ahead of a colder morning so the family can head out quickly when the cold arrives.
How long do frozen bubbles last? Frozen bubbles can be fragile and last seconds to a few minutes depending on temperature and wind. They may crack softly or shiver in the sun. That short lifetime keeps the activity feeling special. I suggest taking a few photos quickly if you want a keepsake.
A Final Helpful Note
You do not need perfection for this to be a success.
A few popped bubbles, cold cheeks, and a little soap on mittens are all part of the memory. Focus on the moments of discovery: the first frost line, the quiet crack when a bubble lifts, and the small celebrations when a child spots a pattern. If you want to try again, warm up inside and come back out. The process stays simple and the results keep surprising you.
Conclusion
If you want another how-to with a similar winter science feel, this guide from How To Make Frozen Bubbles- A Winter Science Activity – Fox Farm offers extra photos and tips to compare. For more step-by-step family experiments that use easy supplies, check the practical ideas over at How to Make Frozen Bubbles | Fireflies and Mud Pies.